https://arsmatrix.com/blogs/news.atomArsmatrix - News2023-06-29T15:13:50-04:00Arsmatrixhttps://arsmatrix.com/blogs/news/start-your-day-with-traditional-portuguese-pasteis-de-nata2023-06-29T15:13:50-04:002023-06-29T15:13:50-04:00Start Your Day with Traditional Portuguese Pastéis de Nataadmin
Good morning, foodies! If you’re on the hunt for a delightful and traditional breakfast that doubles as dessert, you’ve come to the right place. Today, we’re journeying to the heart of Portuguese cuisine with the iconic Pastéis de Nata, or Portuguese custard tarts. Warm, creamy, and encased in a crispy puff pastry shell, these tarts are the perfect start to any day.
Ingredients
For the Custard:
1 tablespoon cornflour
2 cups whole milk
1 1/4 cups caster sugar
1 cinnamon stick
1 lemon, zested
6 egg yolks
For the Pastry:
2 cups plain flour
1/4 teaspoon sea salt
3/4 cup water
200g unsalted butter, room temperature, not spreadable
Instructions
Make the Custard: Dissolve the cornflour in 1/4 cup of milk in a bowl and set aside. Combine the sugar, cinnamon, and lemon zest with 3/4 cup of water in a saucepan. Stir the mixture over low heat until the sugar dissolves and you get a clear syrup.
Add the dissolved cornflour mixture to the syrup and stir well. Remove the pan from the heat and slowly add the rest of the milk, while stirring. Remove the cinnamon stick and lemon zest.
Lightly whisk the egg yolks in a bowl and add them to the milk mixture. Cook over low heat and stir constantly until thickened.
Make the Pastry: Mix the flour with the salt, then add water and mix until the dough is firm. On a lightly floured surface, roll the dough into a rectangle, spread one-third of the butter over two-thirds of the dough. Fold the dough into three sections, like a business letter. Turn the dough 90 degrees and roll it out again into a rectangle. Repeat the process twice more.
Cut the dough in half and chill for at least 2 hours. Then, roll out each piece of dough and cut into circles to fit your tart tins.
Preheat the oven to 290°C (550°F). Pour the cooled custard into the pastry cases, but don’t fill them to the top as the custard will puff up in the oven.
Bake the tarts for about 12 minutes, until the pastry is golden and crisp, and the tops of the custard have darkened.
Allow the tarts to cool for a few minutes in the pan, then transfer to a rack and sprinkle with powdered sugar and cinnamon, if desired.
Conclusion
With this recipe, you can enjoy a slice of Portugal’s culinary heritage right in your kitchen. Perfect for breakfast or a mid-afternoon treat, these Pastéis de Nata are sure to delight. Happy baking, and as we say in Portugal, “Bom proveito!”
]]>
https://arsmatrix.com/blogs/news/millet-sweet-pongal-happy-father-s-day2023-06-18T03:13:50-04:002023-06-18T03:13:50-04:00Millet sweet pongal Happy Father’s dayadmin
APPA — My take on APPA Adorable, Persuasive, Protective, Amazing. The feeling between a father and daughter is mutual. I have been thinking of writing about my dear Appa for a long time. Not only about my biological appa but one more person, my father-in-law whom I used to call appa. Both of them are not physically with me today but there are so many things I learned from them that I feel they are always with me. To mention a few things, my technical knowledge with regards to house maintenance which usually requires a carpenter or a electrician, I would try to fix it before calling a professional. As a young girl I would be my appa’s assistant holding a screw driver or a spanner. I have grown up watching him repair things at home. Right from setting the house with furniture from different parts of India or calling a carpenter and designing, the end result would be unique. People talk about foldable cots, dinning table with a center rotater, shoe rack or a writing table which can be extended . I had the good fortune of enjoying it right from my school days, thanks to appa. Some of the things that he loved to do were stocking up on the orange mithai while traveling, preparing mango milkshake or just buying a lollipop when he used pick me from my grandparents home after college. Here’s how he prepared mango milkshake. He would add the mango pieces, milk ,sugar and crushed ice. How do you crush ice at home? Simply take the ice cubes from the freezer, wrap it up in a thick clean towel and hammer it with your idikki ( pakkad) or just smash it on your kitchen platform.😊. This was his humble brilliance. What do I write about the Appa who I got after marriage! There has been only two instances where we have discussed about something important, but the understanding was always there. Just the look would make me realise what he would want to say; whether it was for a half cup of coffee or a small sweet piece or rasam made by me in a small cup or anything else. When someone would point out that he was diabetic he would reply with a smile, ” it’s ok I will have an extra pills tonight!”. Even when he lost his memory and speech ,the smile was never lost. When ever I would ask him for something, the answer would be a smile. There had been situations were I had to feed him or take him to toilet. He would look into my face which said many things. I think I was fortunate to serve my this appa a little, since I wasn’t blessed to do anything to my biological appa whom I lost 30 years back. One thing was common with both of them there smiling face whatever the situation was. I could keep writing because the bond between a father and daughter is extremely precious, whether you express it verbally or not. I dedicate this to all the lovely fathers. You could also share few lovely moments you had with your appa or one or two specific things you learned from him. Father’s day special. Dedicating today’s Sweet pongal to both my appas.
Ingredients
Barnyard Millet —– 3/4 cup Moong Dal —– 1/4 cup Jaggery —- 1 cup Cardamom Powder —- 1/4 tsp Ghee —- 1/4 cup Milk —- 1/2 cup Water —- 2 1/2 cups Cashew nuts & Raisins 1 tsp each
]]>
https://arsmatrix.com/blogs/news/delicious-concha-recipe-a-taste-of-mexico-s-sweet-bread-delight2023-06-17T03:13:50-04:002023-06-17T03:13:51-04:00Delicious Concha Recipe: A Taste of Mexico’s Sweet Bread Delightadmin
Introduction:
If you’re a fan of Mexican pastries, you’re in for a treat! Today, we’re plunging into the delightful world of Conchas. These sweet and fluffy Mexican sweet breads with their iconic seashell-like topping are not only visually stunning, but also incredibly delicious. In this blog post, we will guide you through a step-by-step koncha recipe, so you will be enjoying these delectable treats in no time. So, grab your apron and get started!
Component:
For dough:
4 cups flour
1/2 cup granulated sugar
1/2 tsp salt
2 1/4 teaspoons active dry yeast
1/2 cup hot milk
1/2 cup unsalted butter, softened
2 large eggs
For Topping:
1/2 cup unsalted butter, softened
2/3 cup granulated sugar
1 cup flour
1 teaspoon vanilla extract
few drops of food coloring (optional)
Instruction:
Step 1: Activate the Yeast In a small bowl, mix warm milk and yeast. Stir gently and let it sit for about 5 minutes until it becomes frothy.
Step 2: Knead the Dough In a large mixing bowl, mix flour, sugar and salt. Make a well in the center and add yeast mixture, softened butter and eggs. Mix everything together until a soft dough is formed.
Step 3: Knead the Dough Transfer the dough to a floured surface and knead it for about 10 minutes until it becomes smooth and elastic. You can also use a stand mixer with the dough hook attachment for this step.
Step 4: Let the Dough Rise Place the dough in a greased bowl, cover it with a clean kitchen towel, and let it rise in a warm place for about 1 hour or until it doubles in size.
Step 5: Prepare the Topping In a separate bowl, beat the softened butter and sugar together until light and fluffy. Gradually add flour, vanilla extract and food coloring (if desired). mix until well combined.
Step 6: Shape the Dough After the dough has risen, press it down to remove air bubbles. Divide the dough into small portions and make balls out of them. Place dough balls on a baking sheet lined with parchment paper, leaving enough room between them for expansion.
Step 7: Add Toppings Take a portion of the topping mixture and flatten it into a disc shape with your hands. Place the disc on top of each dough ball and press it lightly to make a traditional conch shell pattern. Repeat the same process for all the dough balls.
Step 8: Final Rise and Baking Cover the baking sheet with a clean kitchen towel and let the shellfish rise for another 30 minutes. Meanwhile, preheat your oven to 350°F (175°C). Once the shells are puffed, bake them for about 15-18 minutes or until they are golden brown.
Step 9: Enjoy! Remove the shells from the oven and let them cool on a wire rack. Once they cool down a bit, serve them with a hot cup of coffee or hot chocolate. These delightful Mexican pastries are best enjoyed fresh!
Additional Tips and Variations:
For a twist of flavor, add a teaspoon of ground cinnamon or citrus zest to the flour mixture.
Experiment with different colors for the topping by using natural food colorings such as beetroot juice or matcha powder.
If you prefer smaller shells, divide the dough into smaller portions and adjust the baking time accordingly.
To keep your mussels fresh longer, store them in an airtight container at room temperature.
conclusion:
Congratulations! You have successfully made a batch of mouth-watering conchos from scratch. The combination of soft and fluffy bread with sweet, crispy topping is simply irresistible. Whether you are making them for a special occasion or just to satisfy your craving for a delicious dish, these conches are sure to impress. Don’t forget to share them with your loved ones and spread the joy of this lovely Mexican pastry. Buen Provocho!
]]>
https://arsmatrix.com/blogs/news/our-favorite-father-s-day-gifts-for-dad2023-06-06T21:13:50-04:002023-06-06T21:13:51-04:00Our Favorite Father’s Day Gifts for Dadadmin
What makes the better gift — experiences or things? Luckily, outdoor gear can offer both. This Father’s Day is June 18! Give Pop something that can help get him to the moments and places he loves most. The high-quality outdoor gear on this list is sure to facilitate grand adventures and family fun for years to come.
Might as well start with a dream gift for many: an epic side-by-side. From yard work to hauling gear to the fishing hole, the Polaris Ranger XP 1000 can handle just about any side-by-side mission under the sun. Though it’s a highly versatile machine, it clearly leans toward the fun stuff — exploring rugged trails in ways that a full-size vehicle can’t.
For such a tough rig, the XP 1000 sports a surprisingly refined interior. On long treks into far-flung campsites, users will appreciate the plush seats and ample headroom. Key performance stats include an 82-horsepower ProStar Engine, 2,500 towing capacity, and 13 inches of ground clearance. It’s available in three-seat and six-seat configurations.
This one’s more realistic for most gift-givers, but still super useful and at the core of great experiences. Coleman — makers of the legendary two-burner camp stove — dropped a hardy new cooler just in time for Father’s Day. At just $100, the Pro 17-Quart Hard Cooler is an excellent value. Many coolers with similar specs cost twice as much or more.
The Pro is well stocked with the standard features of a quality modern-day cooler. Rubberized boots keep it from sliding around in the back of a truck, and the interior is antimicrobial-treated to help prevent mildew and funky smells. By the numbers, the Pro can hold up to 14 12-ounce cans (plus 9 pounds of ice), and the lid doubles as a fireside bench seat rated to support up to 300 pounds.
A variety of Coleman products will be on sale ahead of Father’s Day from June 11 to 18.
Lululemon maintains an immaculate reputation for crafting comfortable and practical apparel. The just-dropped New Venture Classic-Fit Long-Sleeve Shirt ($118) is an impressive take on the go-everywhere button-up.
Though it can easily serve as a dress shirt or professional wear, the New Venture’s true function is active use. Made from quick-drying, four-way stretch fabric, it’s suited for a long day of travel, afternoon errands, or even a quick game of pickleball. Underarm gussets add plenty of mobility, and a “No-Stink Zinc” treatment should help keep odor to a minimum.
If your pop enjoys cooking outdoors, he already knows the value of a reliable meat thermometer. Traeger Grills — known for popularizing wood pellet grills — also makes the MEATER. This simple yet high-tech meat thermometer allows users to monitor cooking meats via a Bluetooth connection from up to 165 feet away. That means Dad can keep an eye on the progress of the ribeyes while chillin’ on the couch with a beverage in hand.
According to Treager, the built-in Advanced Estimator Algorithm advises users on the ideal cooking and resting times for various types of meat and other foods. The MEATER is on sale now for $88.
Many cocktails are associated with backyard barbequing, but the Old Fashioned might be the reigning champ. WhistlePig Whiskey’s Smoked Maple Old Fashioned Kit ($100) marries the sweetness of maple with smokey notes and classic rye spice. The kit includes two forms of liquid gold — 100% PiggyBack Rye Whiskey and Runamok Maple Smoked Maple Syrup — both of which are barrel-aged.
The GearJunkie team has been a fan of Glerups Slipper Boots for years. They’re warm and cozy enough for indoor use, and the rubber outsole adds utility for occasional trips to the end of the driveway. Made from 100% pure felted wool, these timeless slippers ($155) are sturdy, handsome, and built to last.
This ornate knife from Gerber is both a work of art and a practical everyday-carry tool. The pictured Fastball Clever Folding Knife ($200) has a precise cleaver-style blade with a durable black oxide finish and hand-drawn graphics by Oregon-based artist Jess Mudgett.
Mudgett’s illustrative style celebrates the natural world and gives a nod to a classic Americana aesthetic. From the high-mountain desert to the tropics, Jess created artwork that not only represents some of his personal favorite areas to adventure in but also where these knives and multitools come into use.
If this shape and style aren’t right for you, the knife is fully customizable. From materials to blade shape to finish color, you can craft your order to perfectly suit Dad’s needs and preferences.
KUIU apparel is designed for hunting, but certain pieces — such as the Ridgepoint Fleece Full Zip Hoodie ($199) — work well for just about any outdoor activity. With its Polartec fleece construction, the Ridgepoint is designed to serve as standalone insulation in cool-to-cold conditions.
According to the brand, every fiber in this hoodie is individually coated, extending garment life without sacrificing breathability. The raised hand pockets are accessible even while wearing a backpack waist belt.
If this fleece is on par with KUIU’s proven reputation for excellence, Dad will enjoy it for years to come.
The Vertical ($629) is a new model from sport watch veterans Suunto. Every feature of the Vertical is geared toward full days of outdoor adventure. From multipitch climbing to downhill singletrack, this watch provides everything you need to stay on route and on pace.
A large 49mm color display clearly exhibits paths, contour lines, water, and landmarks on the Vertical’s pre-downloaded global maps. Integrated dual-band GPS promises reliable accuracy, even when surrounded by deep woods, cliffs, or skyscrapers.
The battery life is impressive too — 60-plus hours in the most accurate tracking mode and up to several months in standard watch mode. In the proper light conditions, the solar-charging version($839) boasts 30% more battery longevity.
If you know BGE, you know thatthis funky-looking grill (price varies depending on size) is among the most versatile outdoor cooking stations on the market. From 20-pound turkeys to fresh charred pizzas, the Big Green Egg can handle just about anything that an oven can. Based on ancient Chinese and Indian earthenware ovens, the Egg’s design hasn’t changed much in over a decade — and for good reason. It works and it lasts.
The BGE is available in several sizes, but the “Large” is a great bet for most backyard cookout applications. It’s plenty big enough to cook for a crowd. We (and legions of fans) have tested the heck out of these Komodo grills and love their efficiency, ability to cook hot or cold, and versatility.
If your dad is all aboard the gravel train,these purpose-built tires ($68-78) from Teravail can help him up his game. The Cannonball tire sports a directional tread pattern with a tight-knit row of raised ugs down the center line. According to the brand, this innovative design shreds dirt and debris to decrease rolling resistance. Knobby L-shaped side lugs line both sidewalls for controlled cornering on soft surfaces.
According to several reviewers, the Cannonballs thrive on mud, sand, and hard-packed dirt. They’re tubeless-compatible and available in a wide range of standard sizes.
Manufacturing outdoor gear often yields a mess of leftover byproducts. Now, rooftop tent maker iKamper is turning its excess material into practical, usable products. The brand’s Recovery Apron ($80) is made from repurposed textiles left over from the Skycamp 2.0 manufacturing process. As it turns out, the waterproof poly-cotton canvas used in the Skycamp is perfect for the kitchen or behind the grill.
Dometic is known for its gold-standard coolers and on-the-go refrigeration systems. That’s not all though — the brand also crafts a whole host of top-notch car camping furniture and accessories.
For many weekend warrior dads, the success of a trip can hinge on the comfort of a single camp chair. The Go Compact ($150) is a sturdy and supportive foldable seat made from beechwood, aluminum, and heavy-duty 600D fabric. It’s the perfect spot to plop down and watch the world go by.
This durable bike rack ($650-700) is hands-down the burliest we’ve evertested. Unlike most hitch-mounted bike rack brands, it’s clear that Ride1Up refuses to cut corners. One of our editors used this rack for over 6 months, regularly venturing over rugged terrain, rocky roads, and washed-out mountain passes. It held up to the regular abuse without a single issue.
Ride1Up racks may appear simple and understated, but even a quick visual inspection reveals undeniable quality. It’s almost entirely made from extruded aluminum, with few breakable or plastic parts. If Dad regularly hauls bikes, he can’t do any better than the USA HD Double Hitch Rack.
For many dads, cooking outside is a peak camping experience. Opinel’s Nomad Cooking Kit ($89) is a portable kitchen kit that’s lightweight enough for both car camping and backpacking.
The kit includes a pair of knives (one straight edge and one serrated), a bottle-opening corkscrew, a folding peeler, a cutting board, and a microfiber cleaning cloth.
Case Knives’ Westline EDC knife ($190) is ideally suited for hunters, particularly when skinning game. Even for non-hunters, it looks like an excellent blade for everyday tasks such as opening boxes, peeling fruit, and fireside whittling.
Featuring a seriously acute drop point blade shape, the Westline offers precise cutting and a nimble working edge. The blade itself is made from durable S35VN stainless steel that should hold up to many years of regular use. The handsome curved aluminum handle is designed to be easy to clean and sit comfortably in the user’s hand.
A holiday card from a loved one is a cherished representation of appreciation and love. The trouble is, what do we do with them when they start to pile up? Every holiday serves to move millions of cards from the shelves of CVS into the garbage. Solo Stove’s solution? Burn ’em!
This year, Solo Stove releases a series of Father’s Day cards (free! $10 shipping per order, or free with orders over $99) designed to be used as firestarters. Technically, just about any greeting card could be used as a fire starter but this one is meant to be so you don’t have to feel bad about it.
It’s a fun accompaniment if you plan to gift Dad a new grill or backyard fire pit.
This nifty power bank ($200) is a compact yet powerful option for short car camping adventures. It’s not big enough to run a full off-the-grid overlanding rig, but it’s a reliable power source for recharging small devices such as laptops, phones, and GPS watches. During our testing, it fully charged an iPhone an impressive seven times before depleting.
Natural Atlas is a deep well of mapping and field guide assets all crammed into a single smartphone app (free for basic and $40 for plus). The mapping feature enables users to overlap various layers of information in real time, including public land boundaries, topography, and satellite imagery. If you stumble upon a peculiar plant or rock feature during your travels, the field guide database can help you identify and learn more about the subject of interest.
With its unique combination of features, Natural Atlas can serve as a substitute for books, maps, and devices. It’s perfect for those life-long learner dads who enjoy hitting the trail and investigating the world around them.
The “bamboo” in the name comes from the shirt’s unique blend of 30% polyester with 70% viscose — a fiber derived from bamboo. The result is a stretchy, breathable, naturally cooling fabric. Plus, it boasts a sun protection rating of UPF 20-plus.
For long summer days on a boat, bike, or trail, this is a top contender for Dad’s new favorite shirt.
Comfort is king, especially when traveling long distances. Polaris introduces an all-new UTV that offers a reprieve from the harsh elements and the performance capabilities to navigate the wilderness while carrying a full complement of gear for a multiday trip.
The 2024 Polaris XPEDITION offers 114 horsepower, 14 inches of ground clearance, and a suspension setup built around Fox Podium QS3 shocks that inspire confidence across a wide range of off-road terrain.
An invitation from Polaris to experience the new 2024 XPEDITION put me behind the wheel for a full day of adventure on the North Rim of the Grand Canyon. It encompassed 110 miles and many hours of gravel, sand, mud, rock crawling, a few thunderstorms, and all the other things the desert could throw at us.
In short: Get ready to buzz the trails and traverse adverse terrain with loads of power in a lightweight nimble machine. The all-new 2024 Polaris XPEDITION UTV can transport up to five people comfortably — AC and heat comfort — has a range of over 200 miles, and has numerous accessories to adapt to any number of overland and adventure sports activities. Extended middle-of-nowhere outdoor adventure is what this machine is all about, but it does come with a big sticker price.
Drive system typeOn-Demand True AWD/2WD/VersaTrac Turf Mode
Fuel capacity12.5 gals. (47.3 L)
Bed box dimensions (L x W x H)36.2 x 47.25 x 13.38 in.
Box capacity600 lbs.
Estimated dry weight2,790 lbs.
Ground clearance14 in.
Wheelbase117 in.
SuspensionFOX 2.0 Podium QS3 shocks, long travel, high-clearance dual A-arm with stabilizer bar
Hitch tow rating2,000 lbs.
Payload capacity1,160 lbs.
Tires30-in. ProArmor Crawler XP
Standard featuresFull-power window doors, Polaris HD 4,500-lb. winch, aluminum fairlead & rubber isolator, front bull bumper, ProFit sport roof, convex rearview mirror, JBL Trail Pro 4100 audio system, LED headlights and taillights
MSRP$39,999
Pros
Impressive creature comforts
Power and capability crush the nearest competitor
12 models and trims mean there is probably one for your adventure needs
5 curated accessory packages built around popular recreational activities
Cons
Drone from the engine and PVT amplified inside cabin
Typical side-by-side platforms seat two or four people and have limited capacity to carry gear. Towing capabilities are even more limited. Every major builder has something in their product lineup that is fast, fun, and a blast to romp across almost every type of terrain. Popular sport UTVs that fill this space are the Kawasaki TERX KRX4 1000, Yamaha YXZ 1000R, Can-Am Maverick, Polaris RZR Turbo R, and Honda Talon, to name a few.
Polaris responds to customer feedback with the launch of the 2024 XPEDITION — a sport side-by-side ORV that has the wherewithal to bring along everything for the ultimate multiday outdoor experience — even the kitchen sink if you choose.
[TAG3]Imagine waking up to this view; (photo/Derek Mau)
ADV & XP Models
The Polaris XPEDITION has two distinct models available in two- or five-seat configurations. With a starting price of $28,999, the standard equipment list is pretty rad for the 12 available trims. However, further customization around any outdoor adventure is possible with a bevy of factory accessories and optional equipment.
The range-topping Northstar trim is where you’ll find the exclusive HVAC system, power door windows, and tip-out front windshield as standard equipment.
The XPEDITION ADV sits riders in an enclosed cabin and cargo area with available heating and cooling. Two-seat models get 36 inches of covered cargo space, while the five-seat offers up to 63 inches of flat and covered storage for all the gear you need to bring for a multiday getaway.
[TAG5]XP models are configured with a 30-in. dump box; (photo/Mike Emery, Polaris)
The XPEDITION XP features a 30-inch dump box instead of a covered rear cargo space. The cargo box is 48 inches wide and has tall 16-inch walls to keep plenty of stuff in place on the trail or when working your property.
[TAG6]Rear seats lift up to reveal optional Lock & Ride MAX cargo system for securing cargo; (photo/Mike Emery, Polaris)
The folding 60/40 rear seats in the four-door models can flip up to access the optional rails for securing cargo. Alternatively, the rear seatbacks fold flat to even more cargo area and securely transport up to its 1,160-pound payload capacity. The rear dump box — whether closed or open — can carry up to 600 pounds of gear, spare parts, and other essentials.
An outstanding feature of the XPEDITION is its flat roof designed to mount Polaris’ Rhino-Rack roof rack system, which can support up to 500 pounds when parked. That’s sturdy enough to hold up the optional rooftop tent and a couple of campers. When transporting equipment such as camping gear or kayaks, the Rhino-Rack can carry up to 150 pounds on the move.
The high roofline affords tall passengers plenty of headroom — even when wearing helmets. A few people in our group, who were 6 feet or taller, had space to spare above their helmets, thanks in part to the low seating position.
[TAG8]Fox 2.0 Podium QS3 with position-sensitive spiral technology spring color-matched with the body color; (photo/Derek Mau)
Smooth Rider (Suspension & Tires)
Like any good UTV, the XPEDITION lays the foundation with an all-new reinforced chassis, and FOX Podium QS3 shocks. Underneath are skid plates and raised A-arms as an added precaution if the 14 inches of ground clearance just isn’t enough.
The Polaris XPEDITION rides on Pro Armor 30-inch Crawler XP tires wrapped around 15-inch beadlock wheels. Select the Trail, Hunt, or Kayak accessory collection, and your ORV includes Pro Armor Attack 2.0 all-terrain tires for superior hard-pack performance and a quieter tread pattern. The dual-compound tires also feature an aggressive side tread that can effortlessly claw up rocky terrain and corner hard on loose trails.
[TAG9]Available 15-in. beadlock wheels and 30-in. Pro Armor Crawler XG tires; (photo/Derek Mau)
Power and Towing Capacity
Polaris sport side-by-side UTVs are known for their power-to-fun ratio, and the XPEDITION carries on the tradition with the same powertrain used in the 2024 RZR XP — a 114-horsepower, 999cc liquid-cooled ProStar 1000 Gen 2 engine connected to a high and low-range automatic PVT transmission. The driver uses a three-way switch to select two- and four-wheel drive or the locking differential when the terrain gets gnarly.
[TAG10]2024 Polaris XPEDITION exploring Grand Canyon West; (photo/Mike Emery, Polaris)
The payload for the two-seater XP and ADV models is spec’d at 1,030 pounds, while the five-seater will carry up to 1,160 pounds. The XPEDITION has a 12.5-gallon fuel tank, the largest of any factory UTV, and a potential range of over 200 miles, according to Polaris.
All models and trims of the XPEDITION have a standard 2-inch hitch receiver and will tow up to 2,000 pounds. Or it can be used for accessories such as a bike rack.
Inside, the all-new XPEDITION engages drivers with a tilt and telescoping steering wheel, front bucket seats, and a three-point seatbelt. The seating position still feels a little high, in my opinion, even though the designers intended the driver and passengers to be seated low in the cabin. Regardless, the driver’s perch has a commanding view of the trail ahead.
A 7-inch touchscreen display — available in the Ultimate and Northstar trims — and Polaris’ RIDE COMMAND GPS trail guide system make exploring new territory a cinch. All the switchgear is within easy reach and feels like it’ll hold up to years of use outdoors.
[TAG12]The 7-inch color display is standard equipment in Ultimate and Northstar trims; (photo/Derek Mau)
To protect the rider’s gear, the doors, center console, and rear glass hatch come with key locks. Seat comfort is phenomenal, having supportive side bolsters and lumbar support, and cushy where needed.
Adventurers who cringe at the thought of dealing with extreme temperatures will rejoice over a fully enclosed cab with heating and air conditioning as part of the Northstar trim’s standard equipment. Yes, the Can-Am Defender has three models with an enclosed cab and HVAC system, and there’s also the Polaris Ranger with an optional enclosed cab and heat. Still, those UTVs are intended to be work mules and can’t match the power, range, and versatility of the sport side-by-side XPEDITION.
[TAG13]The 36.2 x 47.25 x 13.38 inch (L x W x H) enclosed cargo bed of XPEDITION ADV; (photo/Derek Mau)
I like the idea of keeping the sand and dust from permeating your precious gear when exploring those hot, dry environments. It’s also fantastic at keeping the occupants cozy when venturing out during the chilling winter months. Now the XPEDITION’s value goes up a notch with an extended riding season that covers almost any time of the year.
Nevertheless, the drone from the engine and PVT transmission resonates inside the cabin with relentless fervor. Fortunately, I had earplugs to help abate the noise. Lowering the power windows also reduced the barrage on my sensitive ears.
The 2024 Polaris XPEDITION lineup has been purpose-designed for a breadth of uses, from worksite hauling to backcountry adventuring. A widened track and stretched wheelbase improve stability and add bed space without compromising the nimble handling off-roaders demand from an UTV.
Although, I imagine the longer wheelbase is harder to maneuver in tightly packed wooded trails. And there is more of a possibility of getting into a high-center situation and teeter-tottering on the tip if going over a steep hump on the trail.
The good news is that the suspension setup and Fox Podium QS3 shocks are totally dialed. It is responsive and terrific at soaking up the bumps and chunder, and the ride quality is superb. Getting the XPEDITION ADV to drift around corners was a breeze because of the substantive feedback communicated to the driver.
After spending a full day blasting and carving through the Grand Canyon, I walked away, elated and wanting more.
The 4WD was on the entire time because we were off-road from start to finish. If trail difficulty were easy-peasy or motoring on paved roads, using rear-wheel drive would likely have improved fuel economy. After 110 miles and over 8 hours of romping through Grand Canyon West, I still had 25% left in the fuel tank.
Not quite the 200-plus mile range that Polaris calls out. But being fuel conscious wasn’t part of the agenda that day.
A quick switch to diff-lock mode and low gear — which puts the XPEDITION into mountain goat mode — means you can tackle almost any obstacle. You can feel it biting and grabbing its way over gnarly trail conditions. It accomplished some mean feats clambering over loose, rocky passages.
[TAG16]2024 Polaris XPEDITION XP Northstar; (photo/Derek Mau)
Comfort, Standard, and Sport Drive Modes
Selecting drive modes on the go happened quite often, as trail conditions were in constant flux. The drive mode switch will change the throttle mapping and response but does not revise the suspension settings. The engine has full power in every mode — only the throttle response changes to smooth out power delivery.
A majority of time was spent in standard mode. It has a nice linear response from your foot to the engine.
Comfort mode slows down inputs and works well when rock crawling or scooting along at a relaxed pace. The throttle response is linear and smooth, which helps minimize wheel slip when bouncing over crazy terrain at slow speeds. All the horsepower is still available, but comfort mode helps ease into the throttle with less abrupt motion.
When we got onto a long stretch of gravel road, switching to sport mode quickened the throttle response and allowed the XPEDITION to stretch its legs. Acceleration pace won’t win any drag races but I gradually reach speeds up to 60 mph.
When bouncing along the trail, it’s imperative to strap down any loose items in the cab or dump box. Anything such as coolers, camping gear, tools, and a spare tire should be secured.
The all-new Lock & Ride MAX cargo system makes it a snap to hold your gear. It is modular and an indispensable feature that makes the XPEDITION quickly adaptable to a mountain of outdoor escapades. The integration is valued, in addition to being intuitive, easy to use, and having infinite adjustments.
[TAG18]Locked and loaded; (photo/Mike Emery, Polaris)
The 2024 Polaris XPEDITION, with its go-anywhere attitude and serious capabilities, opens up a range of possibilities. And having a wide choice of accessories makes it easy to adapt the XPEDITION for all types of seasonal fun. At launch, Polaris offers five rider-inspired accessory collections specific to the platform curated around popular activities: Overland, Kayak, Trail, Hunt, and Utility.
Check out the video below for a look at the accessories available to the XPEDITION.
When it comes to recreation time and getting away from the daily routine, few things are better than a sport side-by-side. From flying across the dunes to mudding to clawing up and over slickrock, nearly every powersports manufacturer has a rig that can kick up your adrenaline level and put a massive grin on your face. The Polaris XPEDITION widens the playing field, offers creature comforts, and is adaptable to your favorite outdoor activity across four seasons.
2024 Polaris XPEDITION Arriving Soon
Twelve model variants cover the gamut offering two-seater and five-seater cabs and enclosed or open rear cargo boxes. Over 100 accessories are on offer to accommodate almost any sports activity or work situation that comes to mind.
For 2024, the Polaris XPEDITION XP and ADV models have two- and five-seat configurations suited up in three trims: Premium, Ultimate, and NorthStar. The Ultimate and NorthStar trims will reach dealers in summer 2023, while the Premium trim will start shipping in 2024.
]]>
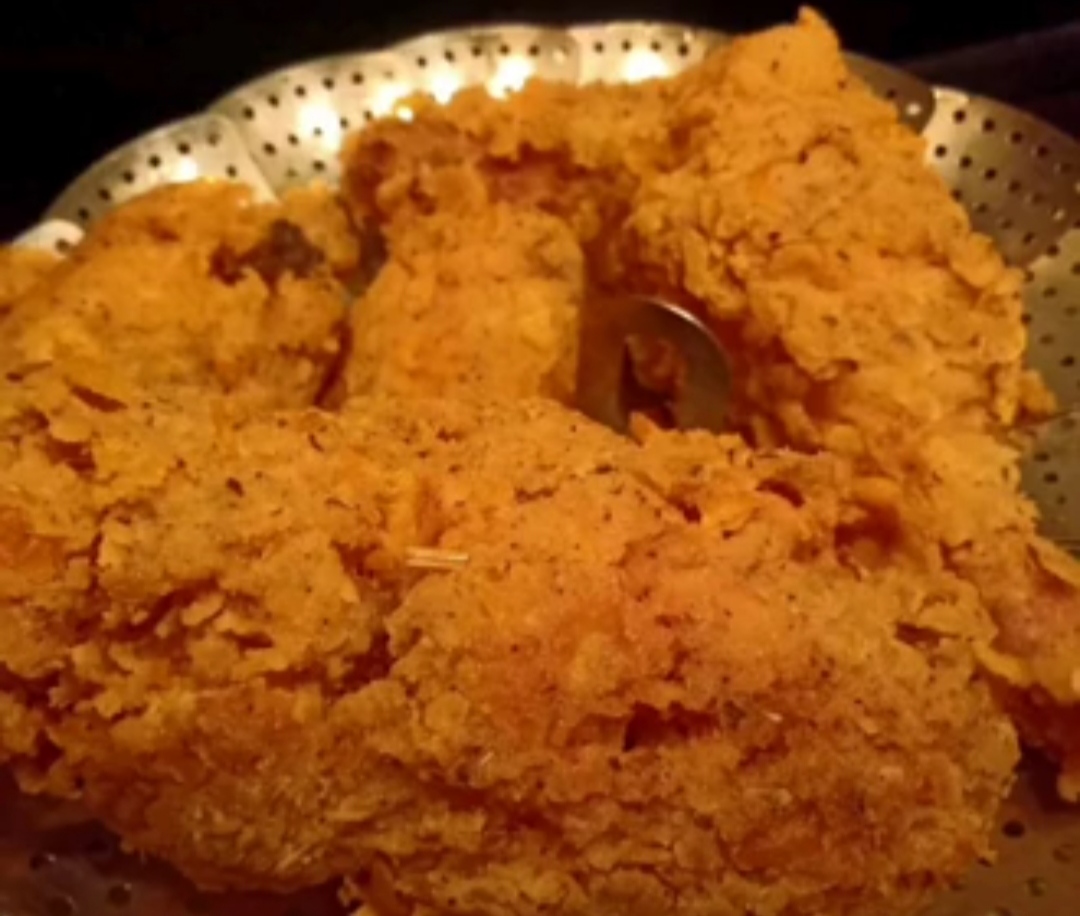
https://arsmatrix.com/blogs/news/quarantine-fried-chicken-qfc2023-06-05T15:13:51-04:002023-06-05T15:13:51-04:00Quarantine Fried Chicken (QFC)admin
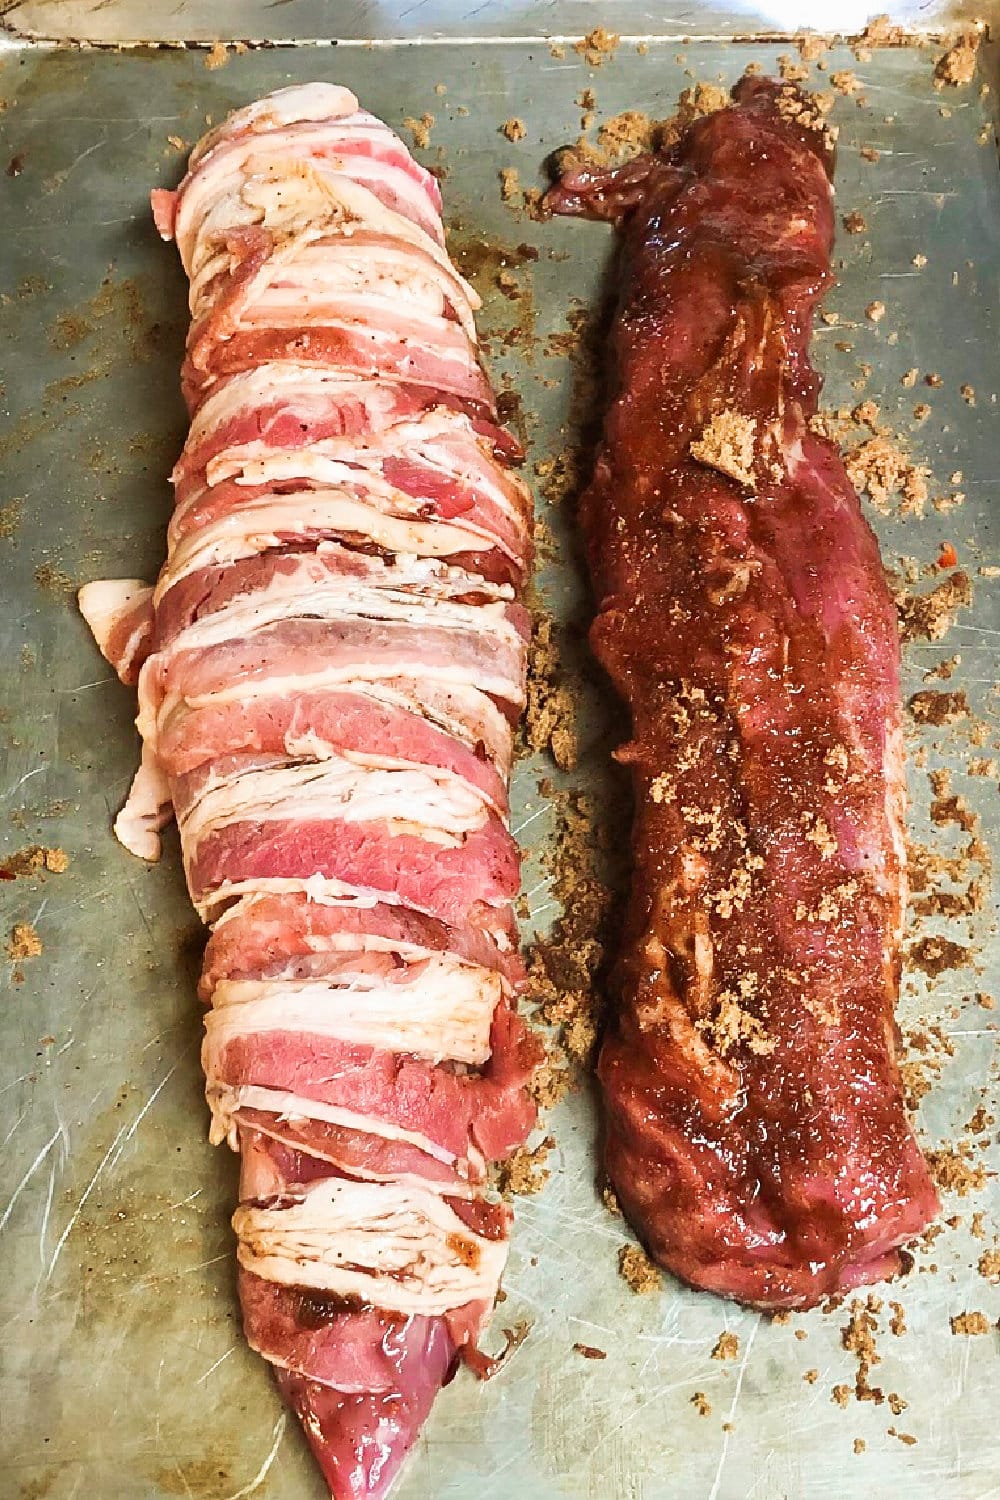
Just as the name suggest I worked on this recipe in the early weeks of covid, when my delivery kitchen was forced to shut down due to the crises the world was facing. I didn’t quite go down the Sourdough route. Our neighborhood KFC was unserviceable for considerable period so we decided to take matters into our own hands. Here’s the recipe to a very nice rendition of Southern Fried Chicken.
Ingredients:
Buttermilk marinade:
Amul chhas or any chhas – 2 pkts (small tetra)
Salt: 1.5 tsp
Pepper: 0.5 tsp
red chilly powder: 2 tsp
Chaat masala/ amchur: 0.5 tsp (opt).
Ginger garlic paste
Chicken:
Drumsticks: 10 or so
Dry rub:
1 part (rice flour)
1 part maida
Salt to taste
Pepper powder
Any mixed herbs, chilly flakes
Garlic/onion powder (optional)
Wet batter:
Egg – 1 whole
Maida – (1/2 cup)
Rice flour – (1/4cup)
Salt
Garam masala (optional)
Water – around 1 cup (add so that it’s a thick batter like idli batter consistency).
Oil- 3 tbsp
(I didn’t have the egg so I omitted it). Adjust water accordingly.
Outer coating:
To the dry rub further add:
Cornflakes: 1.5 cups (grind in mixer but don’t powder)
Salt
Herbs
Method:
1. Wash the chicken and drain excess water.
2. Make deep cuts on the drumsticks with a sharp knife (3-4 on each pc).
3. Prepare the buttermilk mixture and whisk it nicely, then add the chicken and keep refrigerated (overnight or at least for 3 hours at room temp.
4. Prepare the dry rub.
5. Prepare the thick batter.
6. Remove the chicken from the buttermilk drain excess, and add coat in the dry rub. Let it rest for 20-30 mins.
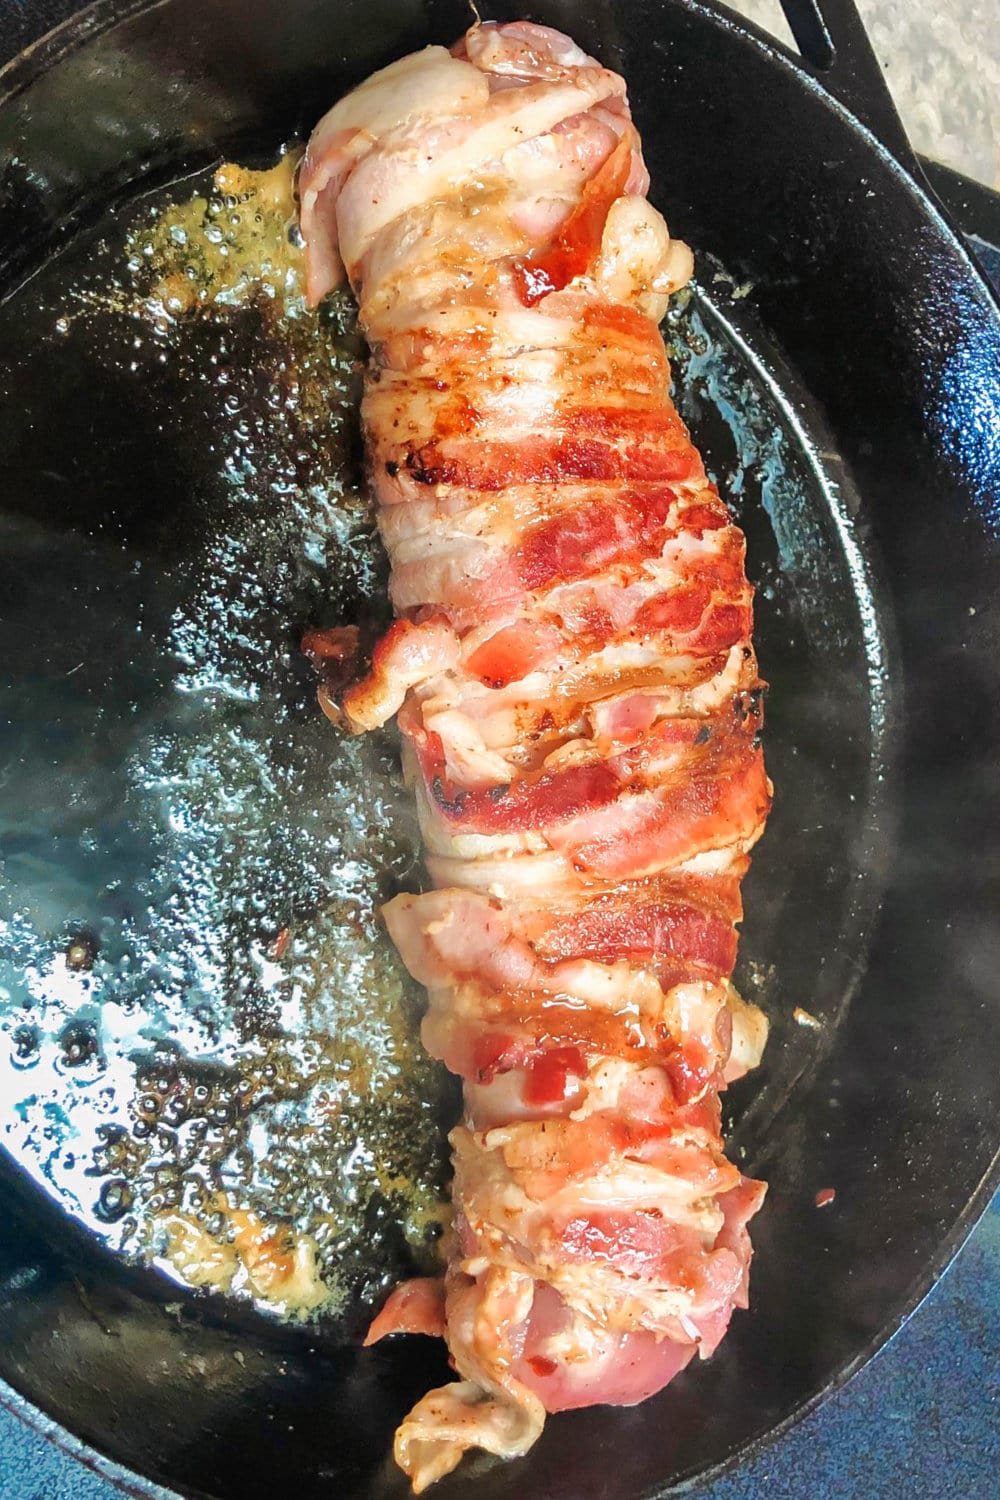
7. Heat up the oil on medium low flame.
8. Take the coated chicken, dip in thick batter shake off the excess, coat in the cornflakes and flour mixture, dust excess and deep fry on medium low flame. Cook max of 5 pc at a time. Don’t touch the chicken for the next 3-4 mins. Just circulate the oil.
9. After 5 mins rotate the chicken for even browning.
10. Take it out after 6 mins on the other side or until a fragile crust is formed.
11. Drain in a colander / wire rack (not on tissues (steam will make coating soggy).
12. Let the chicken rest for about 15-20 mins.
13. Reheat the oil, now on medium to high flame.
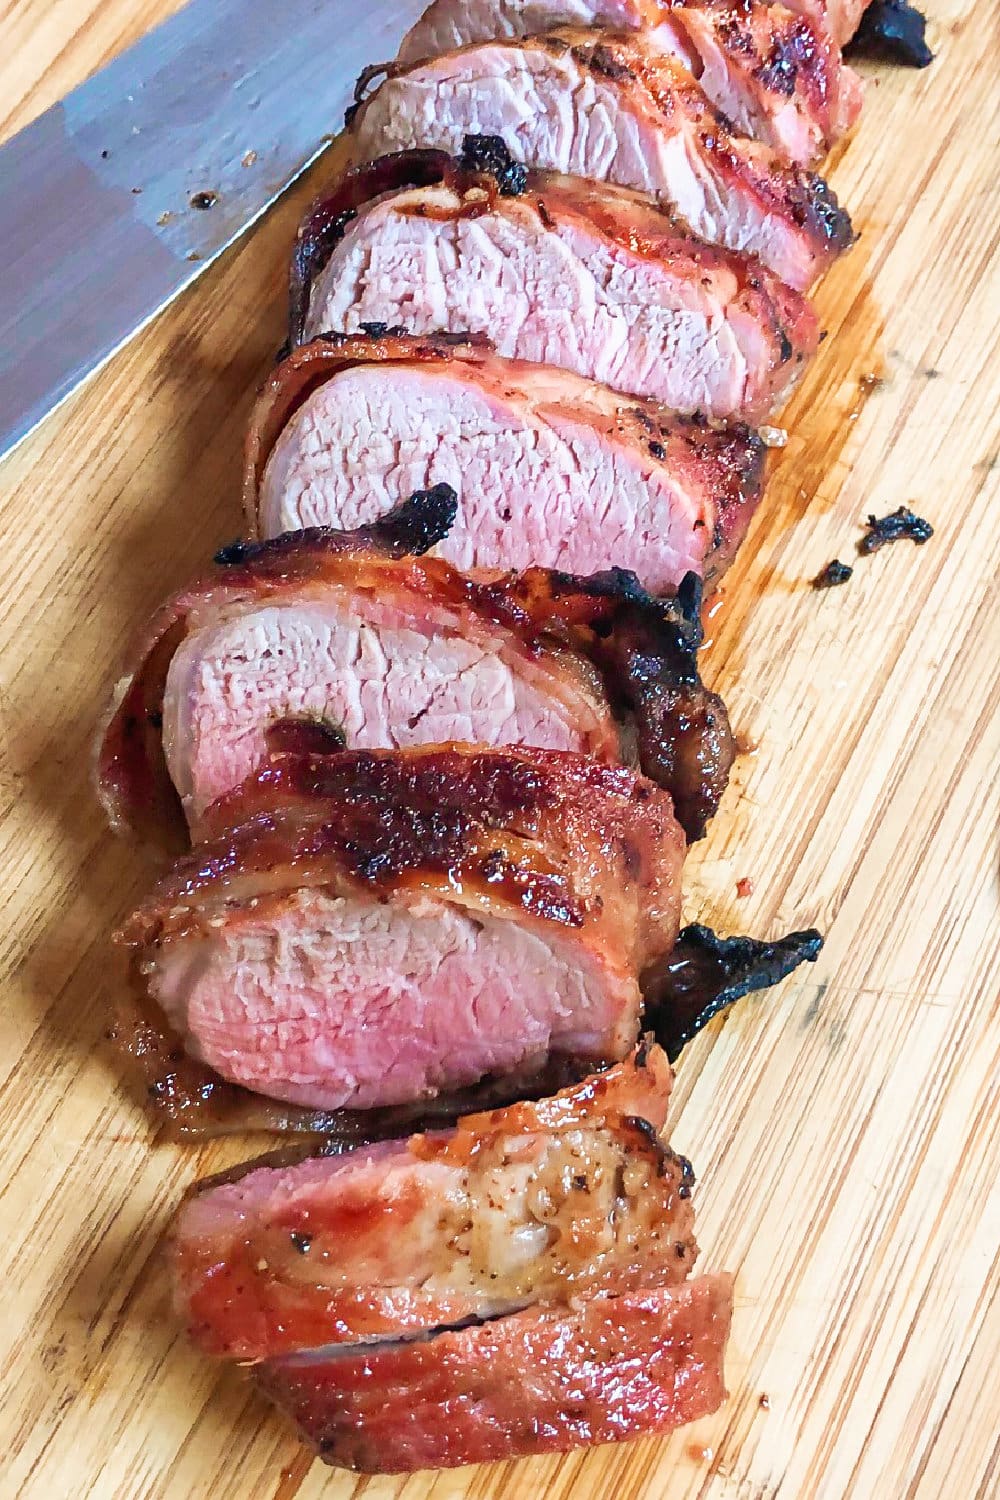
14. Drop in chicken pieces and fry for around 2-3 mins or until colour starts to turn brown. The meat will start to shrink near the base of the drumstick. That’s when its cooked.
15. Drain on a cooling rack again, dab with tissues.
16. Serve hot with mayo/ ketchup or Tabasco.
]]>
https://arsmatrix.com/blogs/news/bienenstich-bee-sting-cake2023-06-04T09:13:51-04:002023-06-04T09:13:51-04:00Bienenstich (Bee Sting Cake)adminfrom Taste of Home
Ingredients
Custard
1/4 cup sugar
3 tablespoons cornstarch
1/4 teaspoon salt
1-1/2 cups whole milk
3 large egg yolks
2 tablespoons butter, cubed
2 teaspoons vanilla extract
1/2 cup heavy whipping cream, whipped
Cake
1/4 cup sugar
1 envelope (1/4 ounce) active dry yeast
1/4 teaspoon salt
2-3/4 cups all-purpose flour, divided
3/4 cup whole milk
1/3 cup butter, cubed
2 large eggs, room temperature
Almond Topping
1/4 cup butter
3 tablespoons honey
2 tablespoons sugar
1 cup sliced almonds
Directions
For custard filling, in a small heavy saucepan, mix sugar, cornstarch and salt. Whisk in milk. Cook and stir over medium heat until thickened and bubbly. Reduce heat to low; cook and stir 2 minutes longer. Remove from heat. In a small bowl, whisk egg yolks. Whisk a small amount of hot mixture into egg yolks; return all to pan, whisking constantly. Bring to a gentle boil; cook and stir 2 minutes. Remove from heat. Stir in butter until melted. Immediately transfer to a clean bowl; stir in vanilla. Cool 30 minutes. Press plastic wrap onto surface of filling; refrigerate until cold.
Whisk custard gently. Fold in half the whipped cream, then fold in remaining whipped cream. Cover and refrigerate.
Meanwhile, while custard is chilling, make dough. In a large bowl, mix sugar, yeast, salt and 1 cup flour. In a small saucepan, heat milk and butter to 120°-130°. Add to dry ingredients; beat on medium speed 1 minute. Add eggs; beat on high 1 minute. Stir in enough remaining flour to form a soft dough (dough will be sticky).
Turn dough onto a well-floured surface; knead until smooth and elastic, 6-8 minutes. Place in a greased bowl, turning once to grease the top. Cover and let rise in a warm place until doubled, about 1 hour.
While dough is rising, make almond topping. In a small saucepan over medium heat, melt butter, honey and sugar. Cook and stir until sugar is dissolved. Remove from heat; stir in almonds. Cool slightly and set aside.
Punch down dough. Transfer to a greased 9-in. springform baking pan, pressing to evenly fill pan with dough. Spoon almond mixture over dough and gently spread to cover entire surface. Cover pan with a kitchen towel; let rise in a warm place until doubled, 25-30 minutes. Preheat oven to 350°. Bake until topping is golden brown, 25-30 minutes. Cool on a wire rack 10 minutes. Loosen side from pan with a knife. Cool 1 hour longer.
Remove cake from base of springform pan. Using a long serrated knife, cut cake horizontally in half; spread filling over bottom layer. Replace top of cake. Serve immediately. Chill leftovers.
]]>
https://arsmatrix.com/blogs/news/best-in-show-overland-expo-west-20232023-06-01T15:13:50-04:002023-06-01T15:13:50-04:00Best in Show: Overland Expo West 2023admin
With 15 Overland Expo events, including the past 10 West events, under my belt, I scoured the 400+ vendors this year for the latest and greatest gear. While I found a lot of the same stuff I’ve seen for years, I did manage to dig up quite a few intriguing new products that are worth a look. Everything from a massive truck camper build to a car seat for your dog caught my eye.
Check out the video I shot at Overland Expo West 2023 to hear about these new products directly from the founders, designers, and reps.
2023 Overland Expo West: Best in Show
Whether you spent the time watching the video or not, you can find the pertinent info on the latest and greatest in the overland world below.
Elevation Off Grid created this monster overland build for Bowen Customs and turned a lot of heads at Overland Expo West 2023. The Warthog build has the largest Bowen custom truck bed ever built, which includes a 60-inch wide garage. That massive bed is on a RAM 4500 chassis and rides on Liquid Springs suspension. It has a Supertramp Camper on the back and 23Zero rooftop tent on the cab. The whole thing is 10 feet high when the tent and camper are collapsed.
While this one isn’t for sale, you can buy one to your own spec starting in November for $350,000-450,000. Contact Bowen Customs if you’re interested.
Campany Vans Furniture Kit is being imported by RRE Global into North America. It’s made of special lightweight wood, and the entire kit for a 170 Extended Sprinter only weighs 350 pounds. That includes the shower, fridge, bed, kitchen, etc. The entire system is attached via airline tracks and can be removed in just 20 minutes.
Pricing starts at $15,000 for a complete Campany Van Furniture kit. You can get yours through RRE Global.
I’ve used a GooseGear interior system for years in my GX460, and I love it. Now, there is an interior storage and sleeping system solution for small crossovers like the Outback and RAV4 (with more coming very soon).
The GooseGear Park Series flatpacks and is assembled by the customer. It doesn’t require a mounting plate, comes in three height options, and can be optioned in a wide range of ways. It is custom-made for each vehicle, to ensure the top surface is flat within each vehicle. Over 6 feet of flat sleeping area is available in each of these small crossovers with this system, without removing any seats.
Pricing starts at about $1,500 and goes up from there. Build out your own system for your vehicle and use the case on GooseGear’s website.
Think of the Polaris Xpedition as a 72-hour overland machine. It’s a UTV that is set up for weekend camping adventures off the beaten path. It is offered in a two- or five-seat configuration and an open or enclosed cabin.
It offers things like AC, heat, Fox shocks, 30-inch tires, and so much more. Pricing starts at about $28,000, and easily climbs to north of $45,000. They will be hitting showrooms later this summer.
If you have a pickup with a 5-foot bed and want a hardshell camper, the new Scout TukTut is for you. It’s the perfect companion for Gladiator, Ranger, Colorado, and the like. Purchase this little camper with just two benches and a bed or fully built-out, including a GooseGear interior option.
Built, they weigh about 965 pounds or base at 634 pounds. Pricing starts at $16,500 and fully built runs about $27,000.
Possibly the cleanest and most configurable truck rack I’ve ever seen is the brand-new Kuat Ibex. This rack is easily configurable at two heights, has adjustable cross bars, offers side-mounted bike racks, and has a ton of accessory mounting options. It is available for both mid-size and full-size trucks, and pricing starts at about $1,500.
Good batteries in your overland vehicle and/or RV are super important to keep all the electronics and systems running smoothly. Size and weight are super important as well, and dcs (deep cycle systems) have a great solution for a lot of applications. The dcs Slimline LFP Batteries are lightweight, easily mountable, rated for cranking amps, and Bluetooth app-enabled.
Currently on offer in North America are a 100ah ($1,150) and a 200ah ($1,750) lithium battery. These high-end batteries have been tried and tested in Australia for years now, but are just hitting the U.S. market.
Since you’re already probably bringing the kitchen sink, toilet, TV, shower, fridge, lounge chairs, and more on your overland adventures, you might as well also bring a couch and coffee table. The SofaBOX is a super-comfy couch in a waterproof box and comes with a matching coffee table aluminum box.
The SofaBOX is built to order — think custom upholstery — and is imported through RRE Global. Pricing is about $4,000.
A great product for any camper setup is a set of wheel chocks, leveling ramps, and sink plates. A tidy quality version of all of that in one product is the TRED GT Leveling Kit. It has been on the Australian market for some time, but is just being introduced on this side of the pond. It is rated to 10 tons, is Australian-made, and comes with a lifetime warranty. A full set will run you $130.
A hot shower after a long dusty day on the overland trail is always nice. Here’s a great solution, the Kakadu Outback Shower. This 16-pound battery-powered shower system offers 4 hours of hot water from a single 1-pound propane tank. It is just being introduced to the U.S. market (available in July) and will run you $500.
Securely mounting large gear like Maxtrax, RotoPax, and the like on the outside of your overland vehicle always seems to be harder than it should be. Overland Kitted has you covered though, with its brand-new Spare Tire Accessory Mount.
The system is completely made in the USA and can securely mount a wide range of gear to a rear-mounted spare tire. Pricing for the Maxtrax mount kit is $340.
Finding shade and shelter on the trail and around camp isn’t always easy. The Eezi-Awn DragonFly 180 offers a great solution with a ton of protection from the elements. It is a 180-degree awning that is self-supported and can be purchased in driver-side or passenger-side configuration.
There is also a mini version for smaller vehicles. The full-size unit weighs 55 pounds and costs $1,350. The Mini version weighs 45 pounds and costs $1,275. Eezi-Awn is distributed through Equipt 1 in North America.
If you ever wanted to drive over a 5-gallon bucket, massive rocks, or fit 37-inch tires to your Tacoma, your prayers have been answered. 74Weld now offers Tacoma Portals. These portal axels are 1.22 gear reduction units that provide a ton of extra ground clearance and retain the factory suspension geometry.
Some mild trimming and body mount relocation are required to fit 37s. The kit also upgrades the rear drum brakes to disks.
Pricing for the whole kit runs about $20,000. The 74Weld Tacoma Portals kit will be available by the end of the year.
One part pop-top camper and one part off-road utility trailer the RMO (Rustic Mtn Overland) Anzac is altogether an RV. The RMO Anzac trailer has a custom GFC pop-top camper system, Dometic Fridge and PLB power unit, and Cruisemaster Suspension. It can be fitted with GooseGear cabinets and even carry a dirt bike. The dry weight is 1,600 pounds, so just about anything can tow it.
It is fully RV certified, offering the best financing and lower insurance rates. Pricing starts at $32,995.
Having AC and heat in your camper or large ground tent is a super nice luxury, but not usually easy to accomplish. The EcoFlow Wave 2 fixes that. It offers 5,100 BTU of cooling and 6,100 BTU of heating in a small package that can be self-powered.
It runs on an optional lithium battery or can be plugged into a 12V power source. The Wave 2 comes with exhaust ducting and when bundled with the battery, costs $2,199.
Australians love their off-road camper trailers and more and more are making it to our shores. The latest to do so is the aor Odyssey, displayed at Overland Expo West 2023. This hybrid model is fully featured, super comfortable, has a massive 74-gallon water capacity, and weighs about 3,000 pounds. It is available through XGrid Campers in North America and costs from about $68,000 to $78,000, depending on options.
I have an MSA fridge drop-slide in my GX460 overland build and love it. The latest and greatest is the new MSA Power Slide. It has the same functionality as a drop slide, but does so at the touch of a button. It also offers up a slide-out table surface for added usefulness.
The MSA Power Slide will be available in North America in August at a cost of $1,950 (add $460 for the fridge barrier). It will be available through The Bush Company USA.
Race proven and now ready for the overland community The Mounting Co. has developed a super-secure quick disconnect mounting bracket. It is made of aluminum with a titanium pin and stainless steel hardware. You can mount up just about anything inside or outside of your vehicle with the sizes of brackets on offer. All are made in Phoenix, and pricing ranges from $249 to $339.
If you want a super configurable truck bed rack that is fully tonneau compatible then look no further than the new Trukd Bed Rack. It is a super-modular truck bed rack system that you can configure to your needs. I appreciate the low-side/high-side overland setup, which allows you to keep your RTT down low while having an awning up high. Pricing starts at about $900 and goes up to about $2,100.
The latest adventure motorcycle helmet on the market is the Scorpion EXO XT9000 Carbon. It has a full carbon shell and only weighs 1,550 g (medium size). It has a unique internal deep channel ventilation system and air fit inflation fit system.
The shield is removable without tools, and the helmet comes with dark and clear shields, as well as a Pinlock insert. The Scorpion EXO XT 9000 costs $499 and is available now.
The belle of the ball at Overland Expo West 2023 was the 2006 AEV-built Jeep Wrangler LJ Rubicon in the Overland Kitted booth. It is a true unicorn, with only 13,000 original miles on the odometer.
It has 37-inch tires, Highline Fenders, Dynatrac 60 axels, Recaro seats, and so much more. Oh, maybe most importantly, it has a 5.7L V8 Hemi under the hood. While many of us might want this, it’s not for sale.
]]>
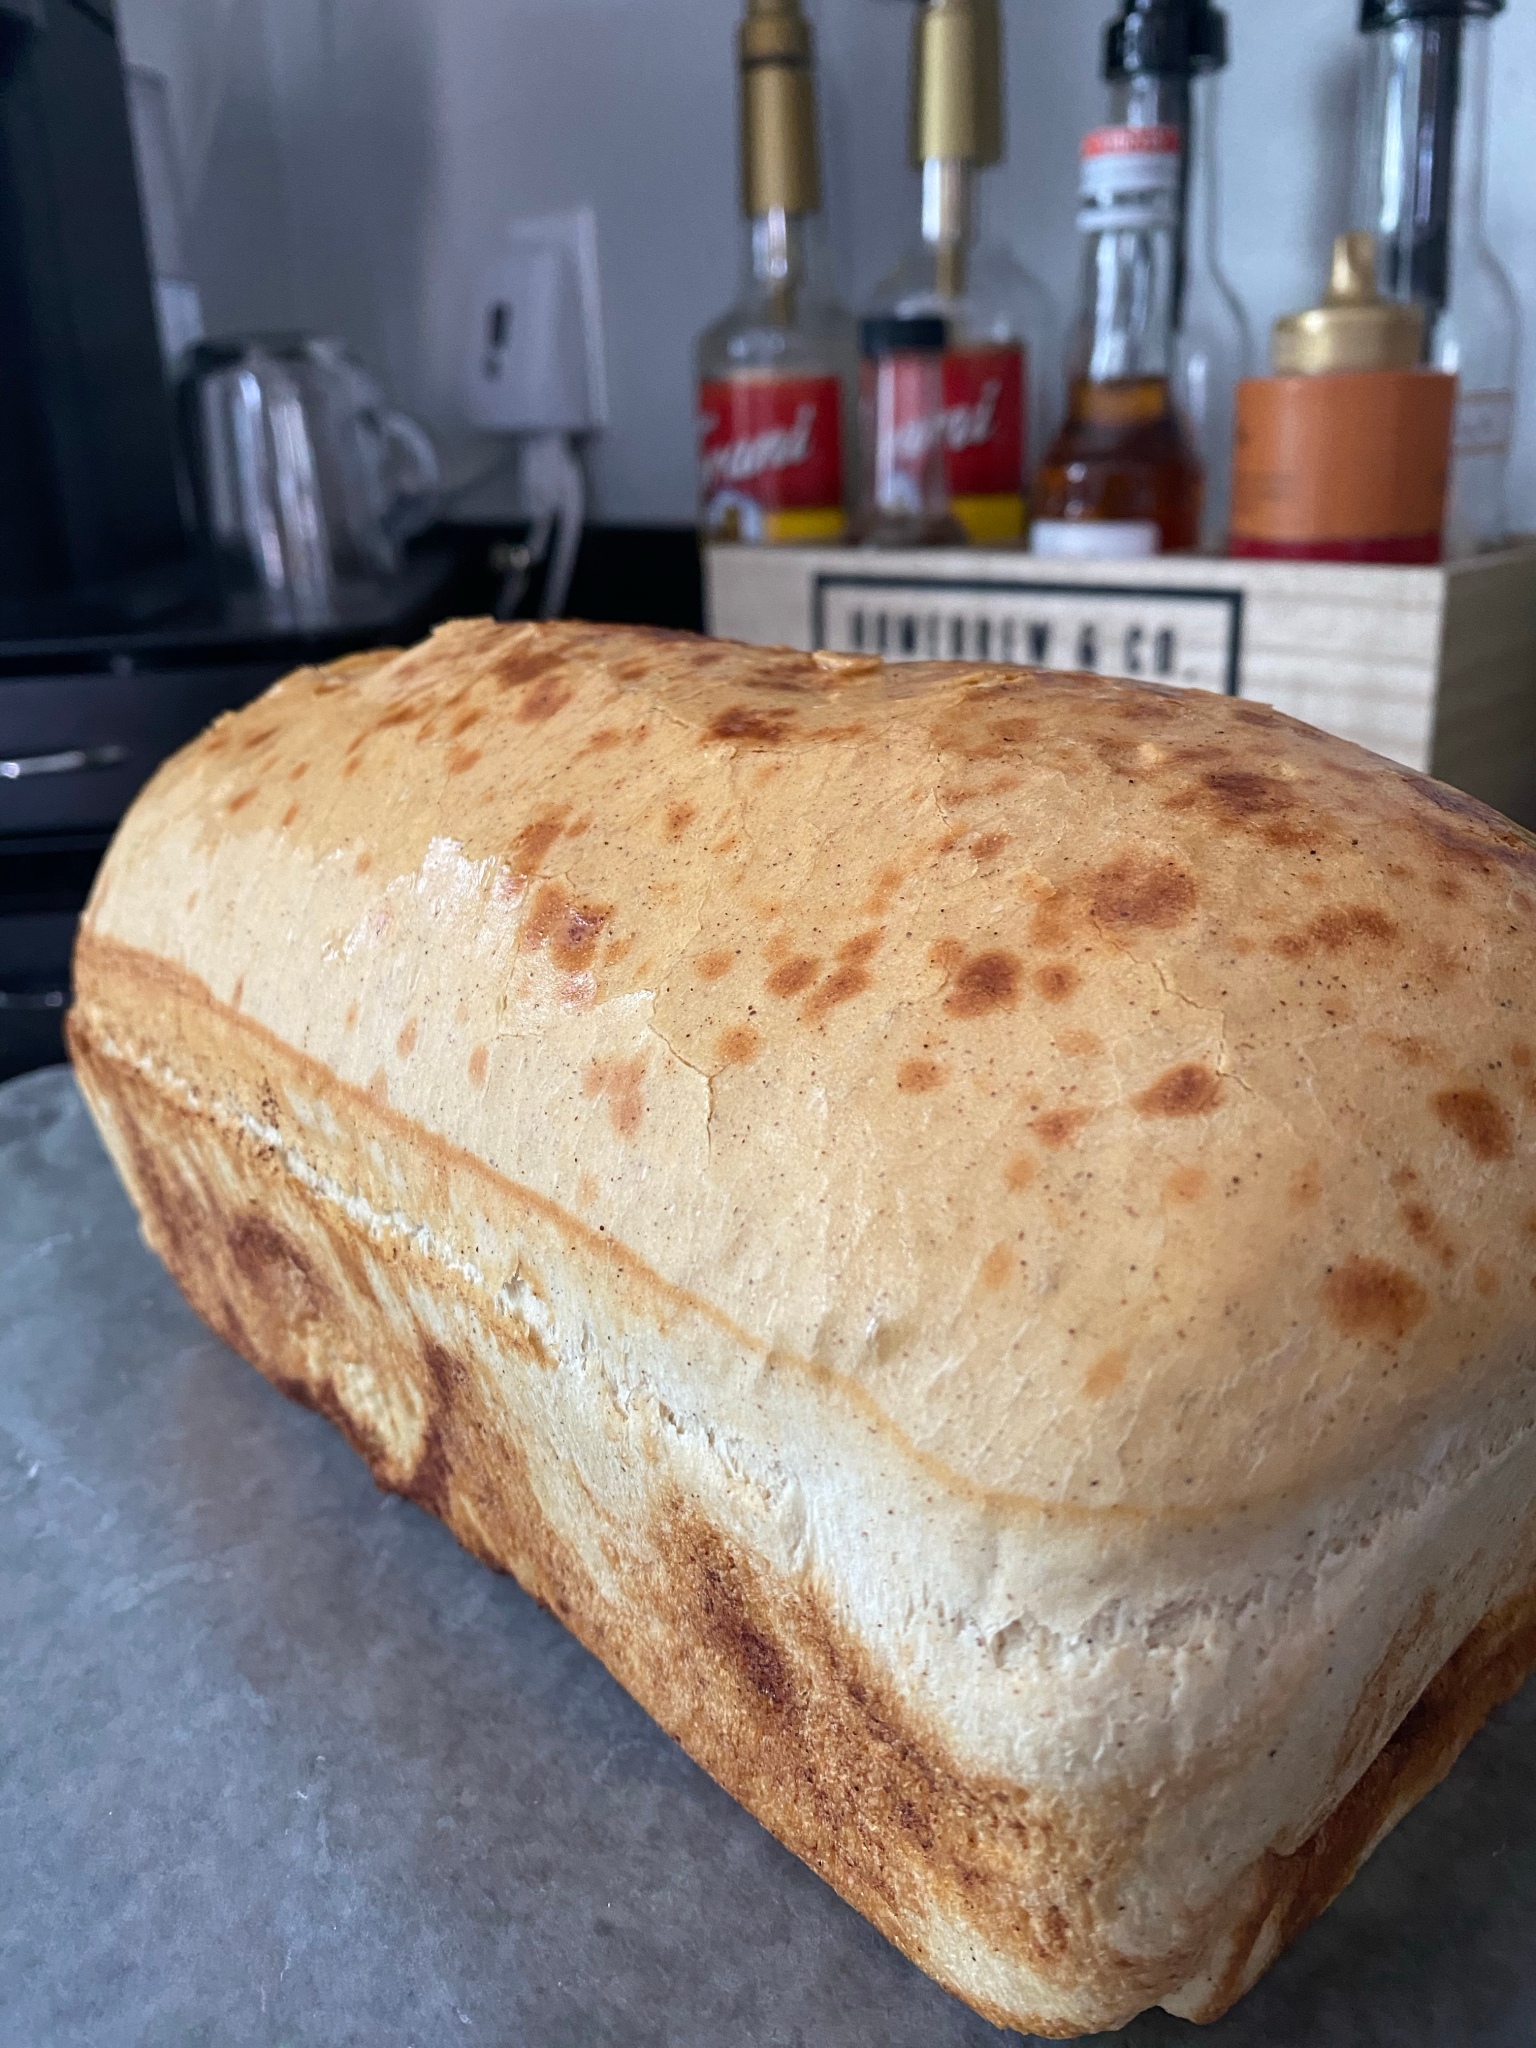
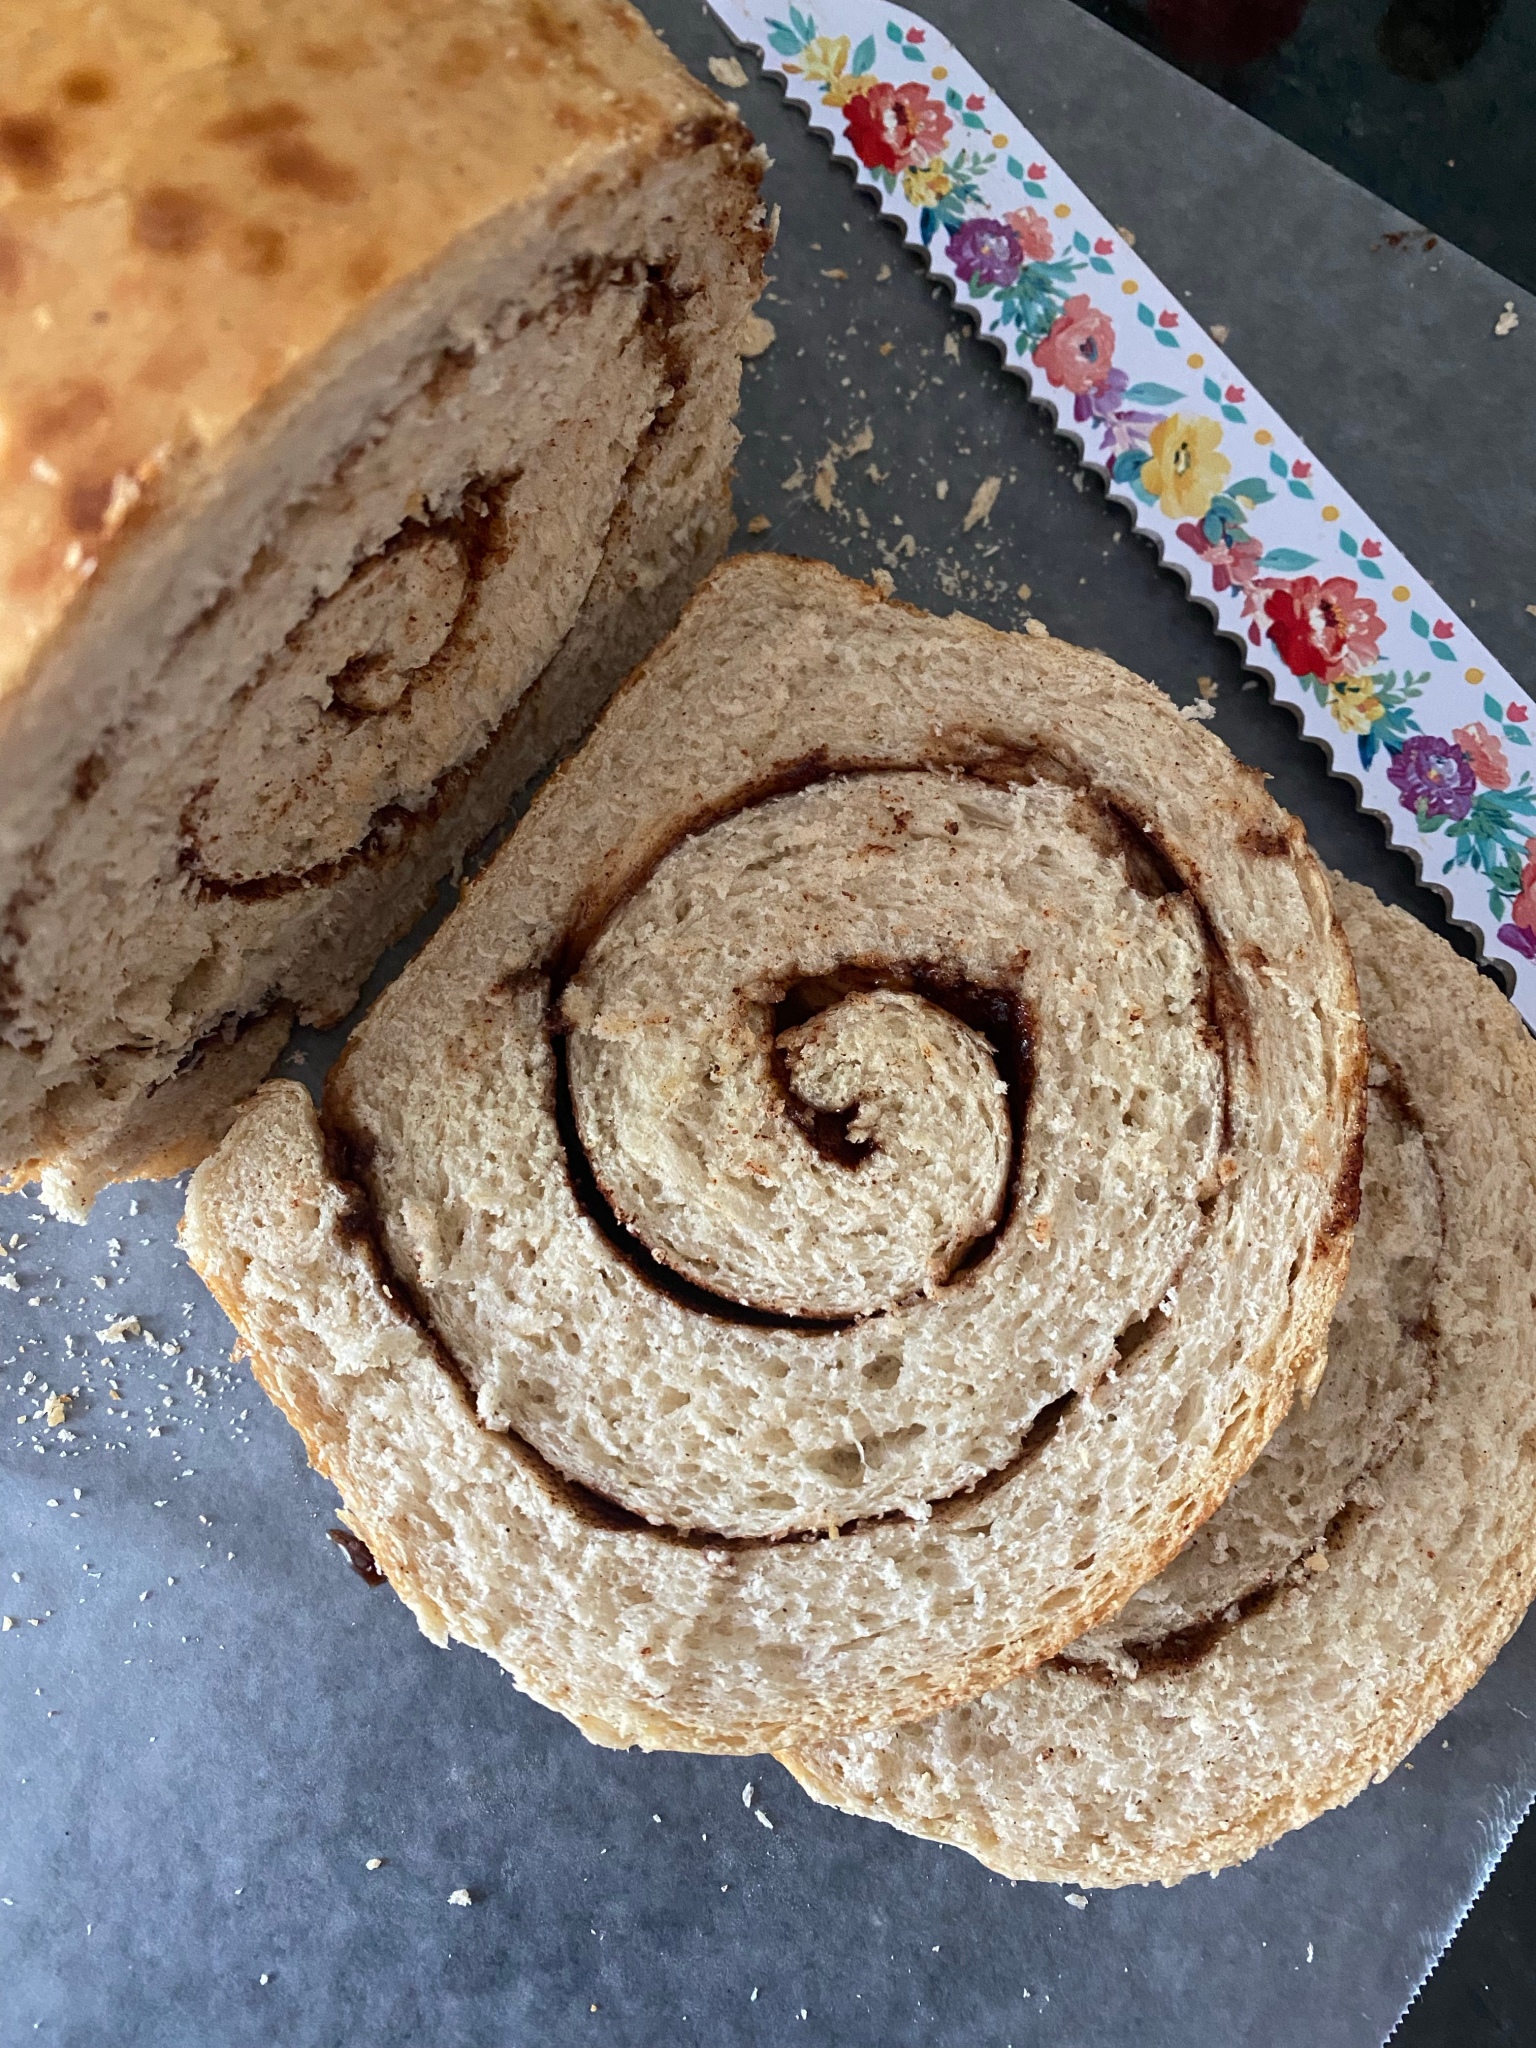
https://arsmatrix.com/blogs/news/easy-cinnamon-bread2023-05-31T21:13:52-04:002023-05-31T21:13:52-04:00Easy Cinnamon Breadadmin
Homemade bread is one of our family’s favorite things to make. This hasn’t always been the case though. For years, I would avoid using ingredients like yeast because I just wasn’t confident in my abilities and things would always turn out less than edible. Fast forward to 2020 and beyond, being a homeschooling mama of 2, and spending more time at home now more than ever, experimenting in the kitchen has become one of the kids and I’s favorite things to do. Not only do we get to create and enjoy delicious treats but they get to help out, get their hands dirty, learn about measuring and cooking, all as part of their homeschool lessons! It’s a win-win for this mama! I hope you and your family enjoy this recipe as much as we did (this bread didn’t last longer than a day around here)!!
Fresh out of the oven
Easy Cinnamon Bread
Dough: 3/4 cups warm water (110° is perfect) 2 1/4 tsp active dry yeast (one packet) 1/2 cup milk (warmed to 110°) 1/3 cups sugar 3 TBPS butter (melted) 1 egg (room temperature) 4 cups bread flour 1 1/4 tsp cinnamon 1 tsp salt (I cut salt in half if using salted butter)
Filling: 1/4 cup sugar 1 TBSP cinnamon 1/8 cup brown sugar
Instructions: 1. Heat water to 110° in a small bowl. Sprinkle yeast on top and gently combine. Let stand for 5-7 min until yeast has dissolved
2. In a medium mixing bowl add water/yeast mixture and beat in milk, sugar, butter and egg.
3. Beat in 2 cups of flour until mixture is smooth.
4. In a separate bowl, add remaining 2 cups of flour, salt and cinnamon. Whisk it all together to get the salt incorporated well.
5. Add flour mixture a little at a time, mixing until the dough is nice and smooth.
6. Once mixed, knead with your hands for 5 min.
7. Shape dough into a smooth ball and place in a lightly greased bowl and cover loosely with plastic wrap. Place in a warm spot and let rise 1-2 hours until doubled in size.
8. Punch dough down and knead slightly on a lightly floured surface.
9. Roll dough out with a lightly greased rolling pin to a 9×20 inch rectangle
10. Combine sugar, brown sugar and cinnamon for the filling in a small bowl and sprinkle over the top of the dough.
11. Starting at the narrow end of the dough, roll tightly, pinching the edges to seal. Tuck ends under slightly and place in a buttered 9x5x3 inch loaf pan.
12. Cover and let rise for 1 hour or until dough has risen 1 inch over the top of the pan.
13. Preheat oven the 350°. Bake for 35 min until loaf is golden brown and sounds hollow when tapped.
14. Brush top with a stick of butter and let cool for 10 min in loaf pan before moving it to cooling rack or slicing area.
15. You can slice and serve right away or wait until loaf is fully cooled. Store in an airtight container for up to 3 days.
Finished bread ready to be slathered in butter 🤤
Did you make this recipe?
Tag me over on Instagram @april_may_june88 and/or leave a comment below!!
]]>
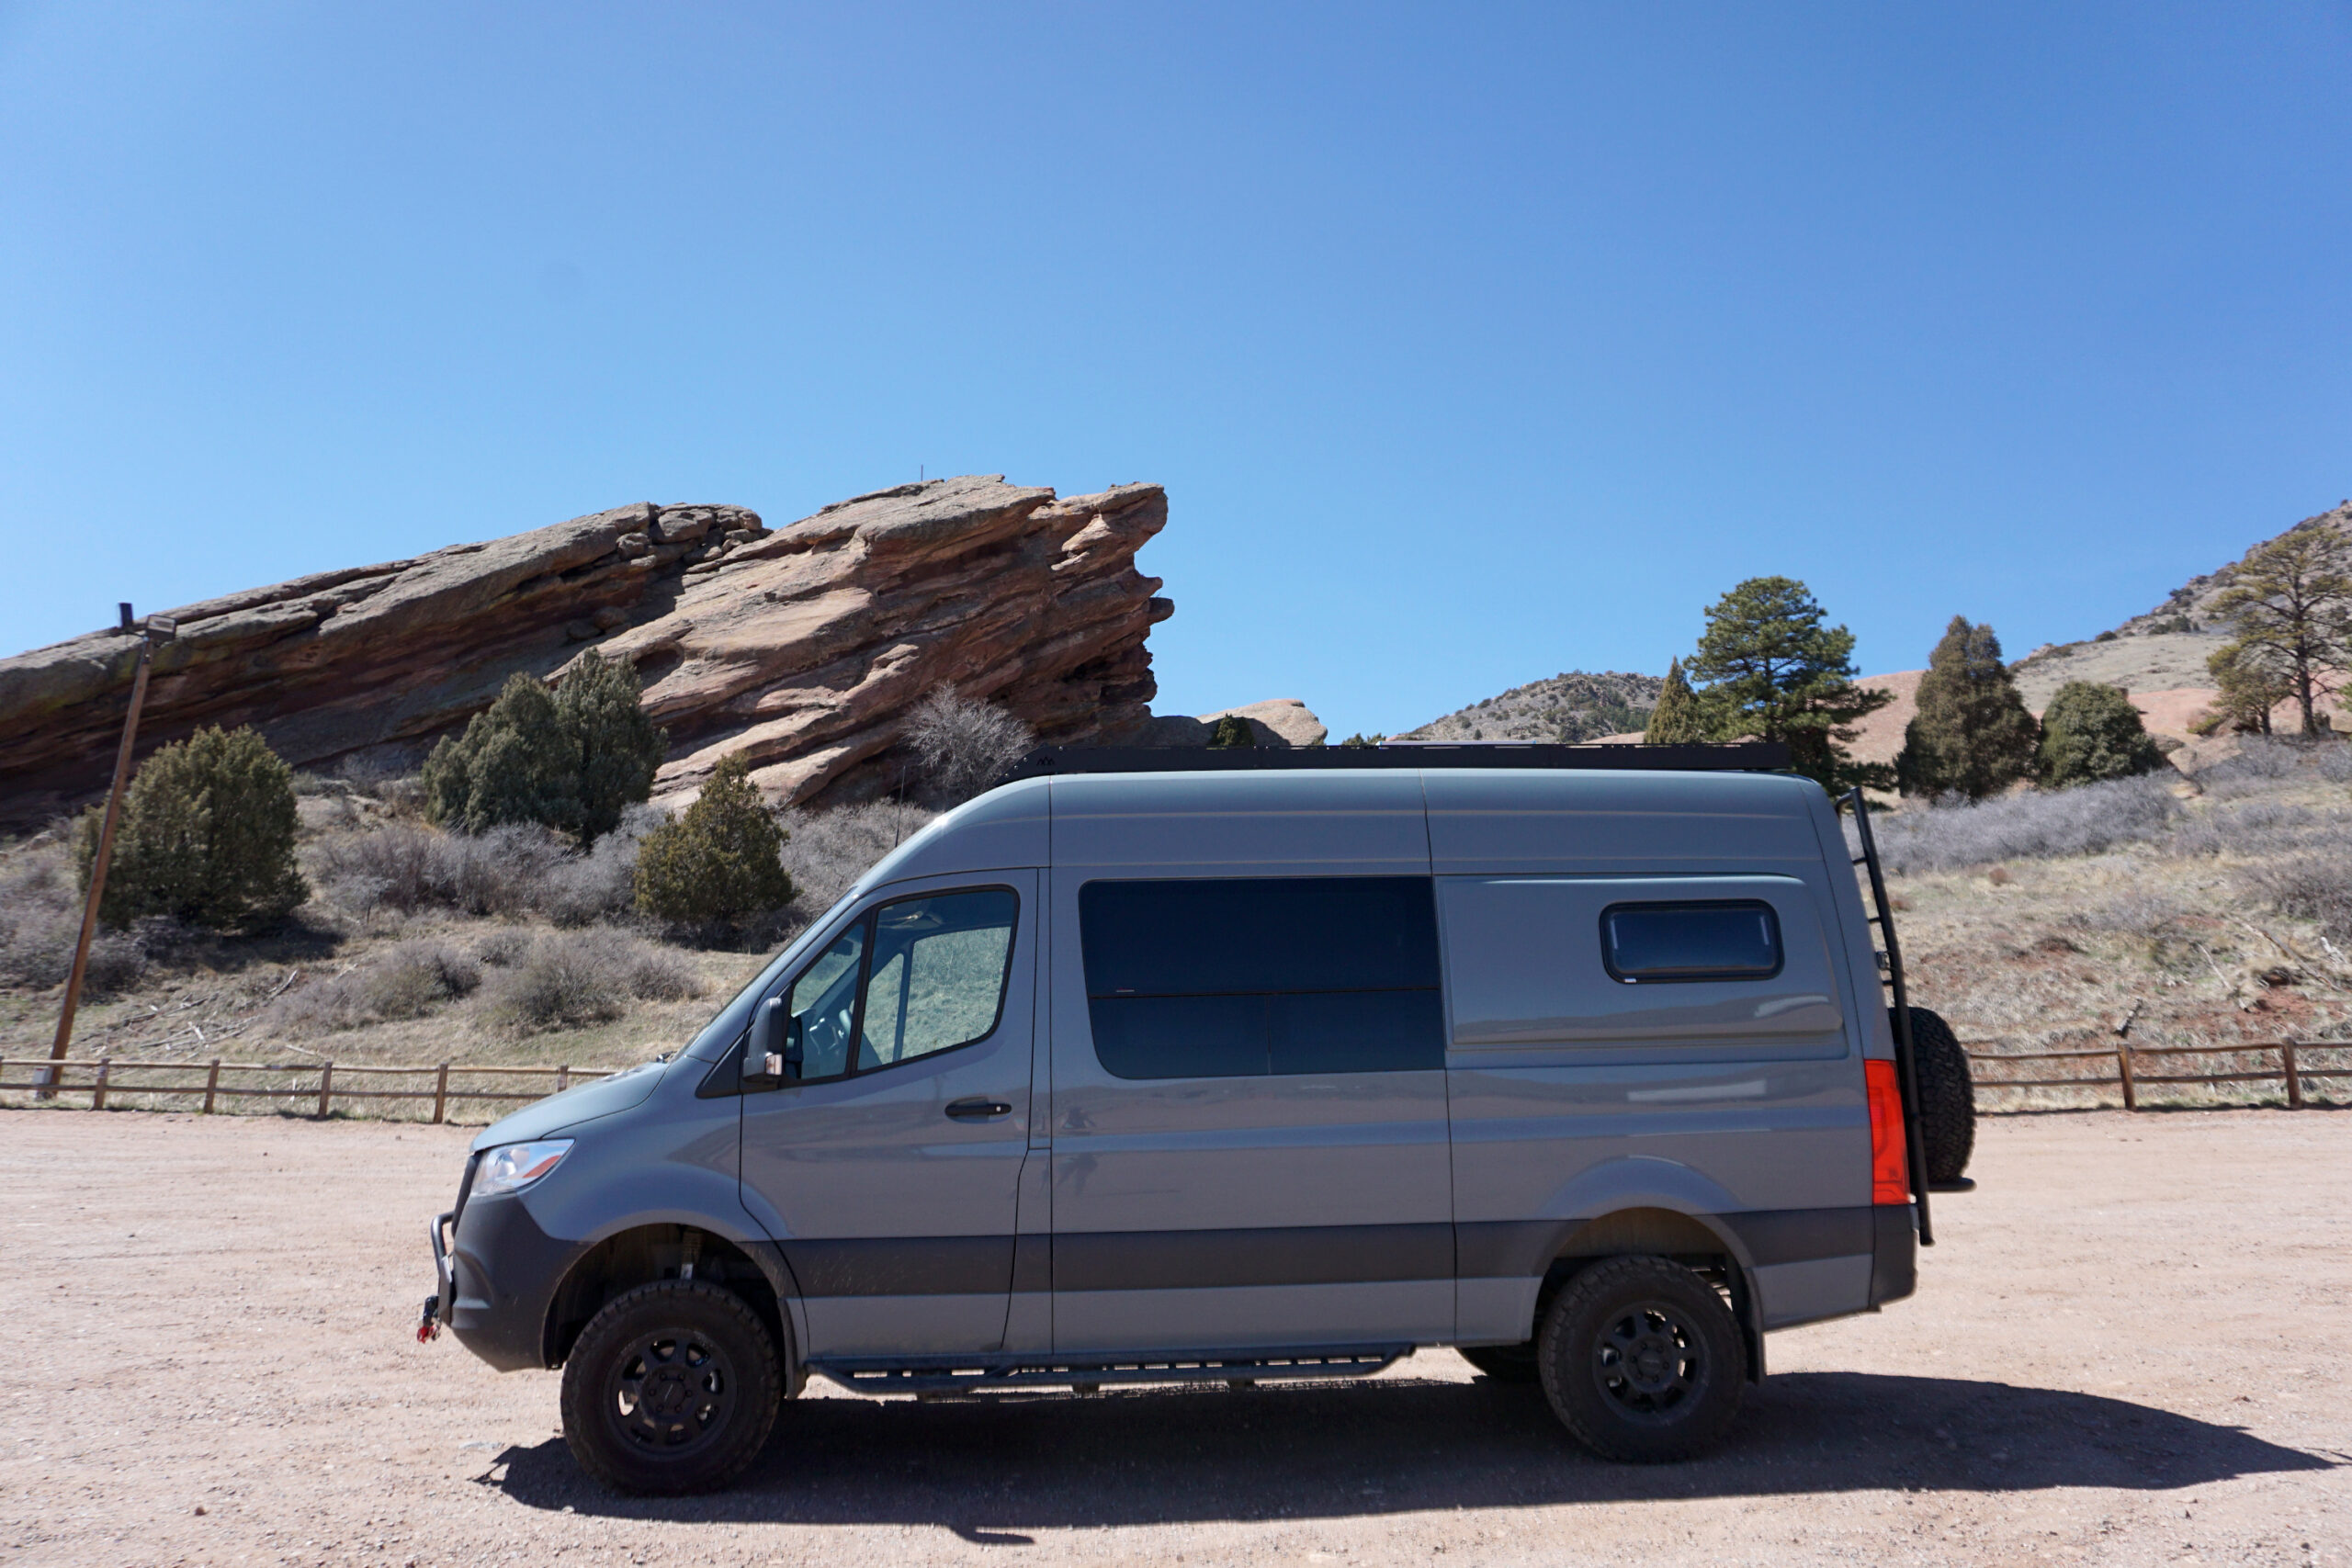
https://arsmatrix.com/blogs/news/adventure-wagon-campervan-review-modular-minimalism-for-the-win2023-05-26T15:13:50-04:002023-05-26T15:13:50-04:00Adventure Wagon Campervan Review: Modular Minimalism for the Winadmin
I was just coming back down a long, winding trail hike west of town, when it began to rain. Thankfully, I only had a half mile to go. I checked the clouds overhead and sped up my pace. We, my pup and I, made it back to the van before the heavy rain set in. I knew we were dirtier (and wetter) than when we had begun. I clicked the key fob, rolled open the side van door, unfolded our towel “doormat,” and we hopped in.
This van is spacious. Like, there’s enough room to fully stand up, no problem, move around, shed layers, sit down, and towel off — again, myself and my dog. The van didn’t feel cramped, there was room. Which I feel is a bigger deal than it sounds when it comes to campervans.
I began hanging our wet layers on hooks, and putting our dry hiking gear and my pack away. I opened up one of the overhead bins, ahem, gear pods, and donned a light zip-up fleece. We had a dry haven in the storm where we could sit back, relax, and watch the rain (and then hail).
Ahhh. This isn’t home, but it’s close.
In short: For starters, yes you can live in this van. But it’s not designed to live in full-time. And yes, there’s a difference. What do I mean? It’s got a bed platform, some electrical (with fancy dimmable lighting), and solar, but mostly, it’s empty. “Empty” allows it to provide a lot of storage space to configure seats for travel, racks, and room for gear. It’s not built out with a kitchen and bathroom and a table and cupboards everywhere. Rather, the Adventure Wagon is meant for part-time, flexible travel — if you are someone who lives in the city, or maybe just wants to take the van out on the weekends, the Adventure Wagon is a great fit.
2023 Adventure Wagon Mercedes Benz Sprinter 4×4 Review
(Photo/Mary Murphy)
Adventure Wagon: Brand Mission, Modular Designs
The Adventure Wagon I tested was a 2023 Mercedes Benz Sprinter 4×4 AWD, with the conversion from Adventure Wagon.
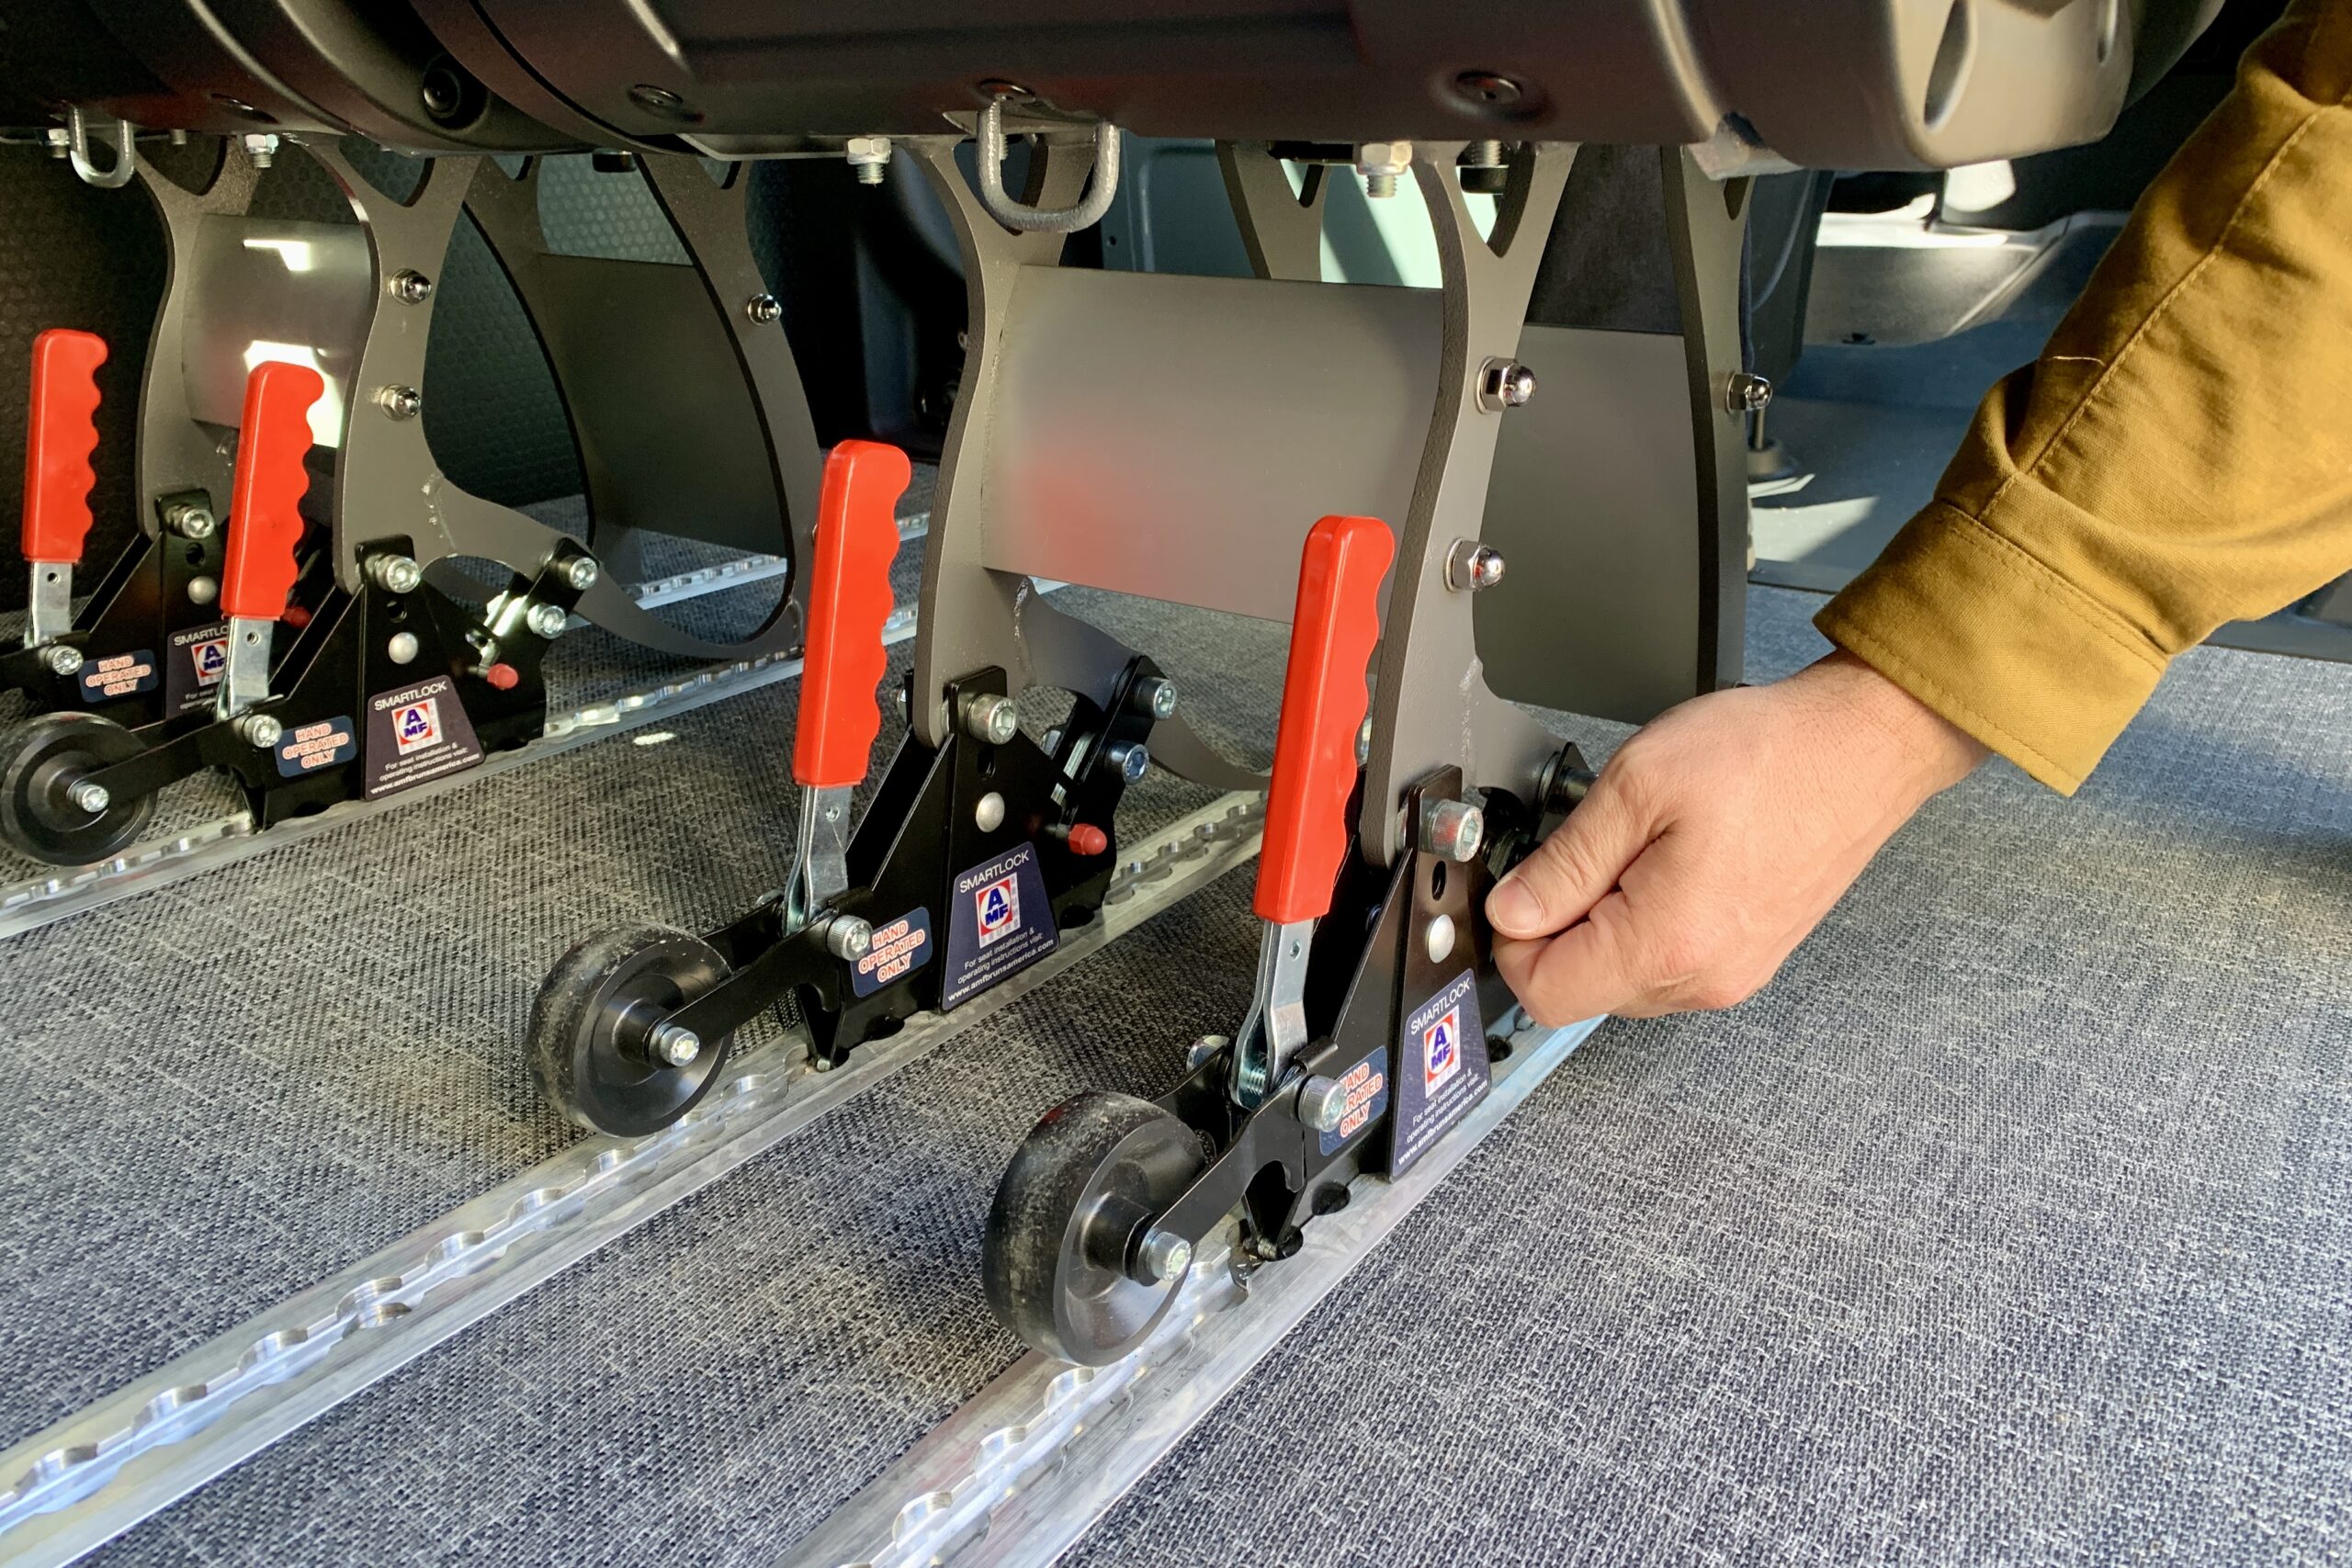
The L-track system runs along the floors and walls, both horizontally and vertically; (photo/Mary Murphy)
Customizations for the Adventure Wagon camper conversion include; various gear tracks, choice of bed platform configuration, choice of gear tray add-on, extra tracks, extra seats, refrigerator tie-down system, wall insulation and paneling, floor insulation, Espar diesel heater, ceiling fans, windows, upholstery, and various metal finishes.
And even though we were handed a vehicle straight from the Adventure Wagon Portland HQ, I actually went on the website and went through the entire build process to see what it would be like for paying customers. It’s easy to configure step by step, and the level of detail is impressive. The best part is, yet again, unlike many campervans, is that many of the build choices you have to make are not permanent — they are all modular pieces in the package.
If you don’t already have a van to upfit, Adventure Wagon has a van purchase program to help you out.
The L-track system on the floor can be configured with four or five tracks (depending on if you want to add rear seats) and certain accessories; (photo/Mary Murphy)
Things like the bed type (bunk or double) and configuration (long ways or wide) you won’t be able to change, but you can change the bed platform height to whatever you need at the time, like to fit more bikes, or if you want it lower for kids when in camping mode. Same with the extra seats, gear pods, and any of the rack or accessory add-ons — I highly recommend opting for a few you’ll think you’ll need, and you can always remove them when not in use.
Finally, with the 2023 Adventure Wagon Sprinter 4×4, you can opt for factory installation (5-day timeline at the Adventure Wagon HQ in Portland), through a certified installer, or DIY.
Put to the Test: Camping, Hiking, Skiing, and Climbing Basecamp
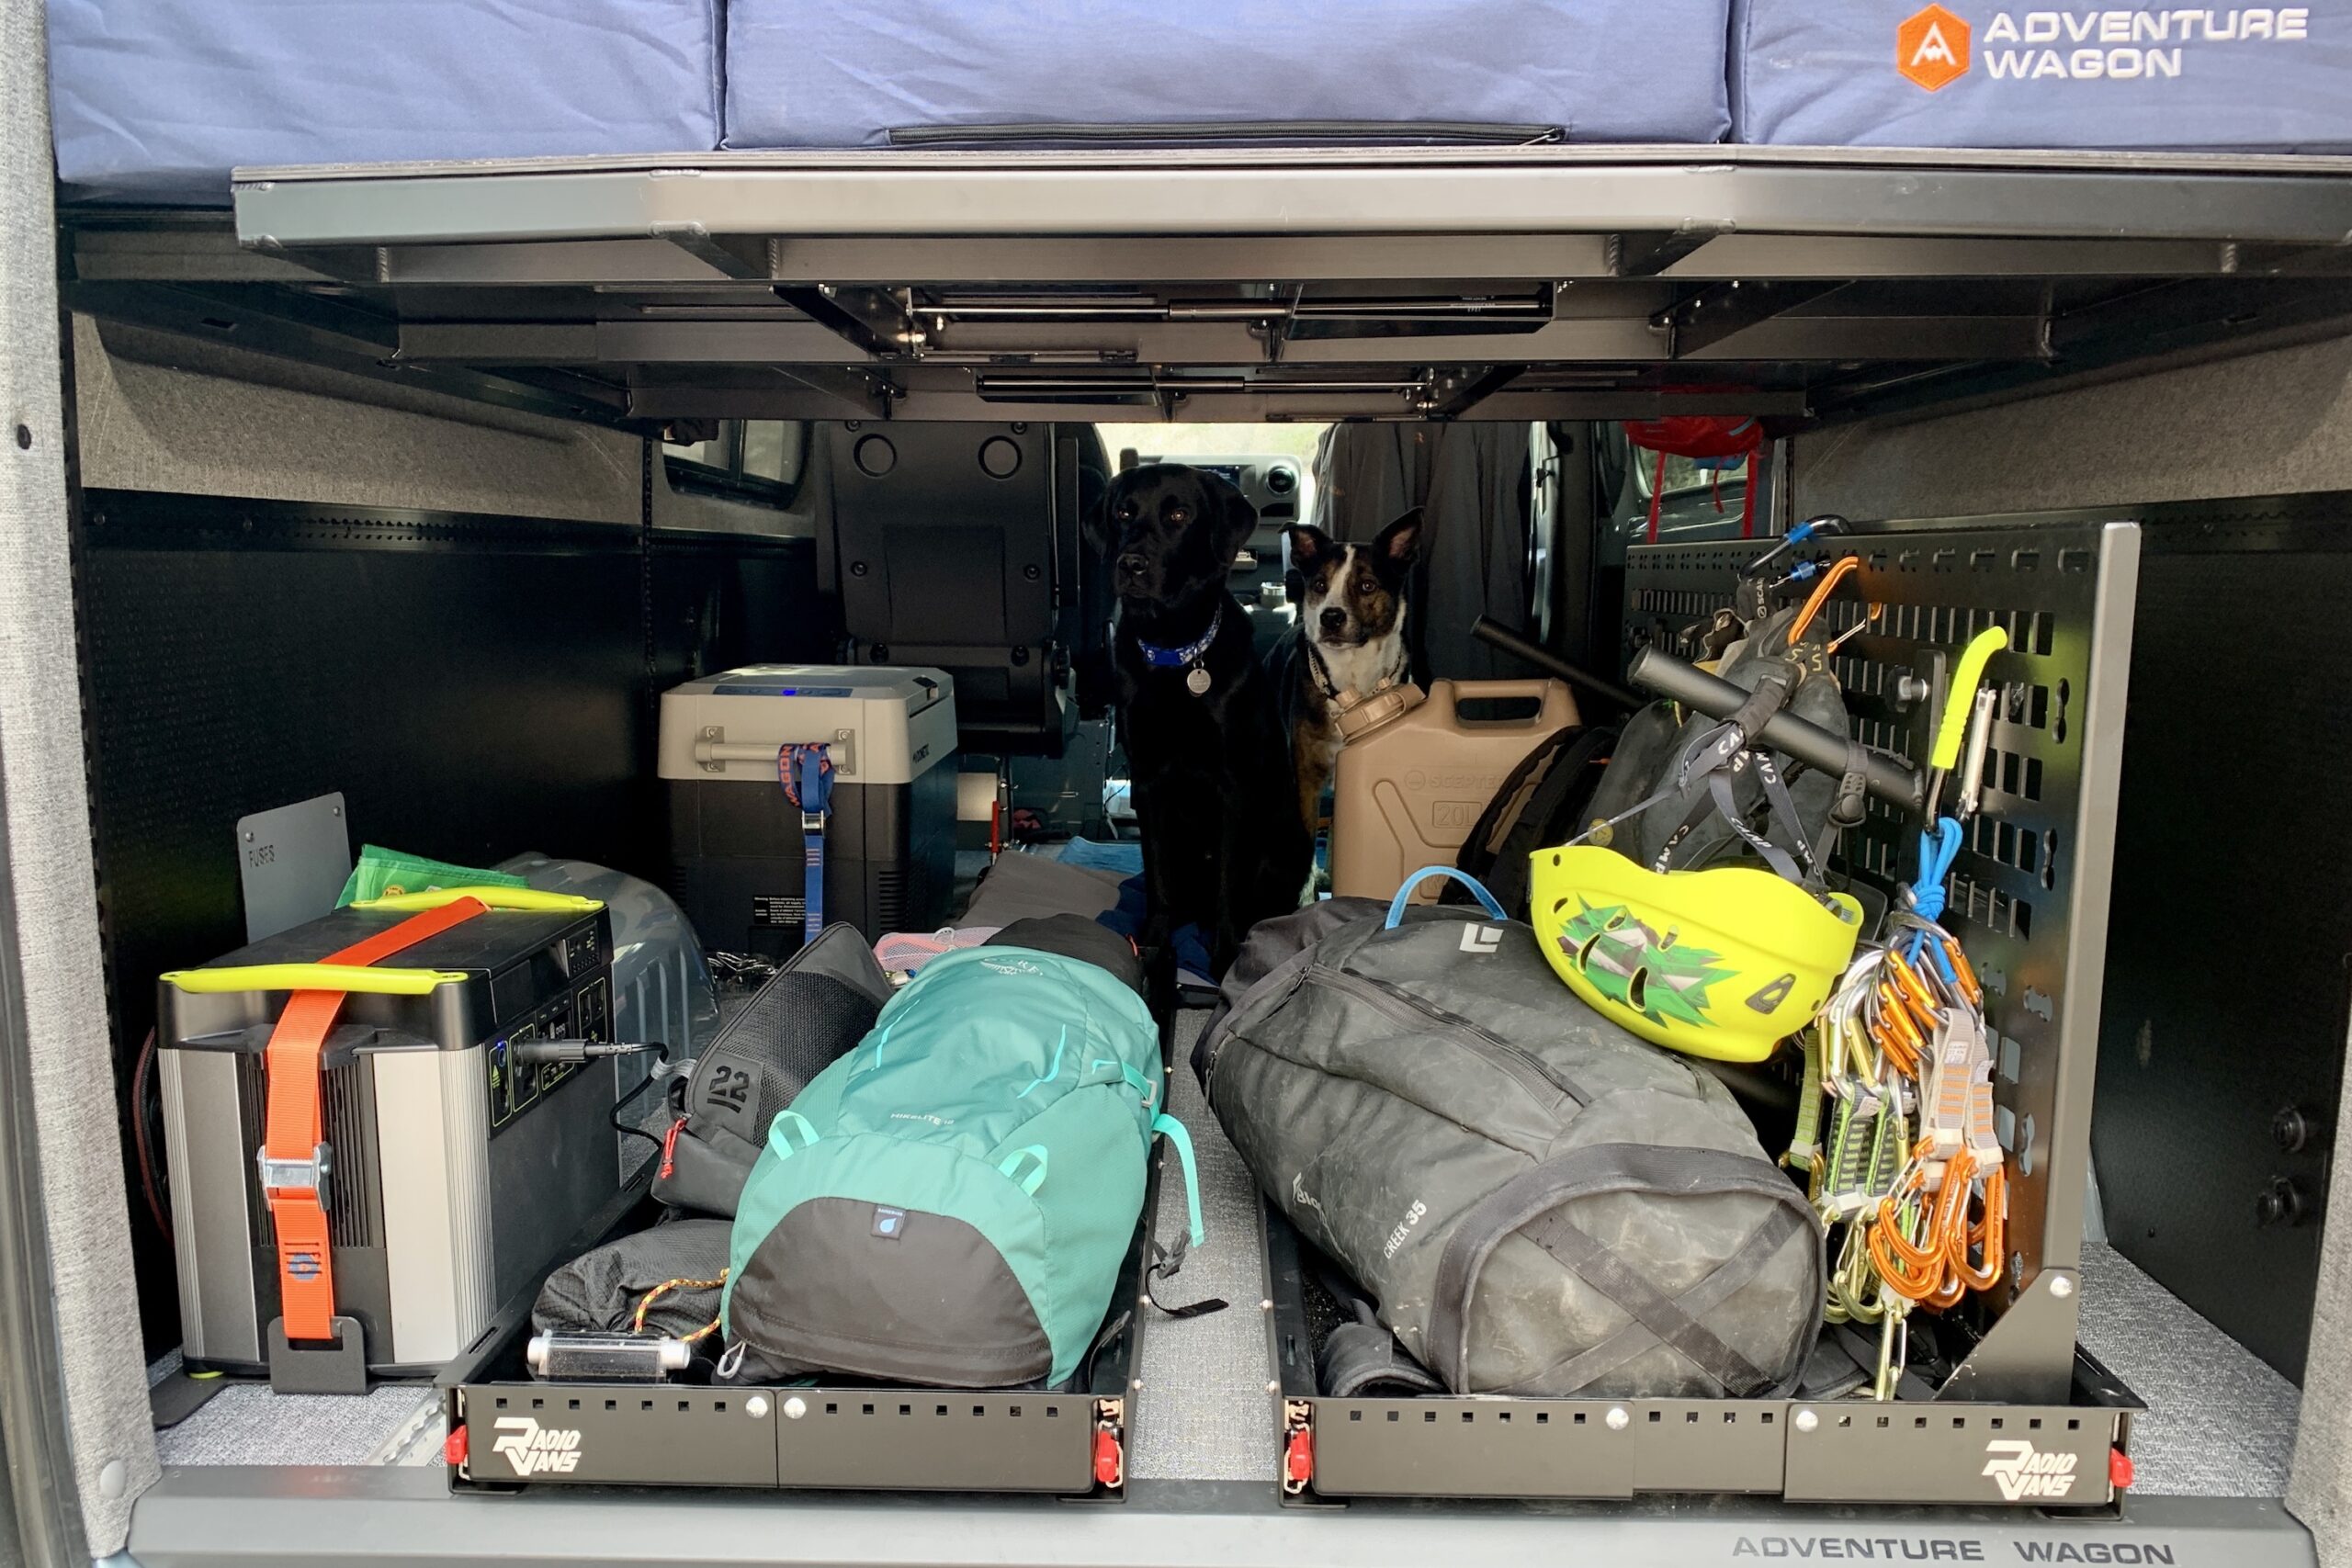
For a part-time van, or “base camp,” gear-hauling vehicle, Adventure Wagon really nails it. There’s no toilet or shower, galley kitchen. Nothing you don’t need. There’s no clutter (OK, built-ins) and that means so. much. room. 11
The Adventure Wagon is much more than just a shell of a van. It’s got lots of usable, modular potential. It’s not like the typical, modern-day van builds we all see so often. In Colorado, that’s a nice change of pace.
There’s electrical, there’s solar, and plenty of room to add a power station or more devices on board. In our van, we stashed a Dometic electric cooler, a water jug, and a Goal Zeropower station to keep things running.
A pile of climbing gear in the Adventure Wagon; (photo/Mary Murphy)
The best analogy I have for the Adventure Wagon is like the framing stage when you are building a house. All the bones are there, the structure. It’s standing. It’s starting to take shape. But you can also make changes and add as you continue building.
This is where Adventure Wagon’s modularity comes in. Thanks to Adventure Wagon’s build and installation of L-tracks, you can install or remove as much of the modular system as you want. Bike rack? Check. Ski rack? Check. Gear tray? Check.
And of course, if you are only planning on ever having two adults in the van (driver and passenger) you can choose not to add any extra seats. That being said, if you do opt for rear seats, they are easy to install and remove — in about 30 seconds.
The rear seat units are easily removable; (photo/Mary Murphy)
Modular Add-Ons
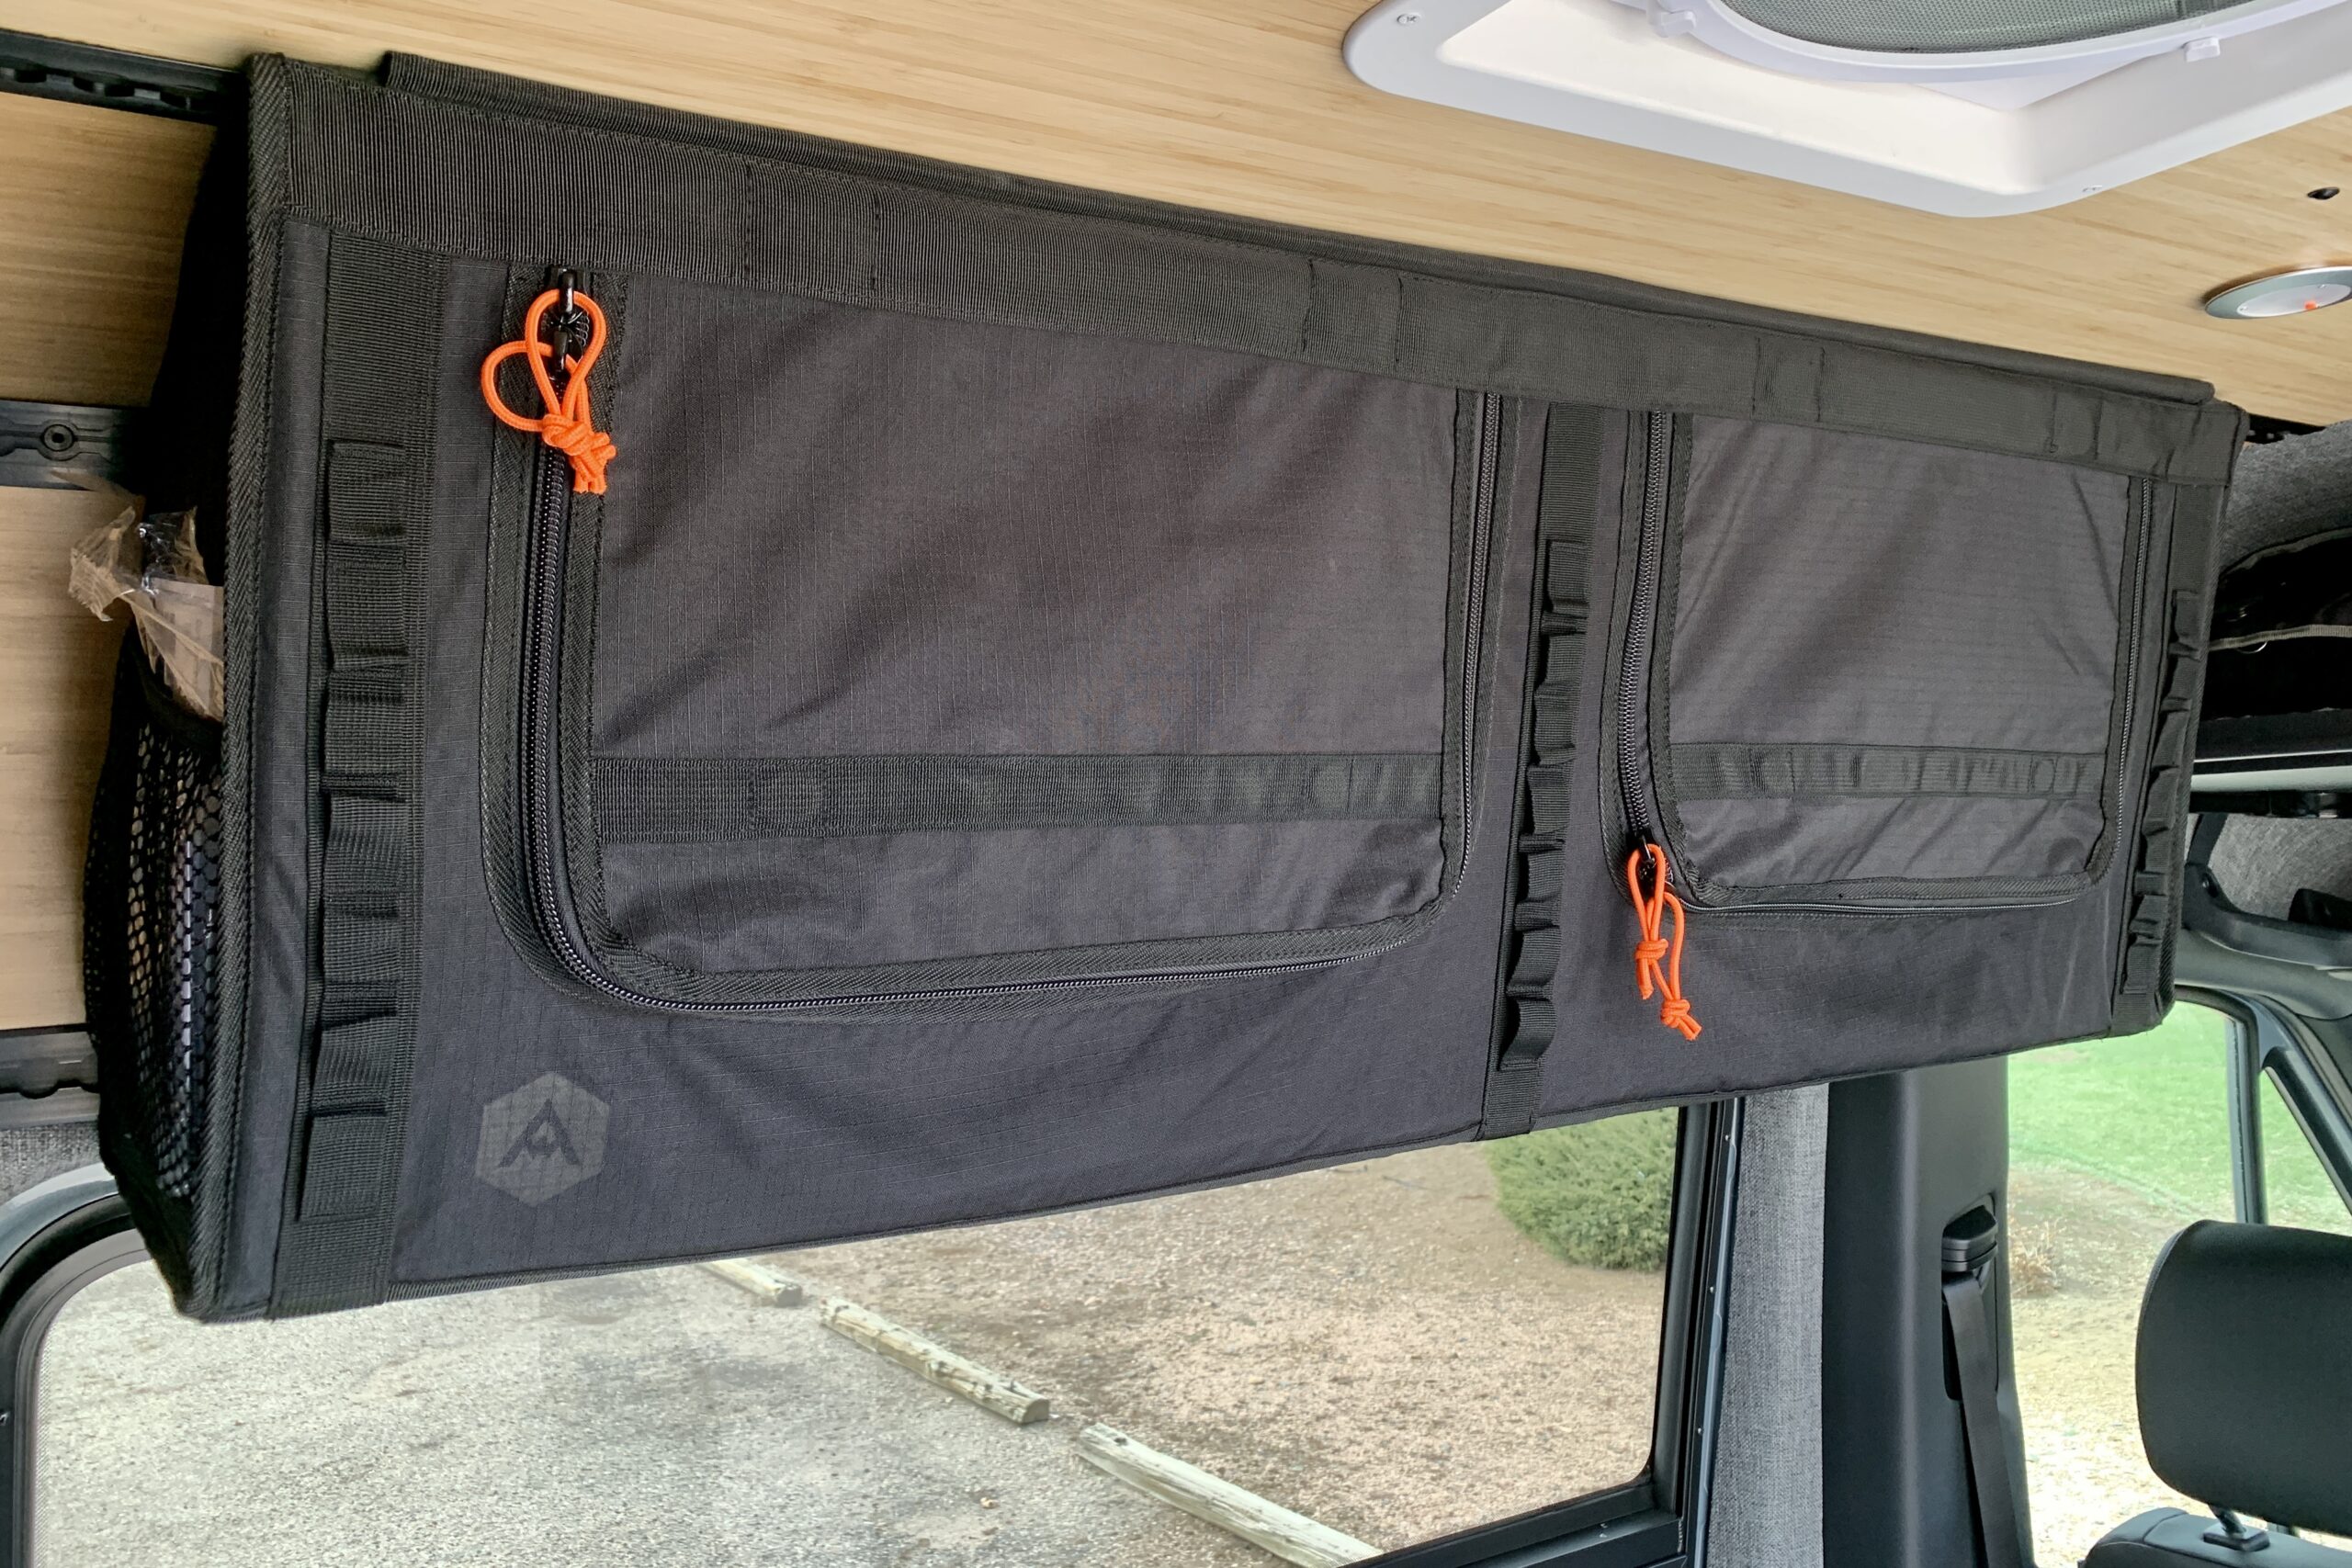
In just one week this April, I used every storage system feature in the Adventure Wagon, including the new-this-year ski rack (which can hold two pairs of skis or two boards, boots, and accessories), the gear tray, the extra passenger seats, and the brand’s “mule bags” (overhead soft-sided storage).
The Mule bags function like an overhead storage “locker,” similar to small closet cupboards you’d find in other campervan builds. A fantastic difference with these is that they are soft-sided, with mesh pockets on the sides and bottom, as well as lash points.
Even with just one or two of these bags installed, I found it super easy to stash, stuff, hang, and organize all my clothes and gear. They are also very easy to install/remove (there are six attachment points; three hand-turn knobs and three bolts requiring a 9/16-inch or 14mm wrench).
The Mule bags attached to the wall L-track system stayed secure while driving and could pack in a ton of gear; (photo/Mary Murphy)
In addition, I spent one night on the Adventure Wagon Moab mattress, which measures 77 inches long by 65 inches wide and 5 inches thick — wider than a full-size mattress, but shorter than a queen. It was plenty comfy.
One feature I didn’t have on this van conversion (but is available) was the option of MOLLE door panels, which I imagine would add a ton of useful and quickly accessible vertical storage on the doors themselves, especially if you are overlanding. Or, if you are parking for a while and using the rear doors and gear tray set up as a bike shop, gear garage, or camp kitchen area.
Adventure Wagon Sprinter 4×4 Review: Conclusion
If you look closely, you’ll spot two eager crag dogs, waiting for us to unload our gear; (photo/Mary Murphy)
After 7 full days in this van, I was super impressed by its versatility. It can adapt to whatever the adventure at hand, wherever you’re going. It can (and I did) seat three-plus people, plus dogs. And unlike other van builds, it just felt so spacious. It’s everything I needed, nothing I didn’t.
Not to mention, driving on questionable old forest roads down to a trailhead, driving in the snow, and driving in the rain was a comfortable and assuring experience in the Sprinter 4×4. If you are looking for a truly unique and high-storage capacity campervan, the Adventure Wagon Sprinter 4×4 should get a spot on your list.
Preheat the oven to gas 6, 200°C, fan 180°C. Bring a pan of water to the boil. Add the broccoli, cook for 3 mins, then add the kale. Cook for 3 mins, drain, then stir through the spinach to wilt. Rinse under cold water, then drain thoroughly.
Heat the butter in a pan over a medium heat. Add the garlic and cook for 1 min before adding the flour. Cook for 1 min, then gradually stir in the milk. Simmer for 2-3 mins until slightly thickened, then stir in 50g Cheddar.
Spoon a quarter of the cheese sauce on the bottom of a 20cm square freezerproof baking dish. Cover with a third of the lasagne sheets, then top with half the veg. Add another quarter of the sauce, another third of the lasagne sheets, then the remaining veg. Top this with another quarter of the sauce, followed by the remaining lasagne sheets, then remaining sauce. Sprinkle with the remaining Cheddar.
Cover with foil and bake for 40 mins or until golden and bubbling, removing the foil for the last 10 mins,
Meanwhile, toss the salad leaves with the tomatoes. Whisk the oil and vinegar in a jug, season, then drizzle over the salad. Serve with the lasagne.
Freezing and defrosting guidelines
To freeze, make up to the end of step 3 then cover with foil and cook for 30 mins. Uncover, leave to cool completely, then wrap in foil and freeze.To reheat, preheat the oven to gas 4, 180°C, fan 160°C. Remove from the freezer and bake straight from frozen for 45 mins. Remove the foil, and bake for a further 10 mins or until piping hot. Once reheated from frozen, eat on the same day – do not reheat a second time.
Heat oven to 220C/200C fan/gas 7. Line a 12-hole muffin tin with paper muffin cases. Stir the sugar and rhubarb together and set aside while you make the crumble topping. Mix together the muscovado sugar with the flour, oats and cinnamon, then rub in the butter until clumpy with your fingertips.
Stir the oil and egg, vanilla and buttermilk into the sugary rhubarb (don’t worry if it’s a little bit juicy). Now, add the flour, baking powder and bicarbonate of soda and stir well.
Quickly spoon into the cases, then scatter each with a thick layer of the crumble mixture. Bake for 15-18 mins until golden and a cocktail stick poked into the centre of a muffin comes out clean. Cool on a wire rack.
]]>
https://arsmatrix.com/blogs/news/cooking-is-easier-with-the-dreo-chefmaker2023-05-22T09:13:52-04:002023-05-22T09:13:52-04:00Cooking is Easier with the Dreo ChefMakeradmin
I enjoy cooking. Of course, that may be because I like food. My wife is an incredible cook and all of our children are great cooks as well. Though most of them are adults, whenever we get together as a family, everyone likes to pitch in and help prepare meals and share new recipes. My daughter and son-in-law even wrote and published a cookbook as a project while stuck at home during the COVID shutdowns. Since I also like to try out new tech, it is great when technology and the kitchen come together. Now there is something new that can make it easy to prepare food, even for those who do not know a lot about cooking. Dreo, a company known for quality products that circulate, heat, and purify the air, has entered the cooking market with their new ChefMaker. Since I recently reviewed and was impressed by their Aircrisp Pro Max Air Fryer, I was excited to try out this new kitchen appliance and see if it could cook as well as my family.
What Is the Dreo ChefMaker?
The ChefMaker is produced by Dreo and is a countertop kitchen appliance that uses Dreo’s patented CombiCook technology which combines convection cooking with moisture and a software designed to replicate the cooking procedures used by professional chefs. It can also air fry, bake, roast, broil, toast, reheat, defrost, and even dehydrate. The Dreo ChefMaker will launch on Kickstarter on Tuesday, May 23. Dreo is having a Launch Day Special where you can get the ChefMaker for a pledge of only $199. The Super Early Bird Special for May 24 and 25 will have a pledge of $229. After that, the pledge will go up to $259 for a limited amount of Early Bird pledgers and then to $279. Pledges will ship in July 2023. The ChefMaker will then launch on Amazon and the Dreo website later in July for $359.
The ChefMaker has the water tank on top and comes with a cook probe. Photo courtesy of Dreo.
Product Components and Specs
Here is what you get in the box:
1 Dreo ChefMaker
1 Nonstick cooking tray
1 Nonstick grilling rack
1 Cook probe
1 User manual
1 Quick Start guide
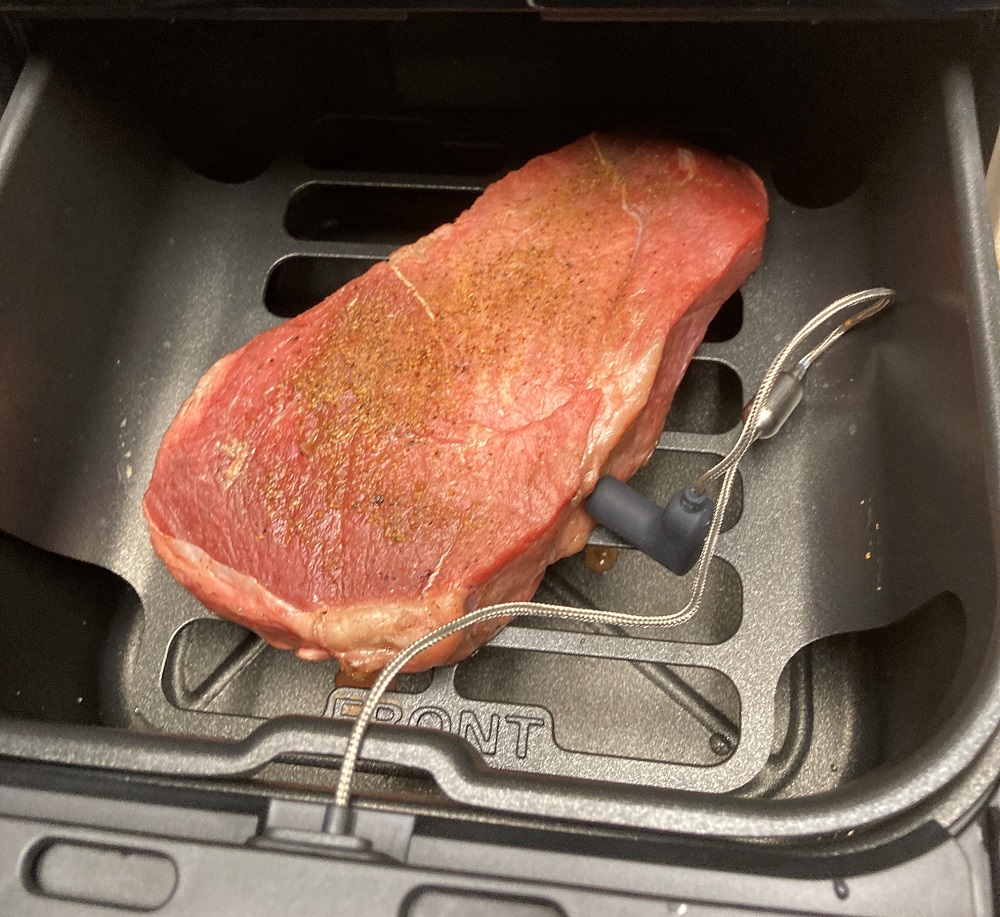
The ChefMaker stands a little over 15 inches high and is almost 11 inches wide and 15 inches deep. The ChefMaker comes in a stainless steel finish with a contemporary design. It features a 6-quart basket with a non-stick interior that is large enough for most cooking needs. It also includes a removable nonstick cooking tray that allows the heated air to circulate completely around the food for more even cooking and for grease to drip through so the food is not sitting in it while cooking. There is also a removeable grilling rack designed for cooking meats and holds the food up higher in the basket. A cook probe plugs right into the front of the basket and is used to monitor the internal temperature of meats during the cooking process.
The window in the basket and interior light lets you check on your food while it is cooking. Photo courtesy of Dreo.
A water tank is built into the top of the ChefMaker. It is used for cooking certain types of foods while using the Chef mode and atomizes the water to increase the moisture inside the basket. The ChefMaker’s cooking temperature ranges from 100°F to 450°F, allowing users to cook a variety of different types of food. The ChefMaker even has a window at the front of the basket and an interior light so you can view and check on your food without having to open the basket and stop the cooking. The controls are at the top of the front of the appliance and features a 5.6 inch LCD display that not only show options, but also provides cooking directions for preparing food with the Chef mode.
The Dreo app is a great way to control the ChefMaker. It lets you access all of the same cooking features as on the control panel. Once you set everything, it will send the settings to the device. You then only need to press the start button on the device to begin the cooking. The app also lets you know how much time is remaining for programmed modes or monitor the temperature
How to Use the Dreo ChefMaker
The ChefMaker is easy to use. Just plug it in and it is ready to go. All of the controls are on front at the top. To use the app, download the Dreo app from the App Store or Google Play store (a QR code is included in the quick start guide and user manual) and the app will walk you through connecting the ChefMaker to your Wi-Fi and to the app. When you want to cook something, choose one of three modes: Chef Mode, classic cook or probe cook. Chef Mode provides CombiCook programs for several types of meats as well as vegetables. It will let you know if you need to fill the water tank or use the probe. The directions on the screen will even provide preparation instructions to help improve the final quality of the food. For example, it may tell you to brush butter on your steak for better browning or to wrap the meat in foil or parchment paper. For some meats you can even choose a classic cook or sous vide flavor. Currently there are 44 Chef Mode programs. However, most can be adapted to similar types of food.
Cooking a sirloin steak on the grilling rack with the cook probe. Photo by Michael Knight.
In classic cook, you can choose the type of cooking you would like to do from eight different options: air fry, roast, defrost, toast, reheat, bake, broil, and dehydrate. Each of these have default settings. However, you can adjust both the ambient temperature as well as the cook time. The classic cook mode operates similarly to a higher end air fryer. Finally, the probe cook mode lets you set the target probe temperature as well as the ambient or cooking temperature. When the internal temperature of the food reaches the target probe temperature, the ChefMaker ends the cooking process.
This steak was cooked in Chef mode at the classic flavor setting. Photo by Michael Knight.
Why You Should Get the Dreo ChefMaker
Our family has been getting a lot of use out of our air fryer. In fact, our teenagers really like it for cooking snacks and meals as well as reheating leftover pizza. (Once you have used an air fryer to reheat your pizza, you will never use a microwave for the job again). While the ChefMaker can do all of the things an air fryer can do, it also features an innovative smart technology that can measure the internal temperature of food while it is cooking as well as the moisture content of the food. The Chef mode is really where the ChefMaker shines. The programming takes into account various cuts of meat including the thickness, fat content, moisture content, and connective tissue content. The algorithm then takes all of that information and adjusts cooking temperature in real-time. For example, for a steak, it will raise the temperature at the start to begin the process and then lower the temp to cook the meat all the way through. Towards the end, the temperature is raised again to give the meat a nice brown exterior.
The LCD display shows all the available programs in Chef mode. Just select what you want and the ChefMaker will take care of all the settings. Photo by Michael Knight.
Our family enjoys a good steak. Over the course of years and years of experimenting on the grill, I feel like I can cook a delicious steak. I have my own process of changing the temperature, rotating, and turning the steaks, and knowing the best spots on the grill. Therefore, I decided to put the ChefMaker to the test against my own cooking expertise. I set aside one steak to cook in the ChefMaker and the rest I cooked on the grill. I seasoned them all the same and did the same preparations. For the steak in the ChefMaker, I followed the directions and used the grilling rack, the cook probe, and put water in the tank. I then set it at the desired doneness and started it. 25 minutes later it was done and I did not have to do anything else once I pressed the start button. Meanwhile I was constantly monitoring and working the grill. At the end, all of the steaks were delicious, tender, and cooked perfectly. The only difference my family noticed was that those on the grill had that “grilled” flavor. Other than that, they were pretty much the same. The difference was the effort and experience. On another occasion, I tried cooking a steak in Chef mode and the sous vide flavor setting. It took longer to cook, nearly an hour, but came out very tender and delicious with the pink right to the edge. The app even let me see which of the four steps was taking place: raising temperature, achieving doneness, pre-sear, and then browning.
Notice how the sous-vide flavor setting in Chef mode provides a consistent doneness right to the edge. Photo by Michael Knight.
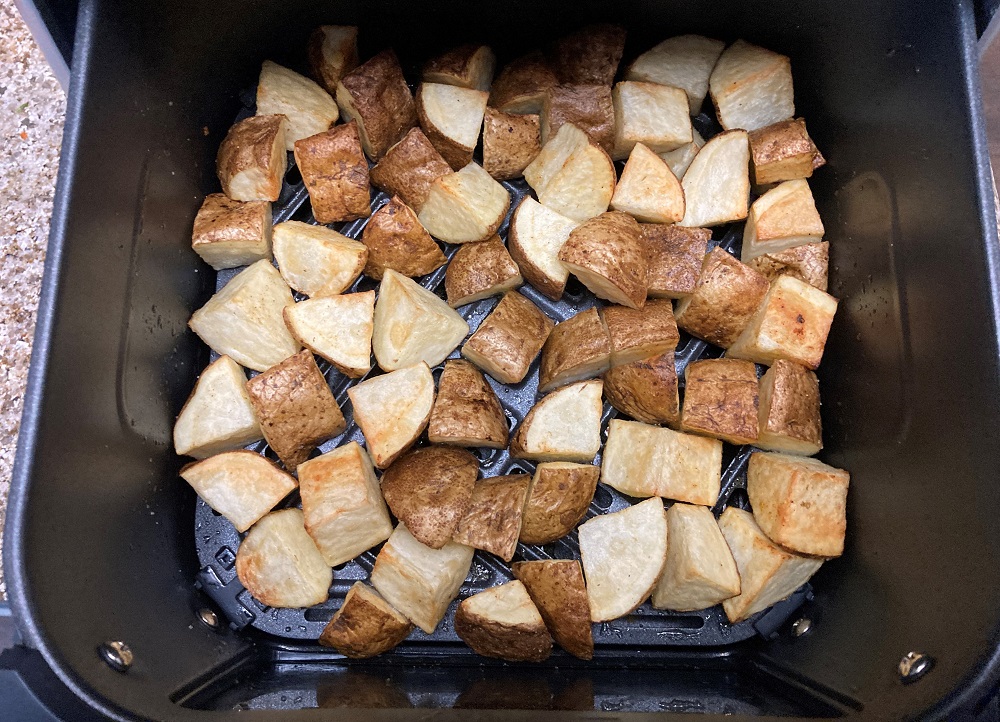
In addition to cooking meats, the Chef mode is also great for vegetables. I used it to cook asparagus and it came out delicious. All I did was brush it with some olive oil and sprinkle salt and pepper and then let the ChefMaker do all the cooking. It took me about 15 minutes to prep and cook. Doing it in an oven would have taken longer. I also tried cooking chunked potatoes. We sometimes like eggs and potatoes for breakfast. All I did was cut up some potatoes, spray a bit of oil on them and add some seasoning and then start the ChefMaker. 20 minutes later, they were ready to eat.
Roasted potatoes in 20 minutes. Photo by Michael Knight.
While in Chef mode, you can pretty much start it and not worry about it until it is done, I like the window at the front of the basket. When I am cooking in classic mode, I can turn on the light and look through the window to see if I need to decrease or increase the time to achieve the desired doneness or browning without opening the basket and stopping the cooking process. The nonstick basket, cooking tray, and grilling rack are very easy to clean. Plus you can store everything in the basket when not cooking.
My family likes cooking with the ChefMaker. Since it does not take constant monitoring, we can put food inside it, start the cooking, and then go do something else while waiting. I can check the status from my phone. It does not take up much room on the kitchen counter and is quicker and easier than using an oven. In fact, before using the oven, we are asking ourselves, “Can we cook it in the ChefMaker?” My daughter even baked a small batch of cinnamon roles in it.
I am very impressed with the Dreo ChefMaker. While it may look like and function like an air fryer, it offers so much more. If you are considering getting an air fryer, then I highly suggest considering the ChefMaker. Even if you already have an air fryer, you may still want to upgrade so you can do so much more cooking with it. We will be keeping our Dreo AirCrisp Pro Max air fryer and can now cook two different things at the same time. Be sure to take advantage of the launch day and early day specials. The launch day special of only $199 is a 45% discount and an incredible deal. Dreo is also offering a promotional giveaway where three lucky winners will each get a ChefMaker. Enter before May 31st.
Disclosure: GeekDad received a sample of this item for review purposes.
Click through to read all of "Cooking is Easier with the Dreo ChefMaker" at GeekDad.If you value content from GeekDad, please support us via Patreon or use this link to shop at Amazon. Thanks!
]]>
https://arsmatrix.com/blogs/news/homemade-pasta2023-05-17T15:13:51-04:002023-05-17T15:13:51-04:00Homemade PastaadminThis easy pasta recipe requires only two ingredients and has incredible flavor and texture.
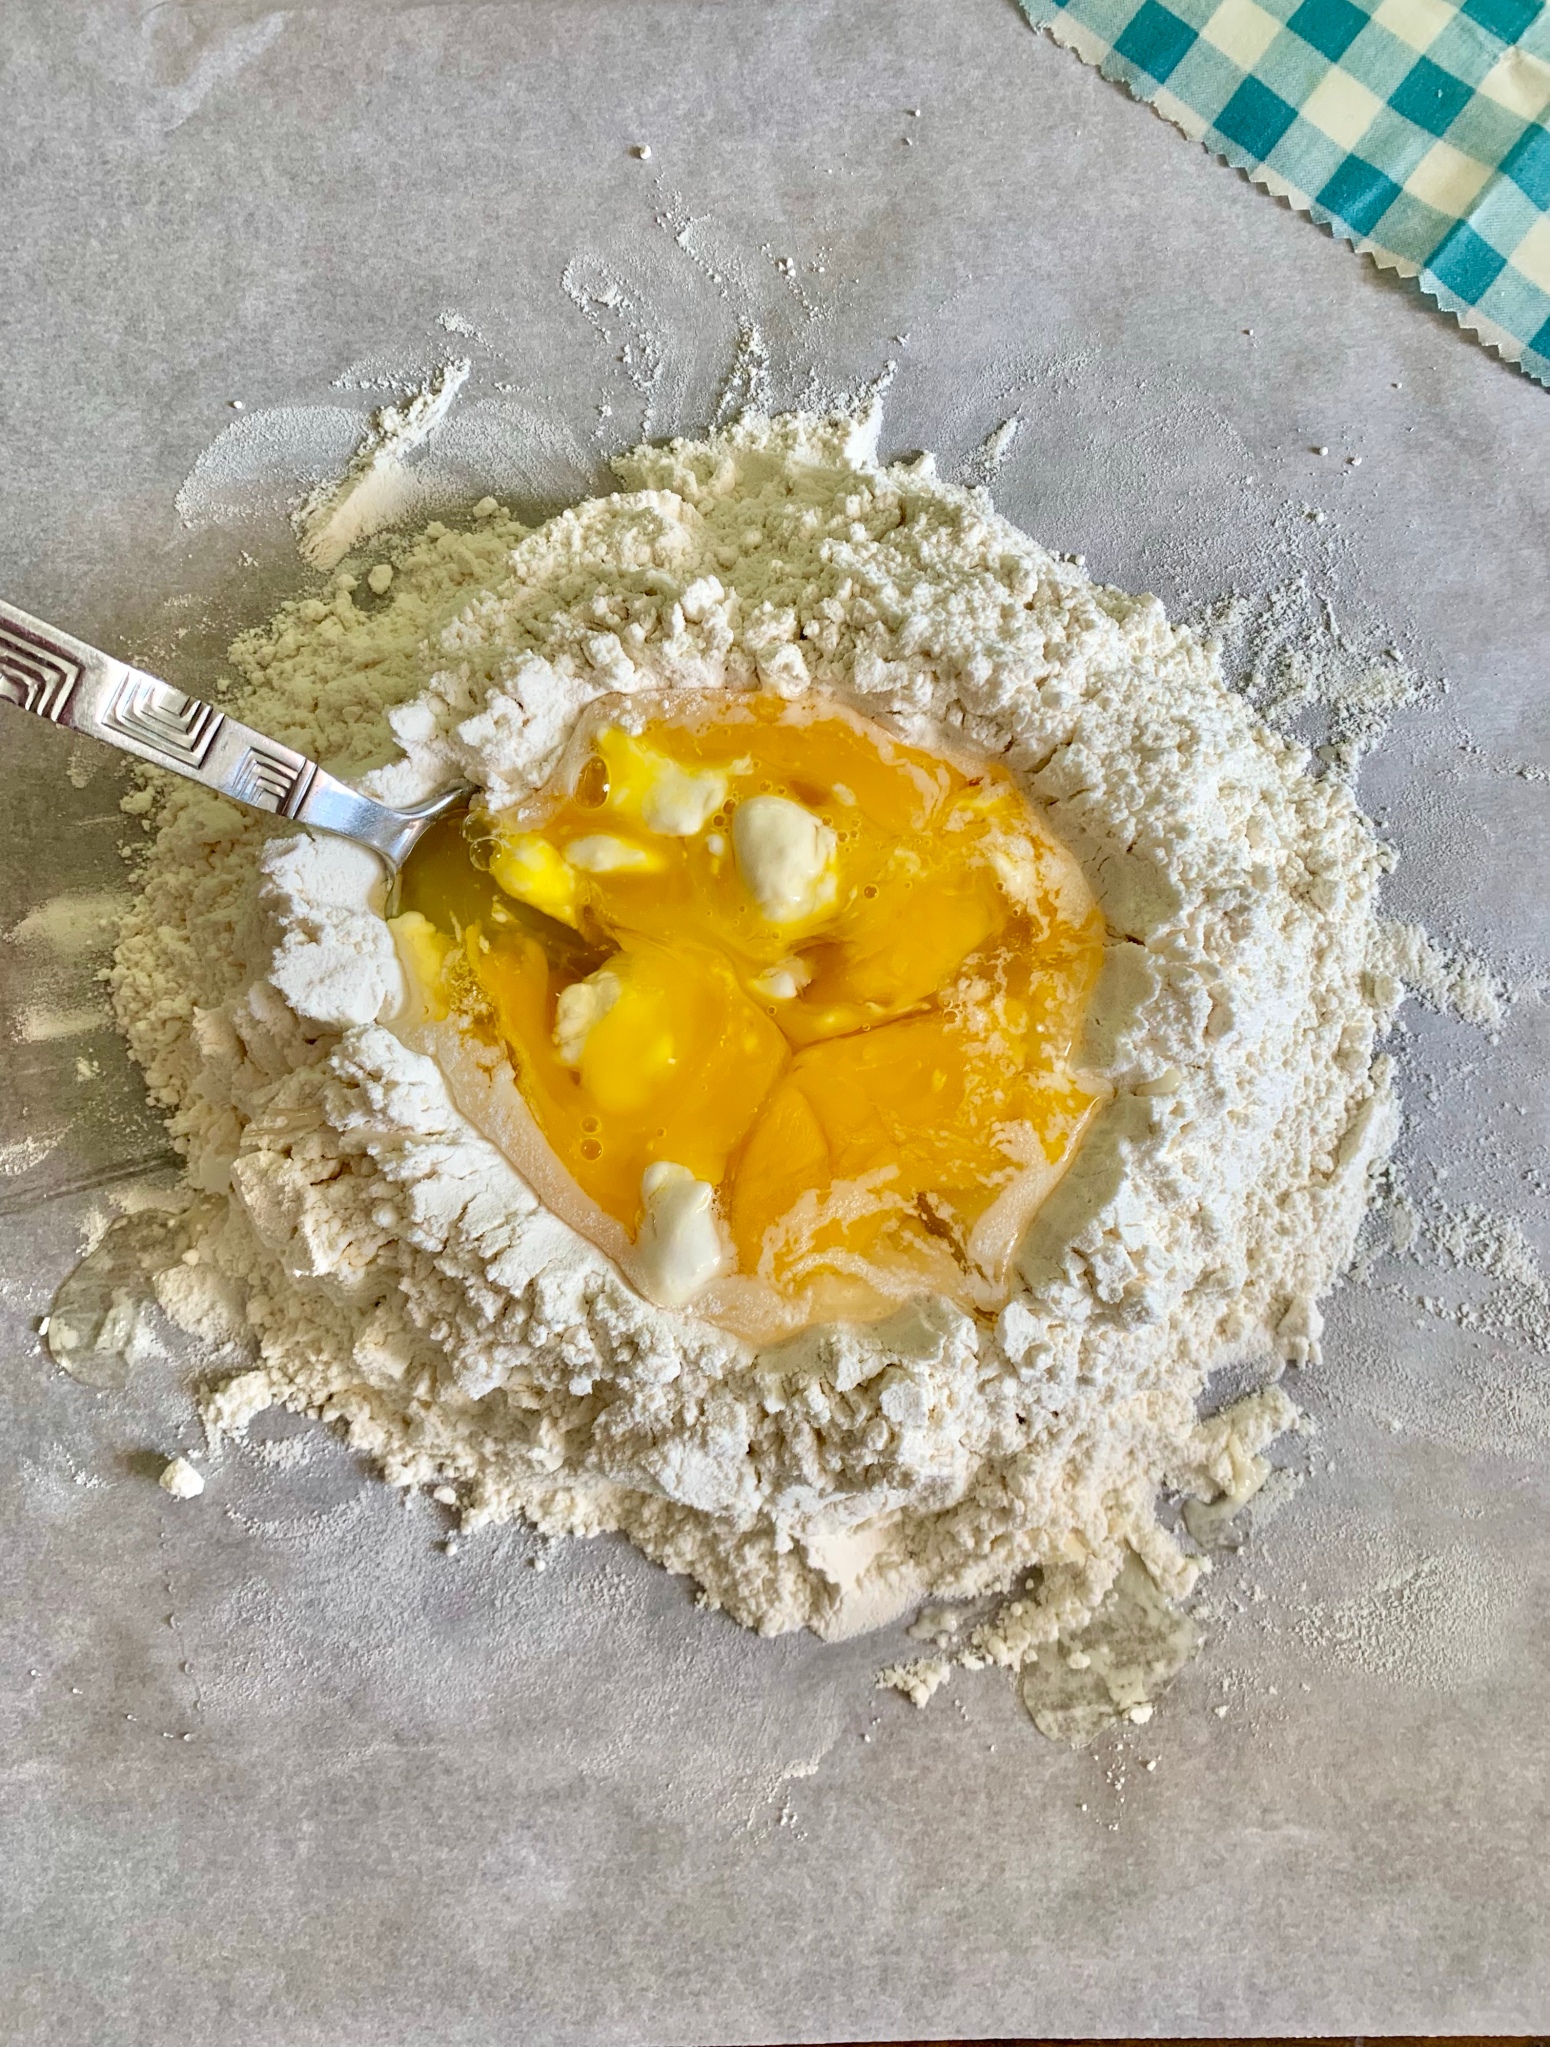
My whole life I’ve always bought pre-made pasta. I thought that homemade pasta would be too difficult and should only be reserved for experts. Looking into the price of kitchen-aid pasta attachments also had me steering clear of trying. I never realized how simple and easy it truly is.
To make this pasta recipe you only need two ingredients and you honestly do not even have to own a pasta maker. No excuses not to try! While it definitely isn’t as quick as dumping a box from the store, the flavor and texture will keep you coming back for more of that homemade pasta.
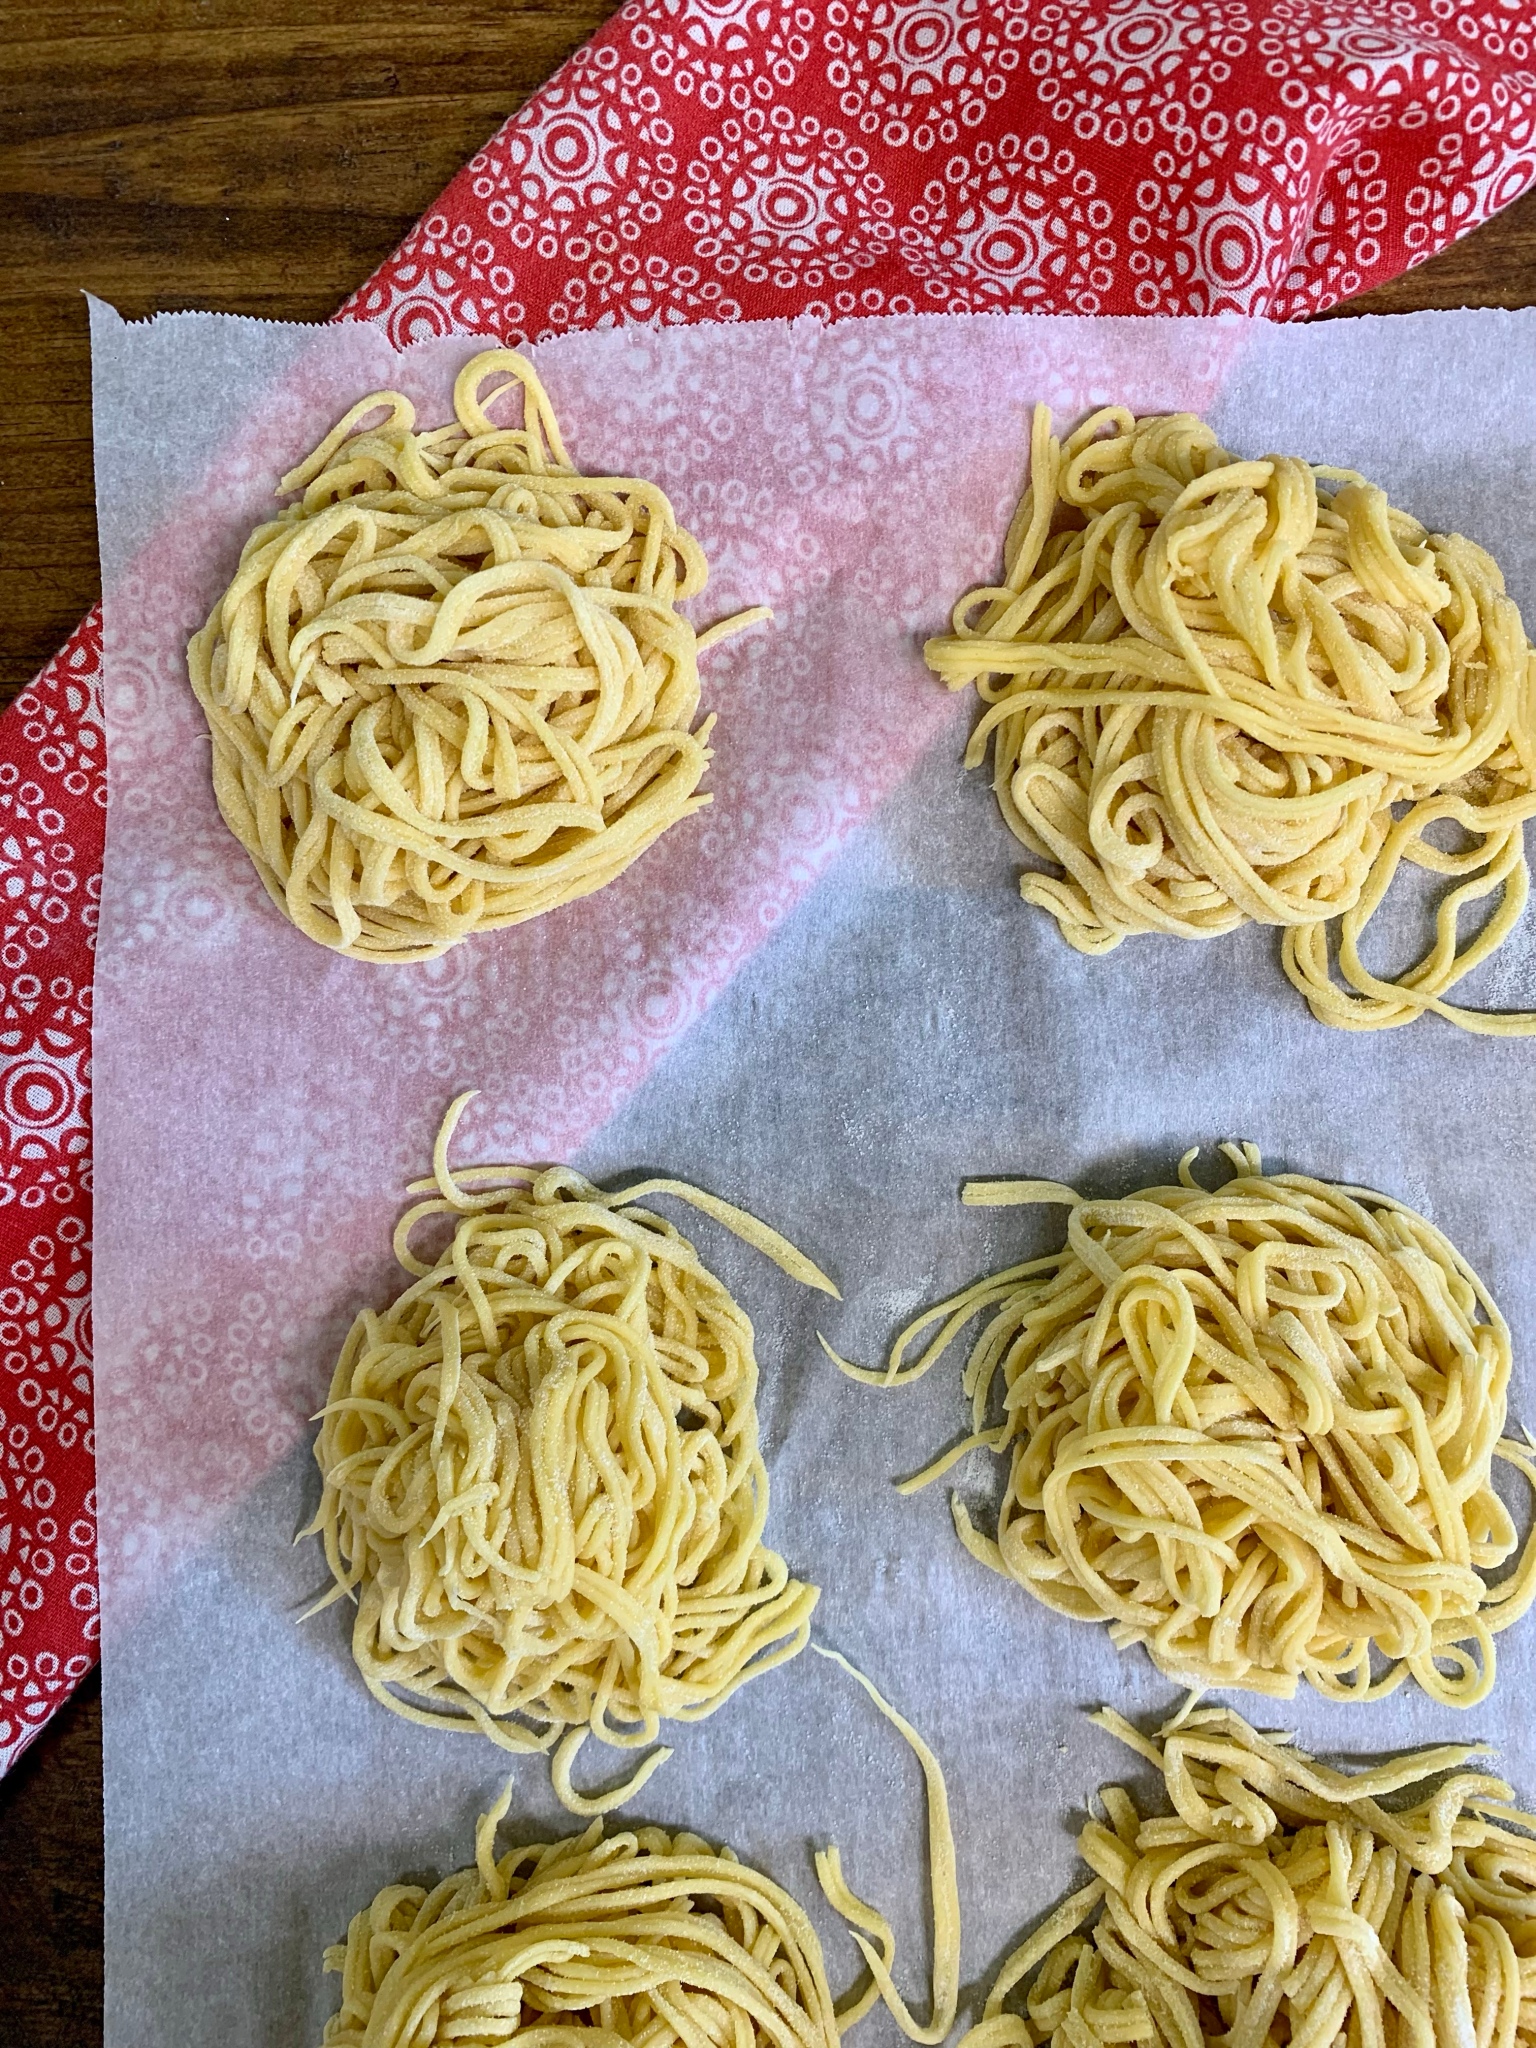
Another part of homemade pasta I enjoy is that it is a family affair. My girls love to crank the handle around and watch the lump of dough turn to flat strips and eventually spaghetti. I love that they enjoy taking part in making this from-scratch part of dinner with me. Even if it is messier when they are around. Learning through our mess.
Benefits
Homemade pasta is just eggs and flour therefor it is fresher and also pulls in that unique taste. Store-bought pasta is mass-produced and you lose some of the nutritional value. The eggs in the pasta add that nutritional boost of vitamins, nutrients, and protein.
The eggs present in homemade pasta also make it more filling.
Homemade pasta eliminates the additives and preservatives that store-bought kinds of pasta contain. These chemicals are used to preserve the shelf life.
Tools
Bowl or baking mat
Fork
Pasta cutter or maker
Measuring cups or scale
Pasta drying rack (optional)
Recipe & Instructions:
Ingredients:
4 eggs
400 grams all-purpose flour
Making the Dough:
1. Pour the flour on a mat or flat surface.
2. Make a well in the center of the flour.
3. Crack the eggs into the center of well.
4. Whisk together eggs and slowly incorporate the flour.
5. Finish by kneading the dough with your hands until smooth and let rest for 20-30 minutes.
6. Divid dough into six equal pieces.
Using a Pasta Maker:
1. On the largest setting slowly crank the dough through the slot.
2. Fold in half and repeat two more times on the same setting, dusting with rice flour each time.
3. Keep moving the setting down one at a time as you crank it through until you get to your desired thickness. For example, mine starts at 7 and the lowest setting is 1. I normally feed through until the 3rd setting.
4. Take your flat strips and feed them through the opposite side to cut into spaghetti or fettuccine noodles.
5. Lay noodles across a drying rack or tea towl to dry for about 30 minutes. You can do this in groups or flat.
Without a Pasta Maker
1. Divid dough into 6 equal pieces.
2. Roll out with a rolling pin to a very thin thickness.
3. Cut with a knife or pasta cutter.
Cook
1. Bring a pot of heavly salted water to a boil.
2. Boil on high for 3-5 minutes.
3. Strain and enjoy!
Tips
Use rice flour to dust the pasta with to prevent sticking. Adding more flour will just absorb into the pasta causing the problem to continue.
Fill a bowl with rice flour and place it next to the pasta maker. Dust the noodles with rice flour to prevent sticking.
If the dough is too stiff add a tablespoon of water at a time. If it is too loose, add a tablespoon of flour.
Allow the pasta to dry for 30 minutes to an hour before cooking.
Storage
If you happen to have any leftovers, the cooked pasta needs to be stored in the fridge in an airtight container for 2-3 days. If you want to store the pasta dry, it needs to be allowed to dry for 24 hours before storing it in an airtight container or bag.
While there is definitely more work to be done with homemade pasta, the flavor and knowledge of all natural ingredients makes it work the effort. Throw the kids in there for another level of excitement.
For more recipes and homemaking projects follow along with me @overeasyhomestead on instagram. Or subscribe below for more recipes.
Here are a few of my other recipes you might enjoy:
]]>
https://arsmatrix.com/blogs/news/overlanding-is-car-camping-fight-me2023-05-16T21:13:50-04:002023-05-16T21:13:50-04:00Overlanding Is Car Camping: Fight Meadmin
The occupants of the other car were in a flurry of activity. A rooftop tent was erected, and solar panels were deployed. The driver set up an elaborate kitchen while the passenger mapped the perimeter with overhead lighting. A deep subwoofer thump shattered the soothing sound of waves crawling up and down the beach.
“Hey man, do you think that is a good idea? We are camping!” I yelled between beats.
“No, we are overlanding,” was the response.
I didn’t know it then, but the word “overlanding” soon grated on me. Fast forward about a decade to today, and “overlanding” has exploded in popularity with a seemingly ever-ascending price tag. And it has potentially fostered a stigma against “car camping.”
What, because you have a vehicle and wallet that can support a rooftop tent (RTT), you’re overlanding, and I’m not? Am I not overlanding if I don’t have a platform roof rack? If I just pull up to the USFS campground in my unmodified Honda Accord and get my Walmart pup tent out of the trunk, am I not overlanding? Are you looking down on me from your lifted truck?
Be careful, you fell off your RTT ladder last night (I do hope your ankle is better). I will say your face is healing nicely. Please don’t burn it with your million-lumen rack lights — that would feel terrible.
What Is Overlanding?
[TAG1]Jeep Grand Wagoneer overland concept; (photo/Bryon Dorr)
I admit that it’s hard to give a hard description of the term “overlanding.” The lines are fuzzy, and clear delineations don’t exist. I’m not a linguistics expert, so I drew from overlanding sources with street cred.
“Self-reliant adventure travel to remote destinations where the journey is the primary goal. Typically, but not exclusively, accommodated by mechanized off-highway capable transport (from bicycles to trucks) where the principal form of lodging is camping; often lasting for extended lengths of time (months to years) and often spanning international boundaries. While expedition is defined as a journey with a purpose, overlanding sees the journey as the purpose” is, or at least was, an accepted definition parlayed by Overland Journal.
I was granted generous interview time with Brian McVickers, one of the head honchos at Overland Journal. He agreed wholeheartedly that although overlanding does have a foundational definition, the many ways that people are finding to participate in overlanding are evolving that definition to accommodate the time and opportunity available.
McVickers repeatedly expressed his desire to avoid elitism and exclusion. “I don’t want to tell the enthusiastic family that camped at the local state park, using their minivan, that they weren’t overlanding if it was an inspiring adventure for them, that is what matters. If they are encouraged by their local adventure they could go on to explore the world for all we know,” McVickers said.
“Overlanding is vehicle-based adventure, but I believe the vehicle must be capable of transporting the participants and necessary gear to the desired location.”
I asked Reed Frick, former product director for Dometic and current consultant in the same field. Dometic invests heavily in the overlanding market, selling everything from powered coolers to storage boxes. Reed stated, “Car camping is about the destination. You camp to ride, fish, hike, ski, etc.”
“Defining overlading is a hard thing to do, it means different things to different people these days,” said Mercedes Lilienthal, an automotive journalist and contributor to GearJunkie. “In the past, it meant prolonged self-reliant travel across many countries in sometimes harsh environments where safety and experience can get one through various tough situations. In today’s world, however, ‘overlanding’ can mean something as short as a weekend camping trip to a local state park off the beaten path with a family that’s never let their all-wheel-drive seven-seater leave the pavement before. The term overlanding has become somewhat of a heavy-hitting buzzword for adventurous car camping, in my opinion.”
Ah, semantics.
Whichever way you lean on the definition, there is no denying that overlanding links to vehicles and that the market has grown tremendously, especially during the peak COVID times. There isn’t solid data citing the total revenue in the overland industry, but its consumer tradeshow has grown substantially.
[TAG2]Close your books, it’s time for a pop quiz. Is this overlanding or car camping? (image/miniwide via Shutterstock)
Set aside the focus on the destination or activity. Car camping is, well, camping, and getting to the campsite by car. Imagine a family in a campsite, tent within sight of the car. A park-supplied picnic table and grill, set up under a shade structure. It’s sort of the classic, almost pastoral, scene of working-class Americans enjoying the outdoors.
But it’s not too far an extension, if at all, that this family is overlanding. Maybe the family had to engage 4WD in their SUV to get to this park — likely not —and maybe they’ve been on the road the entire summer without a solid plan. Now they fit in the “accepted” definition. Are they overlanders?
If so, again, by logical extension, overlanding is car camping.
Larry Jarriel, former community manager/tech rep/content manager at Dometic, had this to say: “Car camping is overlanding and vice versa. Both enthusiasts are looking for community — they just get to that end goal in a different way.”
McVickers further surprised me with this curve ball:
“Car camping requires one to camp. Overlanding doesn’t necessarily mean camping. Plenty of epic overlanding trips have been done without ever spending a night out camping. Sometimes these adventures link hotels or other places to stay. Remember that part of the adventure is experiencing culture, food, activities, and historical sites.
“An overlanding trip often brings adventurers into small villages, towns or even larger city centers and the remote backcountry. You can’t have all those experiences if you are trying to camp isolated in the mountains every night. The perfect adventure will have a mix of all of it.”
But things continued to get confusing. Again, Lilienthal: “We feel that all overlanding with a vehicle is car camping but not all car camping is overlanding … sometimes.”
She continued, “However, if you’re taking your 1985 Toyota Corolla to the local KOH for an ‘overlanding’ adventure, you may as well leave your MAXTRAX recovery boards and satellite phone at home — it’s not that kind of jaunt. But, if you find yourself stuck in the soft sands of the Sahara, get yourself recovered and carry on to explore six other countries; that’s more of our definition of overlanding.”
So, with all these tangled definitions, I wonder: Who cares? Does the definition matter? We all got here in a car, traveled to a cool spot, and we’re camping — or not — and it’s fun.
But I think some do care. I asked for quotes from overlanding insiders for this article, and half of them refused for fear of backlash from certain portions of the outdoor industry. Let me explain.
Overlanding: It’s All About the Gear
[TAG3]Overlanding or overloading? (photo/Creative Commons)
I believe overlanding is at least partially about creating a category and selling gear to that category. Overlanding seems to entail expensive gear (that may already exist in “camping” form), while car camping doesn’t require specialized equipment. Car campers may not pay more for a toiletry bag branded as “overlanding,” but I bet an overlander will.
An internet search on the word “overlanding” produces endless pages mostly focused on preparing the vehicle, necessitating content on products ranging from the actual base vehicle down to the phone mount. From RTTs to kitchen utensils, the overlanding interwebs are filled with an endless supply of premium goods to attach to the car, fill the car, or use at the destination.
By contrast, I had to scroll down to the 16th entry in a “car camping” search before the linked page was primarily about gear. The listings focus on “how to’s,” and some did mention products, of course, but for the sake of explaining methods. And many of these aim at doing it on a tight budget.
Jarriel added that overlanding is “more aligned with preparing the rigs for the adventures” and that the participants “talk a lot about what they’ve done to their vehicles.”
So, the internet emphasis on the vehicles and gear isn’t surprising. But wait, wasn’t it supposed to be about the journey?
[TAG4]Accoutrement? I got your accroutrement; (photo/Bryon Dorr)
Very active forums describe exotic and impressive builds, and pundits argue the merits of one onboard air compressor compared to others and debate over the best mounting location and wiring schematic. I dare say that overlanding is a lifestyle that requires one to festoon what was a perfectly capable vehicle with every conceivable doodad. I’ve seen admittedly impressive builds more than double the vehicle’s base value.
These modifications, often done with a firehose of money, can leave a vehicle less capable in the handling department and woefully short on fuel economy.
Bryon Dorr, our Motors Editor, had this to say: “Overloading is the new overlanding. But don’t be that person. The laws of physics can’t be overcome. Weight in your vehicle reduces performance and fuel economy/range and wears parts out quicker — meaning more money and time spent on maintenance/repair. Adding weight up high on your vehicle, like big heavy rooftop tents, multiplies many of these issues. Enjoy the comforts vehicle-based travel provides, but don’t fall into the overland gear trap.”
Why did I write this? Why do I care about the semantics of overlanding and car camping?
I’ve seen the outdoor industry spawn a new overlanding category, filling it with products that often resemble something already sold to front country campers. Chairs, sinks, tables, you name it. But tag it as “overlanding,” and the price can skyrocket, as can the attitude.
I distinctly feel that overlanders look down on “car campers.”
I asked Kelly Lund, a Toyota-sponsored overlander, if overlanders look down on car campers.
“Yes and no,” he replied. “I understand why overlanding as a culture gets that reputation. When it comes to individuals, though, I think most are just looking to have a good time and want a vehicle to tinker on whether they use it for camping 52 weekends a year or once a summer.”
Lilienthal added, “Online ‘overlanders’ and keyboard warriors may look down on car campers but authentic worldwide travelers that we know don’t.”
People can spend their money in any way and identify with whatever group they desire. But I feel that these formerly unnecessary divisions among campers can create exclusion based on income. And I don’t like or appreciate that kind of elitism, outdoors or not.
Namaste
In the end, we could all just go car camping, or overlanding, and not give one iota about what the activity is called. We could ignore the branding and just use what works.
“Who cares about the label if you do what you enjoy?” Jarriel asked me rhetorically. “There is no right or wrong way to adventure. It doesn’t matter how you identify, as long as you welcome others into the outdoors.”
Lilienthal concurred, “Everybody does it differently and as long as we all get out there and have fun, and respect Mother Nature and each other while doing so, we can all enjoy our time outdoors together!”
Distill it all down, strip away the fluff, and tune out the chatter, and you may end up where I did. Overlanding is car camping and vice versa. We’ve been doing it all along.
]]>
https://arsmatrix.com/blogs/news/mini-filo-tartlets-with-lemon-curd-and-fresh-berries2023-05-12T03:13:50-04:002023-05-12T03:13:50-04:00Mini Filo Tartlets with Lemon Curd and Fresh Berriesadmin
These luscious sweet and tart mini filo tartlets with lemon curd and fresh berries are the perfect dessert for Mother’s Day, all your spring gatherings and celebrations, and of course, all those upcoming graduation parties!
The great thing about these filo tartlets is that they are very easy to assemble, they can be made ahead of time, and they do not require any last minute fuss. These little tarts, are small, portable, and definitely attract attention! This makes them perfect for buffets, as your guests can just pick up one or more!
Essential Ingredients for the Mini Filo Tartlets with Lemon Curd and Fresh Berries
Filo pastry: good quality filo is a must for this recipe; my favorite is Fillo Factory
Butter: to melt and brush on the layers of filo (salted or unsalted butter – either one is fine)
Fresh Berries: to top the filo tarts (any combination will be delicious)
Powdered Sugar: a light dusting just before serving will make them look very pretty
Tips for working with filo pastry
Working with filo is not as tricky as people often think. In fact, the more comfortable you become working with it, the more you realize how forgiving filo pastry really is. Here are a few things to remember when working with filo:
Defrost overnight: make sure that the filo dough is defrosted overnight in the refrigerator, then allowed to sit at room temperature for awhile before using
Do not let it dry: filo pastry is essentially made with just flour and water, which results in light dishes with a great, crispy texture. The lack of fat in filo also means that it can dry out quickly, which is why it needs to be kept covered while we work with it
Butter on each layer: each layer of filo needs to be brushed with melted butter (or, olive oil, if you are making a savory pastry); this step makes filo pliable and easier to form into the shape we want without it tearing
Filo does not like getting wet: keep the surface you place it on dry and clean
Good quality matters: finally, and most importantly as it will make your work easier, look for good quality filo
The three components of the Mini Filo Tartlets with Lemon Curd and Fresh Berries
This delicious dessert recipe comes together easily in three easy steps, which makes them a great option for easy entertaining! Here are the three steps:
Filo cups: prepare them and bake them ahead of time
Lemon curd: make ahead the lemon curd and fill the baked filo cups with it
Toppings: your favorite fresh berries, a dollop of whipped cream, or, just a dusting of powdered sugar
How to make the Mini Filo Tartlets with Lemon Curd and Fresh Berries
Form the filo cups by stacking four, thin sheets of filo one on top of the other; each one brushed with melted butter. Cut the layered filo into twelve – 4″ x 4″ squares
Press each square gently into muffin tins and bake until crispy and golden brown. Allow them to cool completely
Just before serving, fill them with the lemon curd
Top with fresh berries and lemon verbena leaves (optional)
Other ways to use these crispy filo cups
These flaky little pastry cups not only are easy to form, but they can be made ahead of time until you are ready to fill them with any sweet or savory fillings. You can refrigerate them in an airtight container for a day or two. Just before using them, place them on a baking tray in a hot oven for a few minutes to crisp them up again.
For longer storage, they can be stored in a container in the freezer, in a single layer (do not stack them as they are delicate) for up to a month. They will be ready when you need them!
The perfect dessert for every spring and summer entertaining
Delicious fresh berries are in abundance during the spring months. From strawberries to raspberries, blackberries, blueberries and so much more, this is the best season to enjoy them at their naturally sweet state. If you are looking for a quick, no fuss dessert, these easy mini filo tartlets with lemon curd and fresh berries will not disappoint. Light, flavorful, and so pretty, they make for the perfect ending to any celebration!
This recipe is a collaboration with Fillo Factory. You can find filo dough at Whole Foods, Wegman’s and several smaller local grocery stores. I love the quality of the Fillo Factory products and I always make sure to stash a couple of boxes in the freezer!
Mini Filo Tartlets with Lemon Curd and Fresh Berries
--- lemon verbena leaves (optional), for decoration
--- camomile flowers (optional), for decoration
Instructions
Allow the defrosted filo pastry to come to room temperature for at least half an hour
Preheat the oven to 350° F
Brush 12 muffin cups with melted butter. Each cup should have a capacity of about ⅓ cup
On a clean, dry surface, lay out one sheet of filo and brush it with some melted (and cooled) butter
Top the first sheet with a second one and brush it also with butter
Repeat with a third and fourth sheet of filo
Cut the stack of filo into 4" x 4" squares, for a total of 12 squares
Gently press each square into the buttered muffin tins. Poke the bottoms with a fork (this will allow any steam to escape as they bake)
Place in the oven and bake for 7-8 minutes, or, until the filo shells are crispy and golden brown
Remove from the oven and let them cool outside the muffin pan, on a rack
Just before serving, fill the cooled shells ⅔ of the way with the lemon curd
Top with fresh berries (and tiny lemon verbena leaves, if using), dust with some powdered sugar, and serve!
3.5.3251
This recipe is a collaboration with Fillo Factory. You can find filo dough (along with puff pastry) at Whole Foods and several small local stores. I love the quality of the Fillo Factory products and I always make sure to stash a couple of boxes in the freezer!
THANKYOU FOR READING AND FOLLOWING ALONG!
If you are not already following my blog, please subscribe to Marilena’s Kitchen to have each new post delivered right to your inbox!
Please consider supporting my blog by reviewing and rating my recipes!
]]>
https://arsmatrix.com/blogs/news/2023-nissan-pathfinder-rock-creek-review-adventure-friendly-family-hauler2023-05-01T22:21:16-04:002023-05-01T22:21:17-04:002023 Nissan Pathfinder Rock Creek Review: Adventure-Friendly Family Hauleradmin
Pavement sucks. Let’s leave it. That sentiment apparently comes out of the mouths of the crafted “desired demographic” for midsize SUVs of every auto manufacturer’s marketing department, because more examples of these outfitted family-size crossover SUVs continue to find space in more dealer lots.
Just a couple of months back, we tested the new Honda Pilot Trailsport. Now Nissan has brought back its version, the Rock Creek, for the latest generation Pathfinder. And, just like the Trailsport, it brings real differences to the table, not just a “rugged appearance.”
Curious to see how this latest Rock Creek behaves, we ventured off to New York’s Catskills to fling a bit of mud with the Rock Creek’s all-terrain shoes, as well as test its comfort on the interstate and backroads to get there. Breathing in a bit of fresh air throughout was an added bonus.
In short: If a rooftop tent or big cargo-carrying capacity is high on your priority list, the Pathfinder Rock Creek’s roof rack will certainly entice you — not to mention a respectable base price. But beware, there are noticeable on-road comfort drawbacks that come along for the ride.
The Rock Creek lies smack dab in the middle of the Pathfinder lineup, yet is immediately recognizable with several distinct features. To start, the Rock Creek stands a full 2.8 inches taller than other Pathfinders. That’s mainly due to a beefy, matte-black tube-steel roof rack.
A lifted suspension makes up the rest of the difference. It’s 0.6 inches higher than the others. Nissan also tuned that suspension to handle the off-road stuff you want to throw its way.
Serving dual purposes of looking tough, but also adding genuine traction off the pavement, are 18-inch wheels (instead of 20-inch wheels on many Pathfinder trims) with Toyo Open Country all-terrain tires mounted. More than that, Nissan made these Toyos wider than other Pathfinder tires, 265 mm instead of 255.
Inside, Nissan embroidered “Rock Creek” on both front seats and the lower center console armrest, and a nice orange thread stitches the interior together. The Rock Creek comes standard with second-row captain’s chairs as well, making it four-adult comfortable. And, to keep up with the modern overlander theme, you get a 360-degree view camera system.
The Rock Creek comes standard with all-wheel-drive (AWD), unlike most Nissan Pathfinder trims, which get front-wheel drive (FWD) unless you tick a $2,000 options box. Given the credentials, that’s not a surprise. But the Rock Creek also pumps out more horsepower and torque than any other Pathfinder, including the top-of-the-line Platinum. That is a surprise.
Under the hood lies a naturally aspirated 3.5L V-6, just like its brethren. But Nissan included software to take advantage of using premium instead of regular fuel, just as the Infiniti QX60 (its premium-brand cousin) does.
With 93 octane in the tank, it makes 295 horsepower and 270 pound-feet of torque, 11 more of each compared to the other trims. Nice little bragging right. It will run fine on regular fuel but will lose its horsepower advantage too.
Regardless of what’s in the tank, it always channels that power through a nine-speed automatic transmission, which works quietly and quickly, and possesses good intuition on which gear to choose at which time. But for those that want to decide on their own, you do get paddle shifters.
Smooth Operator
Both on the road and off it, the V-6 hums along fine and provides plenty of muscle to get Pathfinder up to speed. The Rock Creek accelerates onto the highway with ease and then finds ninth gear to keep revs well under 2,000, emitting a pleasant mellow tone as you go. But know that you’ll need to stop more frequently in it.
Due mainly to the roof rack and wider all-terrain tires, Rock Creek Pathfinders only manage 23 mpg on the highway versus 27 for an also all-wheel-drive Pathfinder SV. City fuel economy also drops to 20 mpg instead of 21.
Both these attributes make more noise too. Simply put, all-season tires roll down the road quieter than all-terrain variants. But the main noisemaker is the roof rack. After all, it has a lot of angles and gaps and extruding objects to get in the way of airflow. And the air makes sure you know about it.
On the plus side, Nissan did a good job to isolate the Rock Creek’s cabin from the worst of it, and also stuffed it full of things that make trips on the road more pleasant. You get an easy-to-read 8-inch center console touchscreen, which connects to both Apple CarPlay and Android Auto. Heated seats up front keep your backside warm, and three-zone climate control handles your front side.
That’s in addition to a myriad of cubby spaces, cup holders, and USB ports scattered throughout.
The aforementioned 0.6-inch suspension lift translates to 7.7 inches of ground clearance instead of 7.1, which is not that high. Honda’s Pilot TrailSport, for example, leaves 8.3 inches of daylight between the ground and its floor. And the Subaru Outback gives you 8.7 inches, or 9.5 inches if you go for the Wilderness.
But combined with how Nissan tuned the suspension, the tires, and the many drive modes built into the standard AWD system. You can definitely still comfortably leave the pavement. I found a narrow, muddy one-lane road leading to nowhere with its fair share of jutting-out branches and kitchen-sink-deep potholes and ascended with no trouble.
Toward the top, an even steeper snow-covered mud hill that led to a trailhead provided more evidence of the Rock Creek’s sure-footedness. The deep snow cradled the Rock Creek’s underfloor and exercised the all-wheel-drive system, certainly, but I made it to the trailhead just fine.
Adventure-Ready Adjacent
That said, don’t expect to follow modified Jeeps and Broncos through the Moab. Approach and departure angles are 18.8 and 22.8 degrees respectively, with a 19.3-degree breakover angle. Better than the standard Pathfinder, but not much else.
But the Rock Creek has a different advantage. This will haul your UTV (or two) and your friends to the trailhead with space and power to spare — and give your group a nice rooftop place to stay overnight, if you mount an RTT.
That roof rack is rated to handle a 220-pound load dynamically, which is more than double many other racks. And Nissan rates the Rock Creek to tow up to 6,000 pounds worth of stuff from the factory. That figure beats Honda by 1,000 pounds and Subaru’s Outback Wilderness by 2,500.
2023 Nissan Pathfinder Rock Creek: Summary
Nissan’s Pathfinder Rock Creek starts at $44,355, or $5,290 less than the Honda Pilot Trailsport. For that money, you get the rugged look and some legitimate ruggedness to go with it.
You also get seating for seven and 17 cubic feet of space for stuff in the back. Or comfortable seating for four adults and 45 cubic feet of cargo. Or just keep it to you and a friend and bring 81 cubic feet of your favorite things. And don’t forget that 6,000-pound camper trailer you got hitched behind you.
Ultimately, Honda better equipped the Pilot Trailsport for venturing farther off road — and did it in a package that feels more refined. But Nissan built the Pathfinder Rock Creek to fit more budgets and offer more flexibility to use your vehicle to do exactly the way you want.
]]>
https://arsmatrix.com/blogs/news/long-fermented-sourdough-english-muffins2023-04-28T16:21:11-04:002023-04-28T16:21:11-04:00Long Fermented Sourdough English Muffinsadmin
This recipe is a modification of the Naturally Leavened Sourdough Bread by Susan Miller on the King Arthur Baking Company site using the technique from “The Laurel’s Kitchen Bread Book”.
Makes 16 English muffins
Ingredients
2 cups ripe (fed) sourdough starter (454g)
6 cups of bread flour (685g)
1 3/4 cups room temperature water (70 to 80 degrees F)
2 1/2 teaspoons salt
More flour as needed to kneed dough
More water for dough, as needed
1/4 cup of plain corn meal, may need more or less
Small amount of oil, 2 teaspoons
Tools:
Griddle (cast iron or electric), large bowl, dough scraper bench knife, parchment paper, 2 half sheet pans, something to cover the large bowl with (I often use a plate or plastic wrap.), spatula cooling racks
Instructions
If you’re measuring the sourdough starter using volume rather than weight, stir it down before measuring.* I find it is easier to get the sourdough starter out after stirring it down even if I am measuring by weight.
Combine the starter, flours, and water in a large bowl and mix well, until all of the flour is moistened and the dough has formed a cohesive mass. Add extra water or flour if needed to form a soft, tacky dough*
Cover the dough and let it rest for 20 minutes. This rest, known as an autolyse, allows the flour to absorb the water, which starts the dough’s gluten formation, and makes it easier to knead.*
After the rest, add the salt and knead the dough until it’s smooth and supple, though still somewhat soft and tacky.* This took about 10 minutes
When fully kneaded, place the dough back in the bowl, cover, and let it rise for 1 hour.*
Give the dough a fold: Turn it out onto a floured surface and, using a bowl scraper or bench knife, fold it like a business letter. Turn the dough 90° (a quarter turn). Gently flatten it a bit, and repeat the letter fold. Return the dough to the bowl and cover.* The King Arthur Recipe calls for letting the dough rise rise for another hour here. Instead, I put the dough in the fridge overnight, about 12 hours.
In the morning, I turned the dough out onto a lightly floured surface and divided it into two halves using my dough scraper bench knife. I left the dough covered for 30 minutes.
Cover the half sheet pan with parchment paper and sprinkle cornmeal over it. The cornmeal should have some spaces between the grains. Repeat this step with the second sheet pan.
Divide one half of the dough into 2 even halves. Divide each half into even quarters. Repeat on the second half of the dough.
Round the 8 pieces and place the on the cornmeal covered parchment sheet, well separated. I made 2 rows of 4. Sprinkle cornmeal on top of the rounds, then cover with a damp kitchen towel or another sheet of parchment paper. Repeat for the other 8 pieces of dough and second cornmeal covered parchment on a sheet pan.
Let rise at room temperature until when you gently press on a round it doesn’t spring back. This takes between 3 to 4 hours since the dough came out of the fridge.
Once the rounds are ready, heat your griddle to the same temperature you use to cook pancakes. Lightly oil the griddle once it is hot. (1 teaspoon spread over the griddle with a paper towel.)
While griddle is heating, gently flatten 8 rounds of dough to about a 1/2 inch or a little flatter and sprinkle more cornmeal on the flattened rounds, if you want. I used my hands to press the dough down to flatten it.
Gently place the flattened rounds on the lightly oiled hot griddle. Cook until the bottom is golden browned. Flip over with a spatula and and cook until the other side is golden browned. (If you have an instant read thermometer, the inside of the English muffin will read 202 degrees F when done. It was fine with a temperature up to 206 degrees F.)
Place on a cooling rack when done.
After flipping the first eight English muffins on the griddle, gently flatten the second batch.
Once the first batch has finished cooking, carefully lightly oil the hot griddle. Repeat steps 14 and 15th r the second batch.
Once English muffins have cooled, you can cut them in half and toast them.
You can put them in an airtight container and store in the fridge or freezer.
*Original instructions from King Arthur Baking Company website.
Notes:
If you only want to make 8 English Muffins and a loaf of bread, you can take half the dough from step 9, round it and let and let rise until doubled on a covered on parchment sheet. Preheat the oven to 450 F with a Dutch oven in it. Heat the Dutch oven with the lid for 40 minutes. Carefully take the Dutch oven out of the oven and place the parchment sheet with the bread on it inside. Place the lid on the Dutch oven and put the Dutch oven back into the oven. After 20 minutes, carefully remove the Dutch oven lid. Let the bread bake another 10 to 15 minutes, until a deep brown. Turn off the oven. Remove the Dutch oven and carefully remove the bread. Let it cool in the oven with the door cracked or just on a cooling rack.
Needed a Little More Separation Baking on Griddle Nice Rise Lovely Holes for Honey]]>
https://arsmatrix.com/blogs/news/everyday-muffins-with-sourdough-discard2023-04-26T16:21:12-04:002023-04-26T16:21:12-04:00Everyday Muffins with Sourdough DiscardadminThis is one of the best sourdough discard muffin recipes. This bakery-style muffin is tender, moist, and packed full of flavor.
We are in a habit of using our sourdough discard to add flavor to most of our baked goods around here. Just like my Chocolate Chip Cookie recipe, which you can find it here.
The sourdough adds a punch of flavor and adds a special softness I’ve not achieved with other muffins. This bakery-style muffin can be served with breakfast, lunch, snacks, or even dessert. My son believes that muffins are great any time of day and I think I agree with him. It is always muffin time in our household.
If you don’t have a sourdough starter yet, check out my post on All Things Sourdough Starter on how to start your own. Or send me a message and I can get you started on your sourdough journey with my fifth child, Arlo the Sourdough.
We have enjoyed these muffins in a variety of ways. Listed below are a few of the regular ways we make them.
Add-ins
Chocolate chips
Blueberries
Strawberries
Cranberries
Anything your heart desires.
They are so easy to get going. Everything you need I’m certain you already have on hand. Listed below are some helpful kitchen tools you will need.
Tools
Mixing tool
Mixing bowls
Muffin pan
Scale (although not necessary)
Step-by-Step Instructions
1. Prep
Preheat oven to 400 degrees
Grease muffin tin
2. Mix
Mix flour, sugar, salt, baking soda, baking powder, and cornstarch together. Then add in chocolate chips.
Add the wet ingredients to the dry ingredients and gently fold them in. Make sure not to over-mix. The mixture should be thick.
3. Bake
Scoop evenly into greased muffin tins.
Bake on the center rack for 17-20 minutes
Allow to cool and store in an air-tight container for up to 3 days
Tips
Using a scale can be beneficial to ensure precise measurements. If you don’t have a kitchen scale use the scoop and level technique. Fluff up the flour with a fork before you begin. Then, scoop up the flour and level off the top.
Make sure to fold the wet ingredients into the dry carefully. You don’t want to overmix the muffins.
Add the chocolate chips to the dry ingredients to prevent overmixing
Store in an air-tight container for 3-4 days.
I hope you enjoy these muffins as much as we do. Leave me a comment and a picture below of your favorite muffins. You can also follow along with our other baking and homemaking projects on Instagram @overeasyhomestead.
Chocolate cookie cups filled with a fluffy chocolate Kahlua cheesecake. The perfect bite-sized indulgence!
This mini Kahlua cheesecake recipe should definitely be on your list of must-try treats. The creamy cheese filling is laced with Kahlua for a subtle hint of coffee flavor that pairs perfectly with the rich chocolate cookie crust.
If you don’t have a mini muffin pan, this recipe can easily be done with a regular muffin pan or even as a whole cheesecake.
Ingredients
Chocolate Cookie Cups or Pie crust :
2 cups all-purpose flour
½ cup Dutch-processed cocoa powder sifted
1 tsp baking soda
1/2 tsp salt
1 cup unsalted butter room temperature
1/2 cup granulated sugar
1 cup light brown sugar packed
2 large eggs room temperature
1 tsp vanilla extract
Kahlua Chocolate Cheesecake Filling:
1 cup heavy whipping cream chilled
8 oz cream cheese full fat,softened
1/2 cup granulated sugar
2 oz semi-sweet chocolate melted, cooled
1/4 cup Kahlua Liquor
Instructions
Preheat the oven to 350°F. Spray mini muffin tins with cooking spray.
Whisk together flour, cocoa powders, baking soda, and salt. Set aside.
Beat butter and sugars on med-high until light and fluffy (approx. 2-3mins). Reduce speed and add eggs one at a time and vanilla. Beat until combined. Add flour mixture and mix until just combined.
Using a small cookie scoop, scoop dough into muffin tins, press down to flatten.
Bake for approx. 10-13 minutes or until mostly set, but still soft in the middle.
Remove from the oven and immediately use a small glass (shot glass works great) to press firmly down in the center to create a well. Cool in pans for 10 minutes, loosen each slightly by twisting it in the pan. Cool for 5 more minutes then remove from the pan and cool completely on a wire rack.
Kahlua Chocolate Cheesecake Filling:
Whip heavy cream until stiff peaks (ideally with a cold whisk and in a cold bowl).
In a separate bowl, beat cream cheese and sugar until smooth. Add chocolate and Kahlua and beat until incorporated.
Fold cream cheese mixture into whipped cream and pipe into cooled cookie cups. Refrigerate until set (approx. 2 hours).
If making as a cheesecake, follow these instructions… Bake in oven at 350°F for 60 minutes. Edges will likely have slightly puffed and may have just begun to turn a light golden brown and the center should spring back to the touch but will still be Jello-jiggly. Don’t over-bake or the texture will suffer, which means we all suffer.
Sprinkle with chocolate shavings or cocoa powder if desired.
Serve chilled and eat within 2-3 days. Or freeze for up to 4 weeks.
]]>
https://arsmatrix.com/blogs/news/a-small-batch-of-bisquick-sugar-cookies2023-04-23T04:21:10-04:002023-04-23T04:21:10-04:00A Small Batch of Bisquick Sugar Cookiesadmin
Do you need cookies in a hurry? Here comes Bisquick to the rescue. These cookies are super easy to make; plus they taste great. For several weeks, a box of Bisquick sat on my kitchen counter and simply got in the way. I purchased it for another recipe. How many times did I move the box around? When I wanted some cookies to serve with my homemade ice cream, I mused: “Wonder if I could use Bisquick to make cookies?” Surprise! My experiment worked and these are the best sugar cookies. Furthermore, the cookies were incredibly easy to make. This is a small batch — it makes only makes 12 cookies; but that was just right to go with my ice cream. It is very easy to double the recipe or make a second batch, as you may very well want more cookies!
Versatile Bisquick baking mix has been around for a long, long time. Years ago, I cooked with Bisquick on a regular basis making all kinds of things such as pancakes, biscuits, chicken dumplings, cobblers and the crusts for one-dish casseroles. Then, I sort of forgot about Bisquick. Recently, when a recipe called for Bisquick, of course, I purchased the largest box ever. Now I have alot of Bisquick to use in making all those recipes again. I had never made Bisquick cookies, but why not? Let’s experiment. And these cookies turned out great — for a sugar cookie.
Recipe
This is an easy, “almost one bowl” recipe. The ingredients are Bisquick, an egg, sugar, oil and a little vanilla extract. Ingredients which you probably have around your kitchen. No need to get out an electric mixer for this cookie recipe. Just simply mix the ingredients together in a large bowl. The cookie dough may be sticky. If needed, lett the dough sit in the refrigerator for an hour to help with the stickiness. Then roll into balls using your hands. I dipped the shaped cookies into colored “sanding” sugar to give the cookies a little class. Then I flattened the cookies just a bit using the bottom of a flat glass. Bake on parchment paper (or the sides of a paper bag because I keep forgetting to restock my parchment paper). No need to further decorate the cookies — they are ready for serving.
I think homemade ice cream always need a cookie as a side-kick. And these cookies were just the thing.
There are all kinds of things which you could add to these cookies for variations. Add chocolate chips, nuts, M&N’s. Add cocoa powder for a chocolate cookie. Experiment with different kinds of sprinkles. I don’t think I’ll having a problem using the rest of my Bisquick box!
colored sanding sugar or decorating sprinkles for rolling
Method and Steps:
Pre-heat oven to 350 degrees. Line a large baking sheet with parchment paper.
Add the Bisquick and sugar to a large bowl, stir to combine. Set aside
In another medium-size bowl, add the egg and beat until blended using a wire whip or fork.
Add the vegetable oil and vanilla extract to the egg and blend in.
Using a large cook spoon or wooden spoon, stir the egg/oil mixture into the Bisquick until combined. If the dough is sticky, cover and refrigerate for up to one hour.
Using teaspoons, scoop out a spoonful of cookie dough. Roll into a round ball with the palms of your hands.
Place colored sanding sugar or decorating spinkles into a small bowl. Gently roll the cookie dough in the sugar to coat all sides. Place on parchment paper. Repeat with remaining cookie dough. Leave space between cookies on the baking sheet.
Flatten each cookie slightly with the flat bottom of a glass.
Bake in 350 degree oven for 8 – 9 minutes until the cookies are done and the edges begin to turn slightly brown. Do not overcook. Cookies will be soft in center. (The bottoms of the cookies will brown quickly due to being coated with sugar.)
While the cookies are still warm, use a spatula to loosen and transfer to wire rack to cool completely.
]]>
https://arsmatrix.com/blogs/news/homemade-stuffed-crust-pizza2023-04-20T10:21:12-04:002023-04-20T10:21:13-04:00HOMEMADE STUFFED CRUST PIZZAadmin
It’s Pizza Week here in Providence, RI, but most of the time, I prefer to make mine at home.
So let’s not talk diets right now. Let’s talk about what is probably the greatest invention since pizza itself: stuffed crust pizza.
I mean: first, there was the simple margarita pizza. Then someone thought of “extra cheese.” After that, where could we go? And then, someone who in my mind deserved the Nobel Prize for Food, came up with stuffed crust pizza. Originally the brainchild of Pizza Hut, it boldly put cheese where no cheese had gone before.
So for me, since I love to make my own pizzas, the next step was to figure out a way to make stuffed crust pizza at home. Turns out it wasn’t really that difficult.
If you’re not into going through the hassle of making your own dough, most supermarkets have pre-made pizza dough balls in the refrigerated section. Grab a couple of them, and save yourself some time and effort. (If you want to make the dough from scratch, see my recipe at the bottom of this blog.)
Same thing with the sauce: I prefer to make my own from real San Marzano tomatoes, but if you have a brand of jarred sauce you like, use that.
The rest is pretty straightforward: cheese!!
Let’s get started…
You bought or made the dough. If you bought two balls, you rolled them together to make one larger one. You poured a little olive oil in a bowl, and placed the ball of dough in that, covering with a clean towel, to let the dough rise for a few hours.
After a few hours, you punch the dough down to get rid of the air bubbles, and roll it into a ball again, putting it back in the bowl, covered, to rest for another hour or so.
Preheat the oven to 500 or it’s hottest temperature, with a pizza stone on the middle rack.
Now the dough is ready to work. Place your pizza peel on the counter you’re working on. Sprinkle the peel with a large-grained flour, like corn meal or semolina. (That acts like little ball-bearings to let the dough slide off easily.) On top of the pizza peel, stretch the dough out to a size that will be about 2 or 3 inches bigger in diameter than the peel or pizza stone you have in the oven.
Made the mistake of stretching the dough out on the counter rather than the peel, which made it hard to lift. Perhaps it was the influence of the bourbon in the background! I fixed the problem later. (I kept the bourbon.)
Buy a firm mozzarella that slices nicely into sticks. (If you use fresh mozzarella, it will get mushy in the crust.) Cut it into pieces the size of the average mozzarella stick.
Place the sticks of mozzarella around the dough in a circle, about an inch away from the edge.
Now fold the dough over the mozzarella sticks. You might need a touch of water to make the dough stick to itself.
Now make your pizza like you normally would. Sauce it…
Cheese it…
Add toppings…
And bake!
You can never have too much cheese!
If you want to make your own pizza dough, here’s my recipe…
The key ingredient is 00 flour, and it can be found in specialty stores, or online. Ratios for this recipe depend on the humidity in my kitchen on any given day.
4–5 cups 00 flour 1 cup tepid water (100 to 110 degrees) 1 tablespoon salt 1 tablespoon active dry yeast a squirt of extra virgin olive oil
I mix all the dry ingredients in the bowl of a stand mixer, then slowly add the water as it mixes. After the ingredients are well mixed, and the dough pulls from the side of the bowl, I remove it to a floured board, where I knead the dough by hand for another 5 minutes, until it is smooth and elastic, shaping it into a ball. I rub a little olive oil over the ball of dough, place it in a bowl covered with plastic wrap or a clean towel, and let it rise at room temp for 2 hours, punching it down after that. I roll it back into a ball again, and let it rise, covered, for at least another hour.
]]>
https://arsmatrix.com/blogs/news/free-shipping-tomorrow-only2023-04-18T16:21:10-04:002023-04-18T16:21:10-04:00FREE SHIPPING – TOMORROW ONLY!admin
Tomorrow only!! Enjoy FREE SHIPPING on orders of $75 or more. It’s super amazing because you can stack all the deals. This incredible deal lasts for 24 hours only. Shop early for best selection.
Bread is one of the oldest and most beloved staples of human cuisine, and Cuban bread is no exception. With its unique texture and flavor, it has become a staple of Cuban cuisine and is enjoyed by people all over the world. In this article, we will explore what makes Cuban bread different, its history, and what pairs well with it.
Here is a video to help guide you through this recipe
What makes Cuban bread different?
Cuban bread is distinct from other types of bread due to its texture, shape, and flavor. Here are some characteristics that set it apart:
Texture: Cuban bread has a crusty exterior and a soft, airy interior.
Shape: It is typically long and cylindrical, with tapered ends.
Flavor: It has a slightly sweet taste, with a hint of tanginess.
What is Cuban bread called?
Cuban bread is simply called “pan Cubano” in Spanish, which translates to “Cuban bread” in English. It is a staple in Cuban cuisine and is used in many traditional dishes.
What is the history of Cuban bread?
The origins of Cuban bread can be traced back to the late 1800s when Cuban immigrants began arriving in Florida. They brought with them their love of bread and a recipe that would eventually become known as Cuban bread. The recipe typically includes flour, yeast, salt, water, and a small amount of lard or vegetable shortening. In the early 1900s, Cuban bread became a popular food in Tampa, Florida, where it was used to make the famous Cuban sandwich. The sandwich typically includes roast pork, ham, Swiss cheese, pickles, and mustard, all served on a lightly toasted Cuban bread.
What bread is closest to Cuban bread?
If you can’t find Cuban bread in your area, there are a few bread options that come close:
French bread: With a similar texture and shape, French bread can be a good substitute for Cuban bread.
Italian bread: Another option with a similar texture and crusty exterior, Italian bread can work well as a substitute.
However, keep in mind that neither of these options will have the slight sweetness and tanginess that Cuban bread is known for.
What pairs well with Cuban bread?
Cuban bread can be enjoyed on its own or with coffee, but it also pairs well with a variety of dishes. Here are a few suggestions:
Cuban sandwich: As mentioned earlier, the Cuban sandwich is a classic way to enjoy Cuban bread.
Black beans and rice: The soft interior of Cuban bread is perfect for sopping up the delicious juices of black beans and rice.
Butter and honey: The sweetness of Cuban bread is enhanced by a layer of butter and honey.
Cuban bread is a unique and beloved part of Cuban cuisine. Its distinct texture, shape, and flavor make it a favorite of bread lovers around the world. Whether enjoyed on its own or paired with other dishes, it is a culinary delight that is sure to please. Click here for my cuban coffee recipe.
In a bowl or measuring cup, whisk together 1/2 cup warm water, 1/2 cup flour, and 1/2 teaspoon yeast for the starter. Cover with plastic wrap and refrigerate for 8 hours to overnight.
In a mixing bowl, combine 2 ¼ teaspoons active dry yeast (or 1 packet), 2 teaspoons sugar, and 3/4 cup warm water. Let rest for 15 minutes until yeast is alive and bubbling on the surface. Add lard and salt to the bowl, followed by 1 cup of flour. Mix until dough forms a sticky ball. Add the starter, plus all but 1/2 cup of the remaining flour and mix.
Knead the dough on a work surface lightly dusted with flour until it forms a firm ball. Add up to 1/2 cup of the remaining flour as necessary. The dough should be soft and pliable with a slightly sticky surface.
Put the dough in a bowl and cover its surface with vegetable oil. Then, cover the bowl with a damp kitchen towel and leave it in a warm spot until it has doubled in size, which usually takes about 2 hours.
Line a baking sheet with parchment paper and sprinkle with cornmeal.
Move the dough to a surface with a light dusting of flour. Gently press the dough into a rectangle with floured hands. Split the dough into two halves and mold each one into a rectangle that is 12 inches long and 1/2 inch thick. Roll the dough tightly from the long ends to shape two thin loaves, then lightly flatten the tops. Put the loaves onto the baking sheets and sprinkle them with flour. Cover with a dry towel and let them rise for 1 1/2 to 2 hours until they have doubled in size.
Heat the oven to 400 degrees F (200 degrees C). With a sharp knife, create a 1/4-inch deep slit down the top of each loaf. Lightly spray the loaves with water.
Place the pan with your 2 loaves in the preheated oven. Bake for 20-25 minutes, until the loaves turn golden brown.
Move the loaves to a cooling rack and wait for them to cool down for approximately 5 minutes before slicing.
]]>
https://arsmatrix.com/blogs/news/easter-cake-from-caserta-casatiello-dolce-recipe2023-03-31T10:21:11-04:002023-03-31T10:21:11-04:00Easter Cake from Caserta: Casatiello Dolce Recipeadmin
Recently, my close friend Danila from Caserta, a lovely city in the Campania region, shared with me her plan to make a traditional cake which she uses to enjoy on Easter morning by dipping it in milk. Eager to experience it myself, I didn’t want to miss out on the chance to learn how to prepare it.
Casatiello dolce, also known as Easter-sweet-bread is a sweet variation of the traditional savory one. It is a fragrant bread that is usually made with flour, sugar, eggs, butter, and lemon zest, and it is typically shaped like a ring, braided loaf, or rounded loaf. The bread may be decorated with icing, colorful eggs, and sprinkles, making it a delicious and festive addition to any Easter table.
So, without further ado, here is the recipe for Casatiellodolce Cake.
RECIPE:
SweetCasatiello Cake
SERVINGS: 8-10
Resting time: 1 day + 5 h
Preparation time: 20 min
Baking time: 1h 20 min
Total time: 1 day and half
INGREDIENTS
FOR THE SOURDOUGH:
100g (3.5 oz) flour Manitoba
14g (1 ½ tbsp) fresh brewer’s yeast
2 eggs
1 pics of salt
1 pinch of sugar
half glass of lightly warm water
FOR THE DOUGH
500g (17 oz) Manitoba flour
5 eggs
200g (7oz) sugar
100g (3.5 oz) seed oil
zest from a lemon
1 tsp dry vanilla
1 small glass of Rum, or sambuca liqueur
butter and flour to grease the cake pan
FOR THE ICING – TO DECORATE
2 tbsp of water
100g (3.5 oz) icing sugar
STEP-BY-STEP METHOD
STEP 1: Make the sourdough
In a bowl add flour, 2 eggs and salt. In a glass with warm water dissolve sugar and yeast. Add the mixture to the bowl. Knead until obtaining a smooth dough.
Let the sourdough rest and rise for 24 h covered with a kitchen towel.
STEP 2: Make the dough
In a large mixing bowl, combine flour, sugar, eggs, sourdough, lemon zest and vanilla and oil.
Using a stand mixer, or by hand, knead until a smooth and elastic dough forms. If you use a stand mixer, knead for 15 min at low speed.
Grease a round cake pan with high edges (20 x 10 cm – 7×3 inch) with butter and then dust with flour. Let the flour cover the entire inner surface. Remove any excess flour.
Put the dough into the round cake pan and cover it with plastic wrap. Let it rise in a warm, draft-free place for about 5 hours, or until it has doubled in size. You can let it rise in a cold oven with the door closed until the dough is nearly double in volume.
Preheat the oven to 350°F (180°C) at static type.
Bake the Casatiello Dolce for 1h and 20 min, or until it is golden brow. Arrange the cake pan in the middle part of the oven. Place the oven dripping pan immediately under the grill coil to bake it evenly and gently.
Allow it to cool on a wire rack before serving.
STEP 3: Decorate it
Place the sugar in a bowl, ad a spoon of water and mix with a spoon. You have to get a smooth, white icing. Add and bit more of water and mix. Decorate the cake with the icing and sprinkle it with coloured sprinkles.
How to make the perfect icing ]]>
https://arsmatrix.com/blogs/news/rain-or-shine-stamp-a-stack-card-class-hey-there-bunny-part-1-of-42023-03-20T22:21:21-04:002023-03-20T22:21:21-04:00Rain or Shine Stamp a Stack Card Class – Hey There Bunny – Part 1 of 4admin
Hey Guys! I have a new stamp a stack card class for you today! The Kitchen Table Stamper Rain or Shine Stamp a Stack Card Class makes seven sunny Spring greeting cards that are sure to lift the Winter blues.
Let’s get started with this Hey, There card. Aren’t the retired Soft Sea Foam Seam Binding Ribbon and the Clearance Rack Pebbles Enamel Shapes the perfect embellishment to soften and complete the Rain or Shine Designer Series Paper?!
I love how easy breezy and happy this Stamp a Stack turned out. I hope you like it too!
The Rain or Shine Stamp a Stack Class is a free online class with an optional class packet available, while supplies last.
The Rain or Shine Stamp a Stack will be on the blog March 20 through March 23. Optional class packets include:
Rain or Shine Stamp a Stack Stamp a Stack Quick Links
Rain or Shine Stamp a Stack – Hey There Bunny Video 1 of 4 – CLICK HERE.
Rain or Shine Stamp a Stack – Happy Day Bunny 2 of 4 – COMING SOON.
Rain or Shine Stamp a Stack – No One Like You Turtle Video 3 of 4 – COMING SOON.
Rain or Shine Stamp a Stack – Hello Fox Video 4 of 4 – COMING SOON.
]]>
https://arsmatrix.com/blogs/news/instant-pot-key-lime-cheesecake2023-03-18T22:21:10-04:002023-03-18T22:21:11-04:00Instant Pot Key Lime Cheesecakeadmin
Tangy and sweet, Instant Pot Key Lime Cheesecake is a wonderful sweet treat that is so easy to prepare in the electric pressure cooker. We are in love with this rich and decadent cheesecake!
HOWDY! CHEF ALLI HERE. LET’S GET YOU COOKIN’…. SHALL WE??
I’ve been cooking in my Instant Pot for a long time now and I’m still forever thankful for how quick and easy it makes getting dinner on the table for my family.
My guys are a total bunch of carnivores so I really appreciate how fast it is to cook big hunks of meat in my Instant Pot. Big Bold Beef Carnitascome immediately to mind, as does Instant Pot Pulled Pork.
WHAT TO LOVE ABOUT INSTANT POT KEY LIME CHEESECAKE
This is the fastest way to make cheesecake….as in ever. You won’t believe it until you try it.
Yep, this makes a small cheesecake, but it’s super big in richness and flavor so your guests will only need a small piece.
You can make this a day or two ahead of time and keep it store in the fridge until ready to serve.
INGREDIENTS NEEDED TO MAKE EASY KEY LIME CHEESECAKE
Graham cracker crumbs
Butter
Cream cheese
Flour
Granulated sugar
Vanilla extract
Limes and lime juice
Eggs
Heavy whipping cream
WHICH TOOLS ARE HELPFUL FOR MAKING CHEESECAKE IN THE INSTANT POT?
Silicone Spatula Spoons – Of all the tools in my kitchen, silicone spatula spoons are what I use the most. They make stirring and sautéing a breeze and I love all the pretty silicone colors available. Silicone spatula spoons are completely heat-proof so they won’t melt, even when used over high temperatures. I like to have different sizes on hand for different kitchen tasks – soooo handy!
I like mixing bowls that nest inside of each other and have a silicone bottom so they are slip-resistant when I’m working in them. I also really appreciate what’s called “gorilla grip” handles that are on the side so they are each to hold in place when I’m mixing.
When using a 6-quart Instant Pot for making cheesecake, you’ll need a 6-inch springform pan. I also like to use a hand-held electric mixer for making the cheesecake filling, especially one that has a low-speed that you can start out with, before moving up to high.
This cheesecake recipe came from my good friend, Laura Finson, cook-extraordinaire! She, too, loves Instant Pot cooking.
Tangy and sweet, Instant Pot Key Lime Cheesecake is a wonderful sweet treat that is so easy to prepare in the electric pressure cooker. We are in love with this rich and decadent cheesecake!
Course Dessert
Cuisine American
Keyword cheesecake, instant pot
Prep Time 15minutes
Cook Time 37minutes
Approx. Time Needed for Instant Pot to Pressurize: 15minutes
Spray a 6” springform pan with non-stick spray, setting it aside. In a small bowl combine the graham cracker crumbs and melted butter; mix well. then press this mixture firmly into the bottom of the sprayed springform pan; reserve.
Create the Cheesecake Filling
Using an electric mixer, beat together: softened cream cheese, flour, sugar, vanilla and lime zest, scraping sides and bottom of bowl to ensure all ingredients are mixed together well.
Add eggs one at a time and then egg yolk; beat until just combined. Mix in key lime juice and whipping cream, besting until just combined; pour over prepared crust in spring form pan. Gently tap pan on countertop a few times to remove any large air bubbles that may be in filling.
Cook the Cheesecake in the Instant Pot
Add 1 1/2 cups water to the Instant Pot, then place trivet into the bottom of pot.
Place a dry paper towel over the top of the filling in the springform pan, then place a sheet of aluminum foil on top of paper towel, tightly wrapping the pan with aluminum foil. Using a foil sling, lower the wrapped cheesecake pan into the Instant Pot. Lock the lid into place, choosing the high pressure setting for 37 minutes. When the timer sounds, use a natural pressure release for 18 minutes, then a quick release to remove any remaining pressure from the Instant Pot.
Using the foil sling, carefully lift the cheesecake from Instant Pot to a wire cooling rack; carefully remove the foil and paper towel, then carefully run a sharp paring knife around the outside edge of the cheesecake, gently loosening it from the sides of the pan.
Let the cheesecake cool for 30 minutes, then release and remove the outer ring of the springform pan that encases the cheesecake. Cover the cheesecake and refrigerate 6-8 hours, or overnight, until very chilled.
Create the Cheesecake Topping
Using a large spatula, lift cheesecake from springform pan bottom and place onto a serving platter. (Or if you prefer, leave the cheesecake in place on the bottom of the springform pan, but be aware that when cutting the cheesecake, it will easily slip around on your platter, making it rather difficult to cut.)
In a mixing bowl, using an electric mixer, beat the whipping cream and sugar until stiff; gently fold in the zest of ½ of a lime.
Place the prepared whipped cream mixture into a piping bag fitted with a large star tip. Pipe the whipped topping onto the top of cheesecake as desired, in a decorative pattern. Zest the remaining half of lime over the top of the whipped cream and the center of the cheesecake. Place the lime slice halves around perimeter of cheesecake by sliding them gently into whipped cream, as desired. Refrigerate cheesecake (covered) until ready to serve.
Notes
**Please note: the cooking time stated for this recipe does not include the time required to bring the Instant Pot up to pressure since this can vary. This recipe was made using a 6-quart Instant Pot.
We love hearing from our readers and followers, so leave us a comment if you’d like. If you don’t hear back from us shortly, know that we may not have seen your comment. Feel free to reach out to us by email: ChefAlli@ChefAlli.com.
LET’S GET YOU COOKIN’, CHEF ALLI
Please Note: We do use referral and affiliate links here for products and services that Chef Alli loves and recommends. We may receive a small compensation when you use these links. This really helps us keep the recipe blog moving forward. Thank you so much!
]]>
https://arsmatrix.com/blogs/news/taco-rice-casserole2023-03-15T22:21:11-04:002023-03-15T22:21:11-04:00Taco Rice Casseroleadmin
You are just 4 steps and mere minutes away from a big delicious pan of Chicken Taco Rice Casserole! Stir the ingredients together, spread in a 9×13 baking dish, bake, and serve – it’s THAT easy.
Taco Rice Casserole Recipe
HOWDY! CHEF ALLI HERE. LET’S GET YOU COOKIN’…. SHALL WE??
This casserole is simple and quick to make because it’s just a few steps. Combine all the ingredients, spread them into a baking dish and bake. Poof!! You’ve got dinner ready in a flash and your family will be all over it.
WHAT TO LOVE ABOUT THIS RECIPE
It’s fast, furious, and oh-so-easy.
Everybody loves a good Mexican casserole.
I bet you’ll already have all the ingredients on hand.
INGREDIENTS YOU’LL NEED TO MAKE THIS EASY CASSEROLE RECIPE
Cooked, shredded chicken meat
Instant rice
Shredded cheddar cheese
Salsa
Chipotle sauce, totally optional
Sour cream
Taco seasoning
Pinto beans
Sweet corn
Your favorite Mexican food garnishes, such as cilantro, diced tomatoes, etc.
STEP BY STEP INSTRUCTIONS FOR MAKING CHICKEN TACO RICE CASSEROLE
**PRINT THE FULL RECIPE FROM THE RECIPE CARD AT THE BOTTOM OF THIS POST
Preheat oven to 350 degrees F. Spray a 9×13 baking dish with nonstick baking spray; reserve.
In a large mixing bowl, combine the chicken, rice, 1 1/2 cups grated cheese, salsa, chipotles, sour cream, taco seasoning, beans, and corn, stirring to combine.
Place this mixture into the prepared baking dish, gently spreading it out; sprinkle with remaining cheese.
Cover the casserole tightly with foil. Bake for 30 minutes on the center oven rack; remove the foil during the last 10 minutes of the baking time.
Serve casserole topped with your favorite garnishes. Enjoy!
TIPS FOR MAKING THIS FAST WEEKNIGHT MEAL THE BEST IT CAN BE
To keep the casserole ingredients super moist, cover the casserole while its baking. Remove the foil during the last 10 minutes of the baking time to let the top crisp up a bit.
Substitute different types of cooked meats in this casserole in place of the chicken – cooked pulled pork is a good substitute and so is cooked shredded roast beef. This is a great way to use up leftover meats from other meals.
A hot and safe internal temperature for a casserole is 165 degrees F. at the very center.
For cheese that melts and get super creamy, grate your own from a block. Prepackaged shredded cheeses usually have additives that keep the cheese from clumping together.
Substitute other types of beans for the pinto beans in this recipe, such as chili beans or black beans. Or, if you want more fiber or need to “stretch” this casserole to make it feed more peeps, add an extra can of beans.
ANSWERS TO COMMON QUESTIONS ASKED ABOUT THIS RECIPE
WHICH TOOLS ARE HELPFUL FOR MAKING CASSEROLES?
Silicone Spatula Spoons – Of all the tools in my kitchen, silicone spatula spoons are what I use the most. They make stirring and sautéing a breeze and I love all the pretty silicone colors available. Silicone spatula spoons are completely heat-proof so they won’t melt, even when used over high temperatures. I like to have different sizes on hand for different kitchen tasks – soooo handy!
I like mixing bowls that nest inside of each other and have a silicone bottom so they are slip-resistant when I’m working in them. I also really appreciate what’s called “gorilla grip” handles that are on the side so they are each to hold in place when I’m mixing.
If you like to grate your own cheese, a good, sturdy box grater is a must. I love grating my own cheese with thisstyle of box grater.
Can I substitute other types of meat for the chicken in this casserole recipe?
You sure can! I’ve made this recipe using cooked pulled pork, shredded roast beef, and even cubed up leftover pork tenderloin – all are delicious. You can use any type of meat in this casserole that is already cooked.
Is rotisserie chicken meat good in this recipe?
Totally!!!! And an average size rotisserie chicken yields about 3 cups of meat after it’s pulled from the carcass (the bones) of the chicken.
How do I know when the casserole is hot at the center?
Great question! This is important to know since we always want to cook casseroles to a hot and safe internal temperature. After the casserole has baked in the oven for 25-30 minutes, insert an instant-read meat thermometer into the center to check the temp. The internal temperature at the center should be 165 degrees F.
Can I make this taco casserole using white meat chicken instead of chicken thighs like the recipe calls for?
Surely. I prefer boneless, skinless chicken thighs because the dark meat is so much more flavorful and juicy, but if you enjoy the chicken breast meat (white meat), that works just fine, too.
What are chipotles?
So a chipotle is a smoked jalapeno pepper. Now, I don’t have time to be smokin’ any jalapenos, do you? I didn’t think so. Thankfully for both of us, there’s such a thing as canned chipotles in adobo sauce.
You’ll find these in the Hispanic section of your local grocer and I always keep a couple cans of these in my pantry so I can pull them out and throw those suckers into my food processer and blend them until smooth. Then, I spoon the chipotle/adobo puree into a mason jar and store it in my fridge.
You’ll use it just like any other condiment for all kinds of recipes! It will add not only spiciness to your recipe, but also a lot of smoky goodness, as well. But be careful! Chipotles are HOT. A little goes a long way.
Can I double this recipe?
Sure can. Double the recipe and make two 9×13 pans of casserole.
3cupscooked shredded chicken. I prefer cooked shredded chicken thigh meat
2cupsinstant riceuncooked
2cupsgrated cheddar cheesedivided use
2cupsyour favorite salsa
1tsp.chipotle sauce or minced chipotlesoptional
1cupsour cream
3Tbs.your favorite taco seasoning
15oz.can pinto beansrinsed and drained
1cupfrozen sweet cornthawed
Your favorite Mexican garnishessuch as chopped cilantro, sour cream, diced tomatoes, etc
Instructions
Preheat oven to 350 degrees F. Spray a 9×13 baking dish with nonstick baking spray; reserve.
In a large mixing bowl, combine the chicken, rice, 1 1/2 cups grated cheese, salsa, chipotles, sour cream, taco seasoning, beans, and corn, stirring to combine.
Place this mixture into the prepared baking dish, gently spreading it out; sprinkle with remaining cheese.
Cover the casserole tightly with foil. Bake for 30 minutes on the center oven rack; remove the foil during the last 10 minutes of the baking time.
Serve casserole topped with your favorite garnishes. Enjoy!
We love hearing from our readers and followers, so leave us a comment if you’d like. If you don’t hear back from us shortly, know that we may not have seen your comment. Feel free to reach out to us by email: ChefAlli@ChefAlli.com.
LET’S GET YOU COOKIN’, CHEF ALLI
Please Note: We do use referral and affiliate links here for products and services that Chef Alli loves and recommends. We may receive a small compensation when you use these links. This really helps us keep the recipe blog moving forward. Thank you so much!
]]>
https://arsmatrix.com/blogs/news/memphis-soul-pork-ribs-you-ve-got-to-try2023-03-15T04:21:20-04:002023-03-15T04:21:20-04:00Memphis soul: Pork ribs you’ve got to try!admin
One word comes to mind when I think of Memphis, Tennessee: barbecue. That said, when I think of Memphis-style barbecue, one thing in particular makes my taste buds tingle. You’ve probably guessed it from the title – pork ribs!
During a road trip across the southern states of the U.S., I came to realize that Memphis made the best pork ribs. Succulent and saucy, the fall-off-the-bone pork ribs were something I’d crave every now and then but could never enjoy at home in India. One day, the craving was so severe that I decided I absolutely needed to get some of those ribs. Thus, the research and studying began. Today, I’m proud to say I’ve created a recipe that’s pretty close to the real thing (let’s face it – being as good as the Memphis pit-masters is no easy feat).
You’re most likely wondering how I’ve managed to put together a Memphis-style pork ribs recipe that can be executed in a humble Indian kitchen, i.e. a grill-less kitchen (or backyard, for that matter). Well, this recipe calls for the use of an oven.
In addition to an oven, this recipe calls for minimum equipment. You’ll need a:
Mixing bowl
Baking tray
Tongs
Knife and cutting board
It already seems doable, right?
Before I get into the details about the ingredients, I’d like to address the kind of pork ribs I recommend for this recipe. While spareribs or baby back ribs may seem like the obvious choice, St. Louis-cut ribs are in fact the best for this recipe. Why? Well, St. Louis-cut ribs is fattier, which helps keep the meat tender. They’re also thinner and flatter than the other styles, which allows them to cook and brown more evenly. If you’d like to know more about the different kinds of pork ribs, you may want to check out this article by Bon Appetit. You can also take a look at the image below for a quick understanding of what St. Louis-cut ribs are:
Another thing to remember when cooking ribs is to remove the membrane found on the underside of the rack. This will help the pork absorb more flavour. For more on how to do this, watch the embedded video.
Ingredients
2 St. Louis-cut rib racks
1/4 cup sweet paprika
1/2 cup brown sugar
1 tablespoon freshly ground black pepper
1 tablespoon garlic powder
2 teaspoons cumin
2 teaspoons kosher salt
2 teaspoons cayenne
1 teaspoon dry mustard
1/2 teaspoon dried oregano
Cooking instructions
In a bowl, mix all the dry ingredients together. Rub them all over the ribs in a baking tray. Ensure the ribs are meat-side up. Set aside in the refrigerator for the night.
Adjust the oven rack to the middle of the oven. Preheat the oven to 120°C.
Place the ribs in the oven and cook for about 3 hours, until they are tender.
Take the ribs out of the oven and let them rest for about 5 minutes. Cut them apart between the bones and serve.
How easy is that?! I’d love to know your thoughts on this recipe. If you try it out, show me your work by tagging me on Instagram @culinaryquests. Also, if you’re looking to try another American classic, may I tempt you with my Philly Cheesesteak recipe?
It’s fun when the girls (or women as we are known as you reach a certain age,) get together to chat, eat, laugh and simply be ourselves. Tomorrow night we’re gathering in my living room to watch that ultimate “girl movie” Shirley Valentine! I’m not cooking, but instead I’m ordering Chinese. But I can’t let the evening pass without making something! So I opted for Almond Cookies. When I lived in Manhattan you received a plate of these delicious treats at the end of the meal, but here in Florida it’s passed by as the waiter slips the check under your nose and presents fortune cookies. (My favorite fortune, on a bus shelter on Amsterdam and 82 Street in Manhattan next to the now closed Silk Road Palace, had this text next to an open fortune cookie: “It wasn’t chicken!”)
But back to my almond cookies. Easy. The ingredients should be in your pantry and if they aren’t, just get a bag of almond flour at the market and keep some almonds in your baking cupboard. I didn’t have whole, skinned almonds, so used slices. No biggie.
So ladies, prepare to enjoy Shirley Valentine, the Chinese buffet and your almond cookies!
INGREDIENTS:
Remove 2 sticks (8 ounces) of unsalted butter, cube them and bring to room temperature.
1¾ cups unbleached all-purpose flour
½ teaspoon baking soda
1⅓ cup almond flour
½ teaspoon sea salt
1 cup granulated sugar
2 large eggs, divided into separate containers
1 teaspoon almond extract
2 tablespoons water
Whole blanched almonds for topping cookies
Sugar for garnish
METHOD: This recipe is a prime example of why I constantly promote using a kitchen scale. There’s nothing more frustrating than having to use a 1 cup measure, a 1/3 cup measure, a 1/4 cup measure, tablespoons and teaspoons. Just plonk it all onto a kitchen scale in a bowl and measure as you go. Enough of my rant!
Flour. Baking Soda. Almond Flour. Sea Salt. In a medium mixing bowl, whisk together the flour, baking soda, almond flour and sea salt until well combined.
Room Temperature Butter. Sugar. 1 Egg. Almond Extract. Water. To the bowl of a stand mixer fitted with a paddle attachment, add the butter and sugar and beat on medium until light and fluffy, about 3 minutes. Add 1 egg, almond extract and water and beat until well combined.
Spread plastic wrap onto your bench.
Reduce the speed of the mixer to low and gradually add the flour mixture, mixing just until the dough clumps together, about 1 minute. Gather the dough together to form a ball and dump it out onto the plastic wrap. Flatten the dough into a disk, cover with plastic wrap and transfer to the refrigerator to chill for 1 hour.
Preheat the oven to 350F and line two rimmed baking sheets with parchment paper. You may need a 3rd baking sheet for a few of the leftover cookies.
While the dough is chilling, whisk the remaining egg in a small bowl for egg wash and set aside.
ONE HOUR LATER: Remove the dough from the refrigerator, unwrap, and with a knife slice it into strips. Cut the chilled dough into tablespoon portions and roll it between your palms into 1 1/2-inch balls.
Place the balls 2 inches apart onto the baking sheets. Flatten each dough ball slightly and press an almond into the middle. Brush the cookie with egg wash and sprinkle with sugar. Transfer the cookie sheet to the oven to bake, rotating the pans halfway through, until light golden brown, 12 to 15 minutes. I set my timer to 7 minutes, then rotate the baking sheets.
Allow the cookies to cool on baking sheet before transferring to a wire rack to completely cool.
]]>
https://arsmatrix.com/blogs/news/roast-pork-tenderloin-and-potato-skillet2023-03-12T22:21:14-04:002023-03-12T22:21:14-04:00Roast Pork Tenderloin and Potato Skilletadmin
Everybody needs a good skillet meal recipe in their back pocket. RoastPork Tenderloin and Potato Skillet is a fast and easy weeknight meal your family will request again and again.
Roast Pork Tenderloin and Potato Skillet Recipe
HOWDY! CHEF ALLI HERE. LET’S GET YOU COOKIN’…. SHALL WE??
I hope you’re a fan of cast iron skillets. I cannot get enough of mine! I love it for cooking on my stove top, but also for making skillet meals that can go right into the oven.
Some of my favorite cast iron skillet meals are made with beef, such as Sizzle Steaks with Mushroom Gravy and Killer Hamburger Steak. We raise beef here in NE Kansas, so I’m ALWAYS on the lookout for some good beef skillet meals.
We make a lot of Juicy Cast Iron Skillet Steak because I’m surrounded by total carnivores! If you’re a pasta lover, I hope you’ll try one of my very favorite skillet meal recipes, Creamy Tortellini Pasta – it is THE BOMB, truly.
WHAT TO LOVE ABOUT THIS RECIPE
Pork tenderloin is a very tender cut of pork that anyone can be successful with.
This skillet meal is very budget friendly and feeds a crowd.
You can have this meal ready in under an hour, start to finish.
INGREDIENTS YOU’LL NEED TO MAKE THIS EASYPORK RECIPE
Pork tenderloin
Kosher salt
Smoked paprika
Vegetable oil
Bacon
Brown sugar
Red potatoes
Frozen cut green beans
STEP BY STEP INSTRUCTIONS FOR MAKING ROAST PORK TENDERLOIN AND POTATO SKILLET
**PRINT THE FULL RECIPE FROM THE RECIPE CARD AT THE BOTTOM OF THIS POST
Remove the pork tenderloin from refrigeration and unpackage. Let the pork tenderloin rest, uncovered, on the counter for 30-60 minutes to allow some of the chill to escape the meat before cooking it.
Preheat oven to 375 degrees F. In a small bowl, combine the salt, paprika, and brown sugar.
Pat the tenderloin dry with a paper towel; season the pork with the prepared seasoning blend, pressing it into the meat with your fingertips. Wrap the bacon pieces around the pork tenderloin, overlapping at the ends to secure the bacon.
Heat a swish of oil in a 12-inch heavy-duty skillet over medium high heat; when the oil is hot, use a pair of tongs to place the pork tenderloin into the skillet. Sear the bacon on all sides until crispy and golden brown, 2-3 minutes per side.
Surround the tenderloin with with the cubed potatoes, then place the skillet into the oven on the center oven rack, uncovered.
Roast the pork and vegetables for 30-35 minutes, or the internal temperature of the pork reaches 140 degrees F. at the center and the potatoes are are fork-tender. Stir the green beans into the potatoes during the last 10-15 minutes of the cooking time.
Remove the skillet from the oven and cover the pork, allowing it to rest for about 10 minutes. To serve, slice the tenderloin into medallions along with roasted potatoes and green beans on the side.
TIPS FOR MAKING THIS EASY PORK TENDERLOIN THE BEST IT CAN BE
Be sure not to overcook the pork tenderloin. Cooking the tenderloin just until it reaches 145 degrees F. at the center will ensure the tenderloin is juicy and tender, with a slightly pink interior.
Overcooking pork is the main reason it can be dry and tasteless. Don’t do it!
Giving the meat beauty rest both before and after cooking it is also important so the meat fibers can relax. This helps the meat cook more evenly and provides a more tender and juicy eating experience, too.
ANSWERS TO COMMON QUESTIONS ASKED ABOUT THIS RECIPE
WHICH TOOLS ARE HELPFUL FOR ROASTING PORK TENDERLOIN?
Kitchen tongs are a good tool for working with meat when searing it in a skillet. The tongs gently grip the meat allowing you to turn it as needed while browning it.
My favorite type of heavy-duty skillet is a Lodge 12-inch cast iron skillet. I use mine all the time! It’s great for stove top cooking as well as in the oven for a skillet meal like this one. I love how cast iron really holds the heat so it can give superior browning to meat – this adds tons of flavor!
An instant-read meat thermometer is an essential kitchen tool that helps us cook meats to the proper internal temperature. If you want to go wireless, I really like using the MEATER for temping meat.
ARE PORK LOIN AND PORK TENDERLOIN THE SAME THING?
No! Read this post to learn how they are completely different cuts of meat and how this is helpful to know when cooking each one of them.
WHAT IS THE PERFECT INTERNAL TEMPERATURE FOR PORK? IS IT STILL 160 DEGREES F. AT THE CENTER?
NOOOO!! The USDA says we can now safely cook all pork just until it’s 140-145 degrees F. at the center. Pork cooked to this temperature will have a slight pink tinge to the meat and that is perfect! No more gray, overcooked, funky pork – hallelujah!
To be sure your pork is cooked to that perfect 140-145 degree temperature, you’ll need to remove it from the cooking source (grill, oven, grill pan, etc) when the pork has an internal temperature of 130-135 degrees. Then, tent the pork with foil and let it rest.
During this resting time, the pork will raise 5-10 more degrees in internal temperature, finishing out at that perfect 140-145 degrees F.
PRINTABLE ROAST PORK TENDERLOIN AND POTATO SKILLET RECIPE
Everybody needs a good skillet meal recipe in their back pocket. RoastPork Tenderloin and Potato Skillet is a fast and easy weeknight meal your family will request again and again.
Remove the pork tenderloin from refrigeration and unpackage. Let the pork tenderloin rest, uncovered, on the counter for 30-60 minutes to allow some of the chill to escape the meat before cooking it.
Preheat oven to 375 degrees F. In a small bowl, combine the salt, paprika, and brown sugar.
Pat the tenderloin dry with a paper towel; season the pork with the prepared seasoning blend, pressing it into the meat with your fingertips. Wrap the bacon pieces around the pork tenderloin, overlapping at the ends to secure the bacon.
Heat a swish of oil in a 12-inch heavy-duty skillet over medium high heat; when the oil is hot, use a pair of tongs to place the pork tenderloin into the skillet. Sear the bacon on all sides until crispy and golden brown, 2-3 minutes per side.
Surround the tenderloin with with the cubed potatoes, then place the skillet into the oven on the center oven rack, uncovered.
Roast the pork and vegetables for 30-35 minutes, or the internal temperature of the pork reaches 140 degrees F. at the center and the potatoes are are fork-tender. Stir the green beans into the potatoes during the last 10-15 minutes of the cooking time.
Remove the skillet from the oven and cover the pork, allowing it to rest for about 10 minutes. To serve, slice the tenderloin into medallions along with roasted potatoes and green beans on the side.
We love hearing from our readers and followers, so leave us a comment if you’d like. If you don’t hear back from us shortly, know that we may not have seen your comment. Feel free to reach out to us by email: ChefAlli@ChefAlli.com.
LET’S GET YOU COOKIN’, CHEF ALLI
Please Note: We do use referral and affiliate links here for products and services that Chef Alli loves and recommends. We may receive a small compensation when you use these links. This really helps us keep the recipe blog moving forward. Thank you so much!